background image

24

25

Britax Child Safety, Inc.

24

25

FRONTIER/PINNACLE CLICKTIGHT User Guide

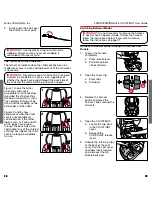
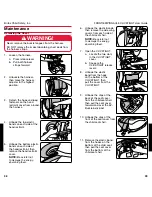
2�  Open the CLICKTIGHT�

a�  Locate the two slots 

in the CLICKTIGHT 

cover�

b�  Squeeze the 

CLICKTIGHT release 

levers�

3�  Unhook the retaining clips 

at the back of the seat 

cover� Pull the seat cover 

forward and over the belly 

pad�

4�  Turn and pull the buckle 

retainer through the slot in 

the child seat shell� 

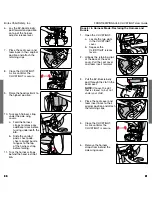
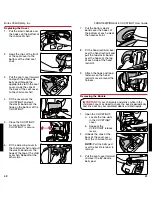
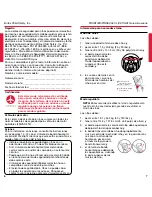
Positioning the Buckle

IMPORTANT:


Select the slot closest to, but not under the 

child�


1�  Turn and push the buckle 

retainer through the slot in 

the child seat shell�

2�  Pull the EZ-Buckle 

belly pad through the 

corresponding slot in the 

seat cover� Place the seat 

cover back in its original 

position and attach the 

retaining clips�

3�  Close the CLICKTIGHT� 

A click confirms the 

CLICKTIGHT is secure�

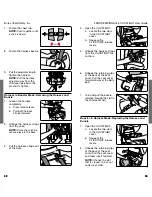
Using the Harness Buckle

To Fasten: 

Insert one tongue 

at a time into the buckle� 

NOTE:

 Proper connection 

is confirmed with an audible 

click after inserting each 

buckle tongue.

To Release: 

Press the release 

button and pull the tongues 

from the buckle� 

NOTE:

 Periodically clean 

the buckle to ensure proper 

operation. See page 42.

Using the Chest Clip

1�  Open the chest clip�

a�  Press tabs�

b�  Pull apart�

2�  Push together to fasten�

NOTE: 

Always position the 

chest clip at armpit level.

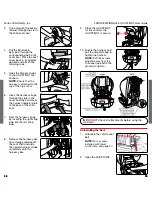
Using the Recline

IMPORTANT:


This child seat must be used in upright 

position in booster mode� 
This seat may be used in either the upright or recline 

position in harness mode� 

1�  Pull the recline adjustment 

handle and adjust the seat 

to the desired position (see 

page 8)�
a�  Ensure that the seat 

is locked into the 

desired position before 

installing in the vehicle�

b�  Ensure the top of 

the child seat does not rest against the top of the 

vehicle seat back while reclining�

c�  Pay attention while adjusting the recline to keep 

hands clear of any pinch point�

Summary of Contents for CLICKTIGHT FRONTIER

Page 1: ...29 99 PINNACLE FRONTIER CLICKTIGHT User Guide Guia del usuario ...

Page 2: ......

Page 3: ... 25 Using Lower Anchors and Tethers for Children LATCH 26 Using the Lower Connectors 26 Using the Impact Absorbing Tether 27 Switching Between Modes 29 Uninstalling the Seat 35 Vehicle Compatibility 36 Incompatible Vehicle Seat Belts 36 Vehicle Buckle Positions 37 Vehicle Seating Positions 37 Maintenance 38 Removing the Cover 38 Replacing the Cover 40 Removing the Buckle 41 Replacing the Buckle 42...

Page 4: ... CLICKTIGHT 15 EZ Buckle Belly Pad 16 Harness Adjuster Release Lever under flap 17 Harness Adjuster Strap 18 Recline Adjuster Handle 19 Serial Number and Manufactured Date Label Frontier ONLY 20 Tether Adjuster 21 Tether Hook 22 Tether Webbing 23 Tether Storage Strap 24 Harness Straps 25 Harness Mode Belt Path Green CLICKTIGHT 26 Serial Number and Manufactured Date Label Pinnacle ONLY 27 Lower Con...

Page 5: ...ENTS Harness Mode Use only with children who weigh between 25 and 90 lbs 11 3 and 40 8 kg and whose height is between 30 and 58 in 76 2 and 147 3 cm and are at least 2 years of age Booster Mode Use only with children who weigh between 40 and 120 lbs 18 1 and 54 4 kg and whose height is between 45 and 62 in 114 3 and 157 5 cm Snugly adjust the belts provided with this child restraint around your ch...

Page 6: ...stration For recall information call the U S Government s Vehicle Safety Hotline at 1 888 327 4236 TTY 1 800 424 9153 or go to http www NHTSA gov For your convenience record all the information about your child seat below Refer to the Serial Number Manufactured Date Label for all information see page 3 Model Name and Number _______________________________ Serial Number ____________________________...

Page 7: ...osition forward facing only in a seating position with a lap shoulder belt Use only the vehicle s lap and shoulder belt system when securing a child in booster mode Never secure a child with a lap belt only in booster mode Always secure the unoccupied child seat If the lower anchors in your vehicle prevent proper vehicle belt fit across your child you cannot use LATCH to position this seat in boos...

Page 8: ...nd route along the green belt path Verify that the belt is not twisted and then buckle 3 Remove slack from the lap part a then shoulder part b of the vehicle belt IMPORTANT Only remove slack from the vehicle seat belt Overtightening the belt may prevent the CLICKTIGHT from properly securing 4 Close the CLICKTIGHT A click confirms the CLICKTIGHT is secure NOTE The child seat is secure when it canno...

Page 9: ...evers 2 Route the lower connector strap along the green belt path and firmly press the lower connectors onto their adjacent lower anchors A click confirms attachment NOTE Verify that the strap is not twisted 3 Pull the end of the lower connector strap to remove slack IMPORTANT Only remove slack from the lower connector webbing Overtightening the webbing may prevent the CLICKTIGHT from properly sec...

Page 10: ...hat can be locked Check your vehicle owner s manual to determine what type of vehicle belt you have and how it can be locked for use with child seats Check that your vehicle has a top tether anchor The top tether MUST be used in harness mode for children that weigh more than 65 lbs 29 5 kg Britax recommends that the top tether be used at all times when installing the child seat Using the top tethe...

Page 11: ...hild seat and vehicle seat during positioning Adjust the child seat to the upright position and place forward facing on the vehicle seat 1 Release the buckle and open the CLICKTIGHT to access the lower connectors a Locate the two slots in the CLICKTIGHT cover b Squeeze the CLICKTIGHT release levers 2 Route the lower connector strap along the green belt path and firmly press the lower connectors on...

Page 12: ...e armrests Before traveling verify that the 9 9 Harness straps are not twisted 9 9 Harness is snug 9 9 Buckle is fastened 9 9 Chest clip is at the child s armpit level WARNING Pull the harness adjuster away from the child seat parallel to the ground to tighten Do not pull sideways 4 Place the child in the child seat Ensure the child is positioned upright in the child seat and not slouching Their b...

Page 13: ...he child s shoulders The child s ears should be below the top of the head restraint 2 Pull the vehicle belt out and route the shoulder part through the shoulder belt guide NOTE Raising the head restraint to the highest position will allow for easier access to the shoulder belt guide 3 Fasten the vehicle belt across the child NOTE The lap part of the vehicle belt must be routed low across the child...

Page 14: ...child seat head restraint from being raised high enough to properly adjust the harness for the fit of your child DO NOT force the child seat head restraint past the vehicle head restraint Doing so could cause the child seat not to perform as intended If the location of the vehicle head restraint interferes with the child seat head restraint raise or remove the vehicle head restraint If the vehicle...

Page 15: ...To Fasten Insert one tongue at a time into the buckle NOTE Proper connection is confirmed with an audible click after inserting each buckle tongue To Release Press the release button and pull the tongues from the buckle NOTE Periodically clean the buckle to ensure proper operation See page 42 Using the Chest Clip 1 Open the chest clip a Press tabs b Pull apart 2 Push together to fasten NOTE Always...

Page 16: ...ea Attach the lower connectors to the anchors located at the front of the storage area LATCH SYSTEM ANCHOR LOCATIONS Tether Anchor Lower Anchors Lower Anchors 11 in 27 9 cm Top To remove the lower connector from the storage slot or lower anchor 1 Press and hold the red release button 2 Pull the lower connector from the storage slot or lower anchor Using the Impact Absorbing Tether Attach the tethe...

Page 17: ...tether label Figures 2 and 3 show examples of when the child seat is unacceptable for continued use If the tether label is torn or if one or both of the loops have pulled through the back side of the shell and or any of the colored stitching has ripped the child seat is no longer acceptable for use 1 2 3 Switching Between Modes IMPORTANT It is not necessary to remove the harness to use this seat i...

Page 18: ...nd buckle tongues to the top of the harness strap before folding 11 Tuck the harness straps behind the head restraint bib TRUE SIDE IMPACT PROTECTION Booster to Harness Mode Restoring the Harness and Buckle 1 Open the CLICKTIGHT a Locate the two slots in the CLICKTIGHT cover b Squeeze the CLICKTIGHT release levers 2 Unhook the retaining clips at the back of the seat cover Pull the seat cover and f...

Page 19: ...he base 3 Pull the harness straps out of the slots 4 Open the CLICKTIGHT a Locate the two slots in the CLICKTIGHT cover b Squeeze the CLICKTIGHT release levers 5 Unhook the harness straps from the CLICKTIGHT hip anchors 6 Unhook the retaining clips at the back of the seat cover Pull the seat cover forward and over the belly pad 7 Turn and pull the buckle retainer through the slot in the child seat...

Page 20: ...and over the harness adjuster plate to the back of the child seat 7 Nest the harness straps by inserting the right strap loop into the left strap loop 8 Remove the harness yoke from storage underneath the seat shell and slide the nested harness straps completely onto the harness yoke 9 Close the CLICKTIGHT A click confirms the CLICKTIGHT is secure 10 Buckle the harness and pull the adjuster strap ...

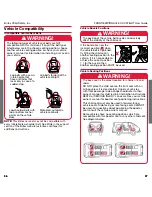
Page 21: ...ion of the vehicle belt buckle can adversely affect the stability of the child seat If the buckle lies near the incorrect position when the vehicle belt is tightened try fitting the child seat in another seating position in the vehicle If it is not possible to achieve the correct position for the buckle then another seating position MUST be used Vehicle Seating Positions The back seat is the safes...

Page 22: ...head restraint cover NOTE Be careful not to damage the energy absorbing foam WARNING 6 Unhook the elastic bands then remove the side wing covers from each side of the child seat shell NOTE Be careful not to damage the energy absorbing foam 7 Open the CLICKTIGHT a Locate the two slots in the CLICKTIGHT cover b Squeeze the CLICKTIGHT release levers 8 Unhook the elastic band from the hook on the bott...

Page 23: ... the hook at the top of the child seat shell Repeat for the other side 7 Pull the bottom elastic bands over the hooks at the bottom of each side of the head restraint 8 Fit the head restraint cover over the head restraint and pull the top elastic bands over the hooks at the top of each side of the head restraint 9 Attach the hook and loop fasteners on the head restraint cover around the harness Re...

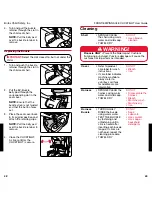
Page 24: ...nfirms the CLICKTIGHT is secure Shell SPONGE CLEAN the shell using warm water and mild soap TOWEL DRY DO NOT Use abrasive cleaners Pinnacle ONLY Prevent the Side Impact Cushions from being punctured Puncture damage will cause the cushions not to perform as intended Cover Refer to product care label for wash instructions If care label indicates machine washable always refer to us britax com faqs fo...

Page 25: ...s or products or to make substitutions Britax products purchased from unauthorized retailers online auction sites or as second hand items are not covered under warranty To make a claim under this warranty you must contact Britax Consumer Services at 1 888 427 4829 or 1 704 409 1699 or write to us using the address on the back cover of this booklet PLEASE COMPLETE AND MAIL THE OWNER REGISTRATION CA...

Page 26: ...46 Britax Child Safety Inc 46 ...

Page 27: ...izando el reclinación 25 Anclajes inferiores y ranuras de retención para niños sistema LATCH 26 Uso de los conectores inferiores 26 Utilización de la correa del retención 27 Cómo cambiar de modo 29 Cómo quitar el asiento de seguridad 35 Compatibilidad del vehículo 36 Cinturones de seguridad de vehículo incompatibles 36 Posición de la hebilla del vehículo 37 Posiciones de los asientos en el vehícul...

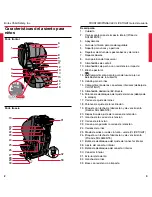
Page 28: ... Almohadilla abdominal EZ Buckle 16 Palanca de desbloqueo del ajuste del arnés debajo de la solapa 17 Correa de ajuste del arnés 18 Palanca de ajuste de la reclinación 19 Etiqueta con fecha de fabricación y de vencimiento Frontier SOLAMENTE 20 Dispositivo de ajuste de la correa de retención 21 Gancho de la correa de retención 22 Correa de retención 23 Correa para guardar la correa de retención 24 ...

Page 29: ...o únicamente como se indica Nunca debe emplearse la correa de ajuste ni el arnés para levantar o transportar el asiento de seguridad para niños ya que podría dañar el regulador del arnés e incluso el propio arnés Sostenga siempre el asiento de seguridad para niños por el exterior o por las correas de retención Información de seguridad De no seguirse todas las advertencias e instrucciones podrían p...

Page 30: ...ad Vial del Gobierno de los EE UU al 1 888 327 4236 TTY 1 800 424 9153 o visite http www NHTSA gov Para su comodidad registre toda la información sobre el asiento para niños a continuación Consulte la Etiqueta con la fecha de fabricación y el número de serie para obtener toda la información véase página 3 Nombre y número del modelo ___________________________ Número de serie ______________________...

Page 31: ...y transversal Solo debe usarse el sistema de cinturón de seguridad de banda horizontal y transversal del vehículo cuando se esté sujetando al niño mediante el modo regulable Nunca se debe sujetar a un niño solo con un cinturón de banda horizontal cuando se esté utilizando el modo regulable Los asientos de seguridad para niños siempre deben estar bien sujetos aunque no estén ocupados Si los anclaje...

Page 32: ...inturón no esté torcido y luego abróchelo 3 Tense primero la banda horizontal del cinturón de seguridad del vehículo a y luego la transversal b IMPORTANTE Sólo eliminar la holgura del cinturón de seguridad del vehiculo Si se aprieta demasiado el cinturón puede impedir que el CLICKTIGHT asegurar adecuadamente 4 Cierre el CLICKTIGHT Un clic confirme que es seguro NOTA El asiento de seguridad para ni...

Page 33: ... del cinturón verde y presione con fuerza los conectores inferiores sobre los anclajes inferiores adyacentes Un clic confirme que es seguro NOTA Compruebe que la correa no está torcida 3 Jale del extremo de la tira del conector inferior para tensarlo IMPORTANTE Sólo eliminar la holgura del tira del conector inferior Si se aprieta demasiado el tira del conector inferior puede impedir que el CLICKTI...

Page 34: ... CLICKTIGHT 2 Jale del cinturón de seguridad del vehículo hacia fuera y páselo por el arco del cinturón verde Compruebe que el cinturón no esté torcido y luego abróchelo 3 Bloque y tense el cinturón de seguridad del vehículo IMPORTANTE Sólo eliminar la holgura del cinturón de seguridad del vehiculo Si se aprieta demasiado el cinturón puede impedir que la CLICKTIGHT asegurar adecuadamente 4 Cierre ...

Page 35: ... inferiores solo para colocar el asiento de seguridad para niños en el asiento del vehículo Sujete al niño utilizando el sistema de cinturón de banda horizontal y transversal del vehículo Comprueba que su vehículo dispone de anclajes de retención de abajo Comprueba que su vehículo dispone de un anclaje de retención superior Afloje el gancho de la correa de retención y colóquelo sobre el respaldo d...

Page 36: ...edor de los apoyabrazos 4 Siente a su hijo en el asiento de seguridad para niños Asegúrese de que el niño esté en posición vertical y no inclinado La parte inferior del niño debe estar en contacto con el asiento de seguridad infantil y la espalda quedar erguida contra la parte posterior 5 Ajuste las correas del arnés alrededor del niño consulte la página 22 6 Abroche la hebilla del arnés Las lengü...

Page 37: ...segúrese de que la banda horizontal del cinturón no está en contacto con el abdomen del niño y que la banda transversal no está en contacto con el cuello del niño Antes de comenzar Si es posible regular la posición del respaldo del asiento en su vehículo asegúrese de que esté en posición vertical antes de colocar el asiento de seguridad para niños en el asiento del vehículo Ajuste el asiento de se...

Page 38: ...hículo puede impedir que el reposacabezas del asiento para niños se eleve lo suficiente como para ajustar correctamente el arnés que sujeta a su niño NO haga fuerza para que el reposacabezas del asiento para niños pase el reposacabezas del vehículo Hacerlo podría provocar que el asiento para niños no cumpla con la función prevista Si la ubicación del reposacabezas del vehículo interfiere con el re...

Page 39: ...lización de la hebilla del arnés Para abrochar Inserte las lengüetas en la hebilla de una en una NOTA Las lengüetas están bien enganchadas si escucha clic cuando las inserta Para desabrochar Presione el botón de desbloqueo y quite las dos lengüetas de la hebilla NOTA Limpie la hebilla periódicamente para garantizar su buen funcionamiento Consulte la página 42 Utilización del broche pectoral 1 Abra...

Page 40: ...aje de retención Anclajes inferiores Reposacabezas del asiento del vehículo 27 9 cm 11 in Anclajes de retención con orientación delantera Sistema retráctil del cinturón de seguridad del vehículo Anclajes inferiores Asiento del vehículo Cinturón de seguridad del vehículo con banda horizontal y transversal Parte superior Para extraer el conector inferior del compartimento o anclaje inferior 1 Manten...

Page 41: ...e pueden observar ejemplos de cuándo el asiento de seguridad para niños debe dejar de utilizarse Debe dejar de usarse el asiento de seguridad para niños si la etiqueta para la correa de retención está rota si alguna de las lazadas ha salido por la parte posterior del asiento o si las puntadas de color están rotas 1 2 3 Cómo cambiar de modo IMPORTANTE No es necesario quitar el arnés para utilizar e...

Page 42: ... superior de las correas del arnés antes de plegarlas 11 Guarde las correas del arnés detrás del protector del reposacabezas TRUE SIDE IMPACT PROTECTION Booster to Harness Mode Restoring the Harness and Buckle 1 Abra el CLICKTIGHT a Localice las dos ranuras en la cubierta del CLICKTIGHT b Presione las palancas de desbloqueo del CLICKTIGHT 2 Desacople los enganches de retención que se encuentran en...

Page 43: ...ce las dos ranuras en la cubierta del CLICKTIGHT b Presione las palancas de desbloqueo del CLICKTIGHT 5 Desenganche las correas del arnés del anclaje CLICKTIGHT de cadera 6 Suelte los enganches que se encuentran en la parte posterior de la cubierta del asiento de seguridad para niños a continuación jale de la cubierta del asiento hacia delante y por encima de la almohadilla abdominal 7 Gire el dis...

Page 44: ...de ajuste del arnés hacia la parte posterior del asiento de seguridad para niños 7 Junte las correas del arnés insertando la lazada de la correa derecha en la izquierda 8 Extraiga el gancho del arnés del compartimento situado debajo del exterior del asiento y pase las correas del arnés completamente por el gancho del arnés 9 Cierre el CLICKTIGHT Un clic confirme que es seguro 10 Abroche la hebilla...

Page 45: ...s adicionales Posición de la hebilla del vehículo La posición de la hebilla del cinturón del vehículo puede perjudicar la estabilidad del asiento de seguridad para niños Si la hebilla se encuentra cerca de la posición incorrecta cuando el cinturón de seguridad está tensado intente ajustar el asiento de seguridad para niños en otro asiento del vehículo Si no consigue colocar la hebilla en la posici...

Page 46: ...OTA Procure no dañar la espuma de absorción de fuerza ADVERTENCIA 6 Desenganche las cintas elásticas y retire las cubiertas laterales de ambos laterales del exterior del asiento de seguridad para niños NOTA Procure no dañar la espuma de absorción de fuerza 7 Abra el CLICKTIGHT a Localice las dos ranuras en la cubierta del CLICKTIGHT b Presione las palancas de desbloqueo del CLICKTIGHT 8 Desenganch...

Page 47: ...la almohadilla abdominal por encima del dispositivo de retención de la hebilla para quitar la 3 Jale de la cubierta del asiento hacia delante y por encima de la almohadilla abdominal EZ Buckle Sustitución de la cubierta 1 Pase las cintas elásticas por el enganche que se encuentra debajo del exterior del asiento para niños 2 Acople los enganches que se encuentran en la parte delantera de la cubiert...

Page 48: ... confirme que es seguro Exterior LIMPIE CON UNA ESPONJA el exterior usando agua tibia y jabón suave SEQUE CON UNA TOALLA NO Utilice limpiadores abrasivos Pinnacle Solamente Evite que las almohadillas de protección lateral frente a impactos sufran daños ya que podría impedir que rindieran como cabe esperar en caso de accidente Cubierta Consulte la etiqueta de cuidado en la cubierta para obtener ins...

Page 49: ...en tiendas no autorizadas sitios de subastas en línea o como artículos de segunda mano no están cubiertos por la garantía Para realizar una reclamación de acuerdo con esta garantía debe ponerse en contacto con el departamento de atención al cliente de Britax llamando al 1 888 427 4829 o 1 704 409 1699 o enviando una carta a la dirección especificada en la contraportada de este manual COMPLETE LA T...

Page 50: ...46 Britax Child Safety Inc ...

Page 51: ......

Page 52: ...Tel 1 888 427 4829 Tel 1 704 409 1699 www Britax com Britax Child Safety Inc 4140 Pleasant Road Fort Mill SC 29708 USA A Britax Childcare company ...

Reviews: