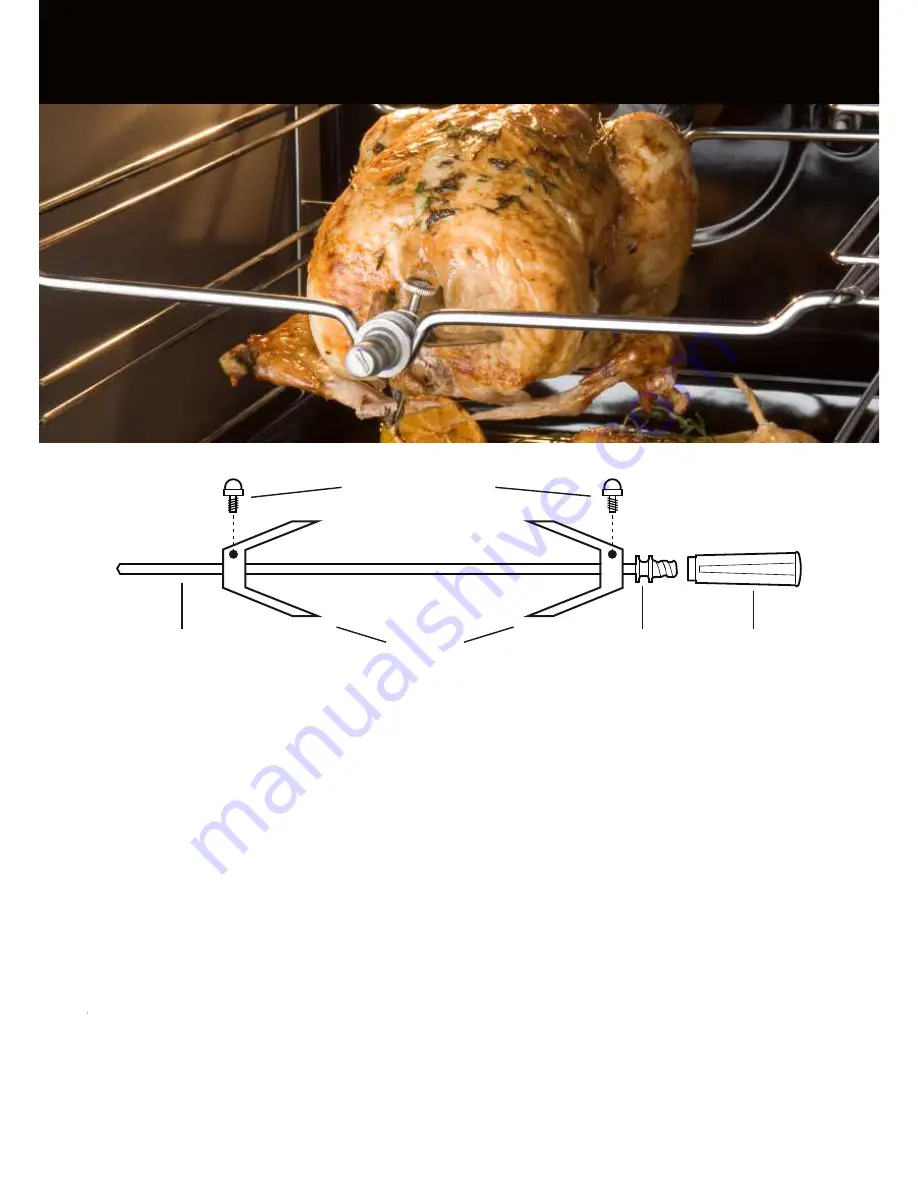
THUMBSCREWS
SPIT END
FORKS
SUPPORT
HANDLE
Using the Rotisserie
1. Place the oven tray in the bottom shelf position to catch any drips.
2. Place the wire support shelf into the oven so that it sits level with the hole at the back of the oven.
3. Pre-heat the oven. A temperature of 200
°C
is recommended.
4. Place one of the forks onto the spit and tighten the thumbscrew.
5. Skewer the meat with the spit, ensuring that the fork firmly pierces and holds the meat. When cooking poultry, aim
for the bone area under the breast.
6. Fit the second fork, again ensuring that the meat is firmly pierced. For poultry, the fork should enter just below the
thighs. Tighten the thumbscrew into place. Ensure that the food is well balanced to avoid stress on the motor drive.
The maximum weight bearing of the spit is 3.5kg (8lb)
7. Turn off the oven. Fit the handle to the spit assembly, then place the spit over the wire support shelf and place the
spit end into the hole in the rear oven wall. Locate the spit support onto the wire shelf. Remove the handle (the
handle is used solely for moving the spit) and close the oven door.
8. Turn the oven back on to the rotisserie/grill function.
As a guide, most meats will require about 15 minutes per 450g at 200
°C
. Always check that food is thoroughly cooked
and that the juices of poultry run clear when pierced.
Operating the oven light in the 60cm and 90cm ovens
Turn the function selector control knob to switch the light on. The light will remain on while the oven is in use. In the
30cm and 40cm ovens, turn the function control to the light icon. The light will also operate once a function has been
selected for cooking.
Cooling fan
The range cooker is fitted with a thermostatically controlled cooling fan designed to prevent the control panel and knobs
from overheating. The fan will operate when a certain temperature is reached. It will turn off when the temperature
decreases.
Using The Probe
Using the Probe
18
19
Using the probe (Delphi models only)
The probe works by measuring the temperature inside a
joint of meat. There are no set cooking times as the
cooking time depends on how long it takes for the
internal temperature of the meat to reach the set core
temperature. This can vary depending on the weight &
type of meat. For this reason it is not recommended that
the probe is used with the automatic timer.
The meat is ready when the temperature set on the right
hand side of the clock fascia is reached and the oven
then switches off.
Foods suitable for use with the probe are large joints of
boneless meat or joints that have been deboned & stuffed
eg. topside of beef, pork fillet, deboned leg of lamb/pork.
It is important that:
Meat should be as close to room temperature as
possible.
The probe is inserted into the centre of the joint of meat
to give accurate results. Once in the centre of the meat
it is cooked to the temperature selected on the clock
fascia panel.
If the probe is not fully inserted to the centre of the
meat, the desired cooking temperature may not be
reached.
To use:
1. Remove the probe port cover on the left hand side of
the oven & insert the short metal end of the probe.
2. Then place the meat in the roasting tin on the 2nd
shelf from the base of the oven & insert the long end of the probe into the thickest part of the meat towards the
centre. Make sure the rubber probe cable is not trapped in the door, or touching the oven shelf as this could affect the
results. Any slack in the cable should rest in the roasting tin.
3. The clock will display 30:80 showing the probe symbol. The left hand side of the clock panel measures the initial
temperature of the meat and always displays 30
°C
to start with & then increases as the meat is cooking. Please note
the probe will only register the temperature of the meat when it is over 30
°C
. Once the meat is over 30
°C
the display
on the left hand side will increase as the core temperature of the meat heats up.
4. The right hand side of the fascia panel is factory set at 80°C that is a suggestion for the core temperature for meats
but can be adjusted by pressing the -/+ buttons. An example is medium to rare roast beef set at 63°C.
5. Once the desired probe temperature has been set the oven starts to heat up & the temperature on the left hand side
of the clock increases from 30°C until the temperature set on the right hand side is reached. When both temperatures
on the left and the right hand side of the display reach the core temperature set, the oven will switch off.
6. ‘M’ allows you to view the time while using the probe.
Below is a chart to be used as a guideline. Meat cooked this way must not exceed 2.5kg in weight and should be left at
room temperature for a couple of hours before cooking.
The probe is best used for red meats and pork, as suggested by the guideline temperatures below. It is not
recommended to cook poultry using the probe.
The meat does not need to rest before carving as it is cooked at a lower temperature than roasting.
Cut of meat
Preferred result
Suggested core temp
Topside beef
medium rare
63°C
Topside beef
medium
70°C
Deboned leg of lamb
medium pink
69°C
Deboned leg of pork
Cooked through not pink
85°C minimum temp
Ovens
Ovens


