


The following steps are required: -
1) Ensure the fitting is turned off
2) The cold water isolator should be closed, this is accessed by unscrewing
the shroud (13) and pulling it back along the elbow taking care not to
scratch the chrome, the 2.5mm hexagon wrench is inserted in the
isolating plug (6) and rotate it clockwise until it locks.
3) The back cover (3) is unscrewed using a 2.5mm hexagon wrench and put
to one side.
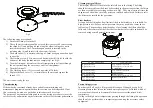
4) The flushing screw (19) is unscrewed downwards till it is level with the
bottom of the body (do
remove completely) see Fig4.
5) Turn the fitting on, hot water at the inlet temperature will pass through
the unit pasteurising the waterways and flow straightener.
6) Turn the fitting off.
7) The flushing screw (19) is screwed upwards till it locks.
8) Replace the back cover (3) , reinstate the cold water and replace the
shroud (13).
The unit is now ready for use.
If the authority concerned already has a suitable commissioning and
maintenance program in operation then this section can be disregarded. If not
this section can be used as a guideline to introduce such a system.
The purpose of any commissioning and in service testing procedure is to set the
valve correctly and monitor any deterioration in the valves thermal performance.
not
Commissioning
Cleaning integral filters
Flow limiters
Pasteurising system
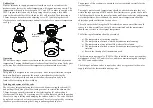
The integral filters are fitted into the inlet elbows to the fitting. The fitting
should be removed from the bases as described in the previous section the filters
are then accessible for servicing as shown in Fig3. They are a friction fit into the
adaptors and should be care fully prizes out washed and refitted. Failure to refit
the filters may invalidate the guarantee.
As supplied the fitting has flow limiters fitted to both inlets so it is suitable for
high-pressure use. For use on low pressure they may need to be removed see
table below. The procedure described above for cleaning the filters should be
followed. After removal of the filter the flow limiters are visible and should be
removed using a small pointed instrument.
In order to kill off any bio film growth this range of fittings has a built in
cleansing feature that allows the mixed water passages to be flushed with hot
water without the need to disassemble the mixer or reset the mixed water
temperature.
Owing to the high water temperatures passing through the fitting this operation
should only be performed by a competent person using the necessary safety
equipment.
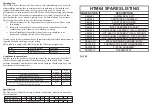
SUPPLY PRESSURES
FLOW LIMTERS
High pressure hot
High pressure cold
Grey limiter 6l in hot side
Yellow limiter 10l in cold side
(
As supplied)
High pressure hot
Low pressure cold
Grey limiter 6l in hot side
Remove limiter
Low pressure hot
High pressure cold
Remove limiter
Yellow limiter 10l in cold side
Low pressure hot
Low pressure cold
Remove both limiters
Fig 4
Fig 3