S
Stte
ep
p 1
1::
Make sure trigger switch is not locked in the ON position.
S
Stte
ep
p 2
2::
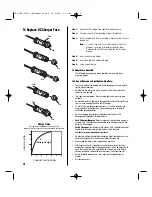
Plug the AC charger or DC charger/adapter into the socket located
on the base of the spotlight handle as illustrated.
Always Allow Battery to Fully Charge
S
Stte
ep
p 3
3::
F
Fo
orr D
DC
C C
Ch
ha
arrg
ge
err//A
Ad
da
ap
ptte
err::
Plug the other end of the DC
charger/adapter into a 12-volt DC receptacle. LED indicator on base
of handle turns off automatically when battery is fully charged.
F
Fo
orr A
AC
C C
Ch
ha
arrg
ge
err::
Plug the other end of the AC charger into a wall
outlet. LED indicator on base of handle turns off automatically when
battery is fully charged.
Step 1:
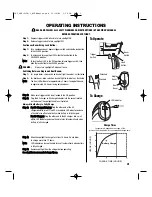
Depress trigger switch in handle to turn spotlight ON.
Step 2:
Release trigger switch to turn spotlight OFF.
Continuous Beam Using Lock Button:
Step 1:
For a continuous beam, depress trigger switch and slide the lock button
to the LOCKED position.
Step 2:
To unlock and turn spotlight OFF, slide the lock button to the
UNLOCKED position.
N
No
otte
e::
To lock the Dual LED in the OFF position, release trigger switch, then
slide the lock button to the LOCKED position.
WARNING:
Always turn spotlight off when not in use.
Switching Between Single and Dual Beams:
Step 1:
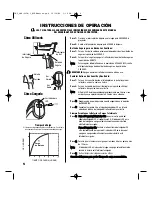
For single beam, slide switch on back of light to one dot, as illustrated.
Step 2:
For dual beam, slide switch on back of light to two dots, as illustrated.
N
No
otte
e::
The Dual LED will burn for approximately 3 hours if using both beams,
or approximately 4.5 hours if using only one beam.
To Operate
2
Trigger
Switch
LED Indicator
Lock
Button
Beam
Switch
Single
Beam
Dual
Beam
Unlocked
Locked
To Charge
OPERATING INSTRUCTIONS
READ AND FOLLOW ALL SAFETY WARNINGS AND INSTRUCTIONS IN THE OWNER’S MANUAL
BEFORE OPERATING SPOTLIGHT.
S
Stte
ep
p 4
4::
Allow the spotlight to charge for at least 8 hours. Do not allow
to charge more than 12 hours.
N
No
otte
e::
LED indicator on base of handle turns off automatically when battery
is fully charged.
S
Stte
ep
p 5
5::
Remove spotlight from the charger before operating.
S
Se
ee
e c
ch
ha
arrtt ffo
orr rre
ec
co
om
mm
me
en
nd
de
ed
d c
ch
ha
arrg
ge
e ttiim
me
ess..
2
4
8
12
4
Battery Charge
USAGE
(HOURS)
CHARGE TIME (HOURS)
Charge Times
Charge time is dependent on usage of the
product. See chart below for recommended charge time.
INS_800-2250-1_DLEDMarine.qxd 12/16/09 3:39 PM Page 3


