background image

11

Operation

Collector Removal

 CAUTION

Operation Without Bagger

For operation without bagger, the mower deflector 

MUST be properly installed in the down position and 

retained by the spring latch.

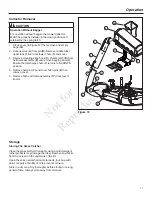
 1.  Lift up cover (

5

, Figure 19) then remove and empty 

bags (

30

).

 2.  Unhook strap (

A

) from pin (

B

). Remove middle tube / 

upper tube (

2

) from lower chute (

3

) and cover.

 3.  Remove mounting strap hook (

C

). Rotate latch (

D

) from 

hardware assembly (

E

) and remove bagging boot (

3

). 

Ensure that discharge chute (

7

) returns to the DOWN 

position.

 4.  Remove hair pins (

7) 

and cover hitch pins (

8

) then 

remove cover.

 5.  Remove hitch and frame assembly (

17

) from rear of   

tractor.

Storage

Storing The Grass Catcher

Clean the grass catcher thoroughly using a mild detergent 

(other products may damage the tube). Remove any debris 

from the  screen on the underside of the lid. 
If paint has been scratched on metal parts, touch up with 

paint, or apply a thin film of oil to prevent corrosion.
Store in a dry area. Dry thoroughly before storing for a long 

period of time. Always store away from moisture.

Figure 19

5

30

17

A

B

2

C

E

F

8

7

3

D

1

No

t fo

r  

Rep

rod

uct

ion

Summary of Contents for 1695710

Page 1: ...ATTACHMENT OPERATOR S MANUAL 1737726 Rev D Turboless Triple Bagger Mfg No Description 1695710 Triple Bagger 46 52 Mowers N o t f o r R e p r o d u c t i o n ...

Page 2: ...of slopes never across the face of any slope Never operate on slopes greater than 17 6 10 WARNING ALWAYS shut off the tractor Disengage the PTO and allow all moving parts to stop BEFORE disconnecting or clearing tube or emptying catcher Before leaving the operator s position for any reason engage the parking brake disengage the PTO stop the engine and remove the key To reduce fire hazard keep the ...

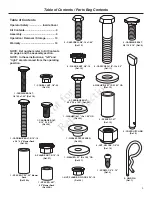
Page 3: ...D X 1 25 OD Ref 12 4 SPACER 1 27 Ref 13 4 NUT NYLOCK 1 2 13 Ref 14 1 CARRIAGE BOLT 1 4 20 x 1 25 Ref 18 1 CONICAL NUT 1 4 20 Ref 19 1 CARRIAGE BOLT 5 16 18 x 2 0 46 Mower Deck Ref 25 2 CARRIAGE BOLT 5 16 18 x 1 25 Ref 24 1 WASHER 341 ID x 1 00 OD Ref 23 1 SINGLE STEP SPACER Ref 22 1 WASHER 33 ID x 1 25 OD Ref 21 1 NUT FLANGE NYLOCK 5 16 18 Ref 20 1 SPACER 1 32 46 Mower Deck Ref 29A 1 SPACER 687 52...

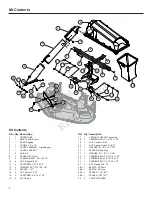
Page 4: ...TE side Ref Qty Description 17 1 UPRIGHT SUPPORT Assembly 18 1 CARRIAGE BOLT 1 4 20 x 1 25 19 1 NUT Conical 1 4 20 20 1 NUT Flange Nylock 5 16 18 21 1 WASHER 33 ID X 1 25 OD 22 1 SPACER Single Step 23 1 WASHER 341 ID X 1 0 OD 24 2 CARRIAGE BOLT 5 16 18 x 1 25 25 1 CARRIAGE BOLT 5 16 18 x 2 0 26 1 CARRIAGE BOLT 5 16 18 x 75 27 2 NUT Flange 5 16 18 28A 1 BAFFLE 46 Short 28B 1 BAFFLE 52 Long 29A 1 SP...

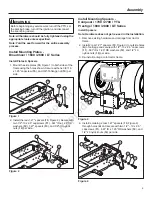
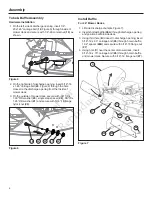
Page 5: ...3 x 2 5 capscrews 11 561 ID x 1 25 OD washers 12 1 27 spacers 13 and 1 2 13 nylock nuts 14 per side 14 13 11 12 Figure 2 Install Mounting Spacers Conquest 1700 2700 YT Prestige 1800 2800 GT Series Install Spacers Note Hardware does not get re used in the installation 1 Remove existing hardware and carriage from tractor frame 2 Install 2 rear 1 27 spacers 13 Figure 3 to outside holes A of carriage ...

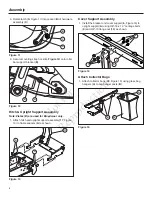
Page 6: ...3 single step spacer 22 33 ID x 1 25 OD washer 21 and secure with 5 16 18 flange nylock nut 20 22 24 21 23 20 Figure 6 Install Baffle For 46 Mower Decks 1 Lift side discharge chute A Figure 7 2 Insert shortest baffle 28A through discharge opening and position baffle inside deck 3 Using third hole B closest to discharge opening insert 5 16 18 x 2 0 carriage bolt 25 through hole in baffle 1 32 spacer ...

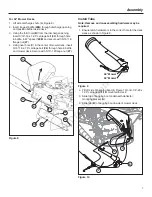
Page 7: ...18 x 75 carriage bolt 26 through hole in baffle and mower deck Secure with 5 16 18 flange nut 27 28B 29B A 27 24 B 26 C 27 Figure 8 Install Tube Note Remove and re assembling hardware may be required 1 Ensure latch hardware is in the correct hole for the deck sizes as shown in Figure 9 46 Mower 52 Mower Figure 9 2 Fit left side of bagging boot 3 Figure 10 onto 1 4 20 x 1 25 carriage bolt 18 mounte...

Page 8: ...y 1 Attach hitch and upright support assembly 17 Figure 13 to frame spacers A as shown A 17 A A B Figure 13 Cover Support Assembly 1 Install the bracket and cover support 6 Figure 14 to upright support A using 3 8 16 x 1 0 carriage bolts 9 and 3 8 16 flange nut 10 as shown 6 9 10 A Figure 14 Attach Collector Bags 1 Attach collector bags 30 Figure 15 using grass bag hangers A to bag hanger posts B ...

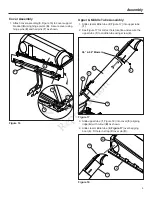
Page 9: ...1 Slide clear middle tube 2 Figure 17 into upper tube 1 2 See Figure 17 for correct hole location and secure the upper tube 1 to middle tube using screw 4 46 52 Mowers C D 2 3 4 1 Figure 17 3 Slide upper tube 1 Figure 18 into cover 5 aligning ridge A with cutout B as shown 4 Slide clear middle tube 2 Figure 17 over bagging boot 3 Fit hole in strap C over pin D 5 B 1 A Figure 18 N o t f o r R e p r...

Page 10: ...d pass Do not open the cover with mower engaged If a large amount of cut grass is spilling out from under deck the tube may be plugged or the bags may be full discontinue mowing stop the unit disengage the PTO shut off the engine and then empty the catcher or clear the tube WARNING ALWAYS shut off the tractor Disengage the PTO and allow all moving parts to stop BEFORE disconnecting or clearing tub...

Page 11: ... discharge chute 7 returns to the DOWN position 4 Remove hair pins 7 and cover hitch pins 8 then remove cover 5 Remove hitch and frame assembly 17 from rear of tractor Storage Storing The Grass Catcher Clean the grass catcher thoroughly using a mild detergent other products may damage the tube Remove any debris from the screen on the underside of the lid If paint has been scratched on metal parts ...

Page 12: ...the time warranty service is requested the manufacturing date of the product will be used to determine warranty eligibility ABOUT YOUR WARRANTY We welcome warranty repair and apologize to you for being inconvenienced Warranty service is available only through servicing dealers authorized by Briggs Stratton or BSPPG LLC Most warranty repairs are handled routinely but sometimes requests for warranty...

Page 13: ...13 Notes N o t f o r R e p r o d u c t i o n ...

Page 14: ...14 Notes N o t f o r R e p r o d u c t i o n ...

Page 15: ...15 N o t f o r R e p r o d u c t i o n ...

Page 16: ...Copyright 2011 Briggs Stratton Corporation Milwaukee WI USA All Rights Reserved N o t f o r R e p r o d u c t i o n ...

Reviews: