background image


27 


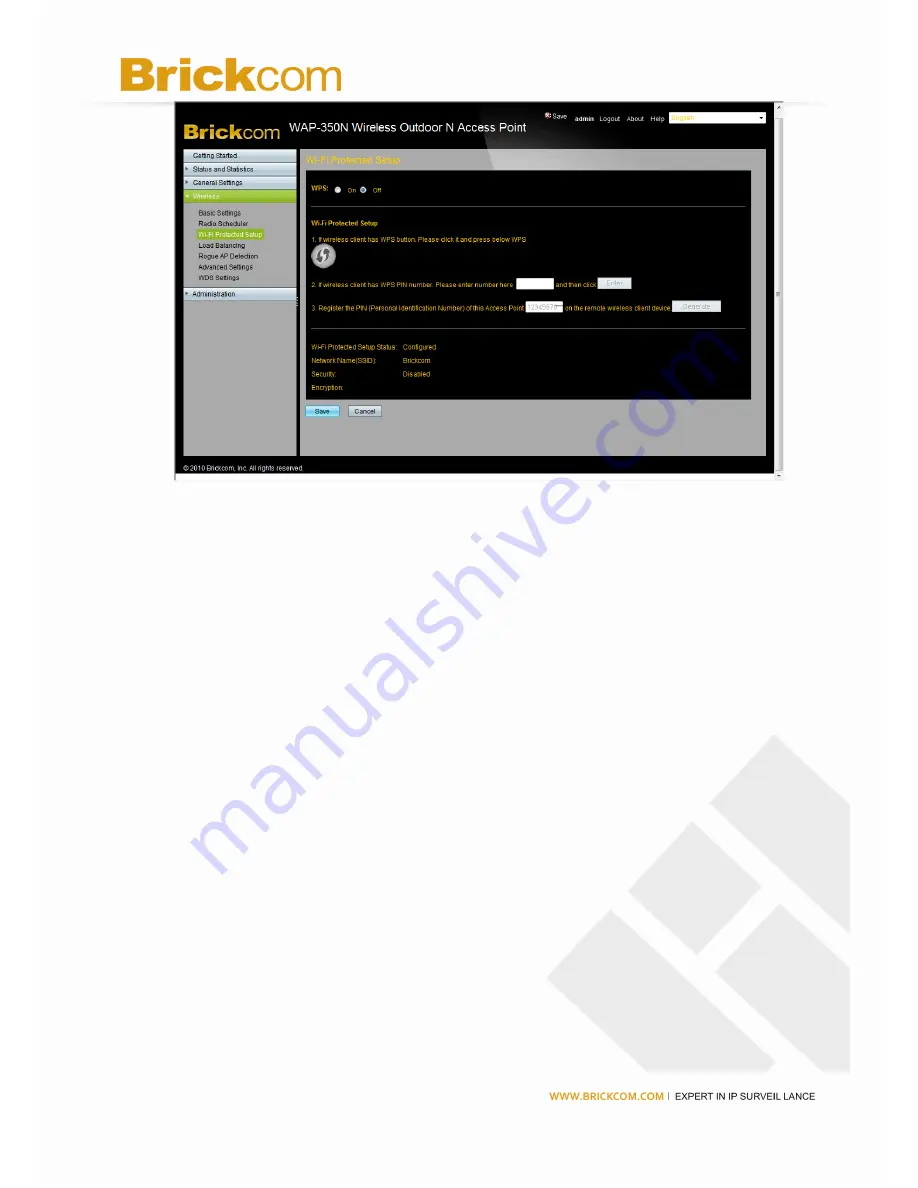
To configure the wireless WPS settings of the access point, follow these steps: 

1.  Click Wireless > Wi-Fi Protected Setup. 

2.  Configure the wireless Wi-Fi settings by doing one of the following actions: 

• 

Option 1—Use this method only if the client device has the WPS push button. Press 

the WPS button of the client device and then click the button on the right. 

• 

Option 2—Provide the PIN number of the client device. You can find this number in 

the utility of the device. Enter the number and click Enter.   

• 

Option 3—Enter the PIN number shown on the label at the bottom of the access point 

into the utility of the client device. 

3.  Click Save. 


Summary of Contents for WAP-350N

Page 1: ...1 WAP 350N User s Manual Quality Service Group ...

Page 2: ...2 Product Name WAP 350N Release Date 2012 01 Manual Revision V1 0 Web Site www brickcom com Email support brickcom com info brickcom com ...

Page 3: ...t Settings 18 Configuring Captive Portal Settings 19 Configuring 802 1X Authentication Settings 20 Wireless 21 Configuring Basic Settings 21 Configuring Radio Scheduler 26 Configuring Wi Fi Protected Setup 26 Configuring Load Balance 28 Configuring Rogue AP Detection 29 Configuring Advanced Settings 30 Configuring WDS Settings 32 Administration 34 Configuring User Account 34 Configuring Password S...

Page 4: ...ss point provides longer coverage by using multiple antennas to transmit and receive data streams in different directions Networks are useful tools for sharing computer resources You can access one printer from different computers and access data located on another computer s hard drive Networks are even used for playing multiplayer video games So networks are not only useful in homes and offices ...

Page 5: ... point or wireless router An infrastructure configuration extends the accessibility of a wireless computer to a wired network and may double the effective wireless transmission range for two wireless adapter computers Since an access point is able to forward data within a network the effective transmission range in an infrastructure network may be more than doubled since access point can transmit ...

Page 6: ...r your laptop computers PCI adapters for your desktop PCs and USB adapters for all PCs when you want to enjoy wireless connectivity These wireless products can also communicate with a 802 11n 802 11g or 802 11b wireless print server if available To link your wired network with your wireless network connect the access point s Ethernet network port to any switch or router with Power over Ethernet Po...

Page 7: ...access points are connecting to a switch that provides them with power Each access point can connect multiple wireless devices to the network This network provides connectivity among wireless network devices and computers that have a wired connection to the switch The switch connects to a router that connects to the Internet ...

Page 8: ...d inside the device The two antennas support 2x2 multiple in multiple out MIMO diversity in wireless N mode Connecting the WAP 350N Access Point This document describes how to place and connect the WAP 350N Access Point to your network Depending on your application you might want to set up the device first before mounting it Placement Options You can place the WAP 350N Access Point horizontally on...

Page 9: ... Using a PoE Switch to Connect the WAP 350N Access Point to the Network To connect the WAP 350N Access Point to your network using a PoE switch simply connect the Ethernet port of the access point to a PoE port on the PoE switch Using a PoE injector to Connect the WAP 350N Access Point to the Network Use a PoE power injector to connect between WAP 350N Access Point and a non PoE switch or PC ...

Page 10: ...on utility from your computer 1 Connect your computer to the same network the WAP 350N Access Point is connected to 2 By default the WAP 350N Access Point has DHCP client enabled You can either attached to the router to get an IP or wait for a while for the Access Point will automatically set it s IP address of 192 168 1 250 and a default mask of 255 255 255 0 3 Launch a web browser such as Intern...

Page 11: ... you to configure access point with easy steps All the configurations also can be set by accessing into the menu of Setup Wireless and Administrator However Getting Started is a convenient way to guide the user to set the access point quickly ...

Page 12: ...The System Summary page displays the access point s current status information for the local network To check system information and local network status follow these steps 1 Click Status and Statistics System Summary This page displays the status information of your access point System Information PID VID The description of the access point Hardware Version The version of the access point s curre...

Page 13: ...TTPS Service Status of HTTPS Service Local Network MAC Address The MAC address of the access point s local network interface IP Address The access point s IP address as it appears on your local network Subnet Mask The access point s subnet mask Default Gateway The access point s default gateway address DNS 1 The access point s primary DNS server address DNS 2 The access point s secondary DNS serve...

Page 14: ... Byte Transmitted Octets The number of bytes transmitted Received Error The error number of bytes received Transmit Error The error number of bytes transmitted Wireless Settings SSID Name The Service Set Identifier or network name This access point may have up to four wireless networks each with a unique SSID Wireless Radio The status of current wireless radio MAC Address The MAC address of the wi...

Page 15: ... the TCP UDP Services information of your access point TCP Service Table Service Name The name used for the service Type The protocol used for the service Local IP Address The IP address of the service Local Port The local port number of the service Remote IP Address The remote IP address of the service Remote Port The remote port number of the service State The current status e g listen establish...

Page 16: ...f your access point Select Log type Choose RAM or FLASH as the log type Rows per page The number of the records displayed in this page Log Time The log time recorded of your access point Severity The local port number of the service Description The brief explanation of your access point 2 To update the status information click Refresh 3 To clear the status information click Clear 4 To export the s...

Page 17: ...the Associated Clients information of your access point MAC Address The MAC Address of the client Channel The channel used by the client Band The Radio band used by the client State The current status of the client TxRate The data transmitted rate of the client RxRate The data received rate of the client RSSI Received signal strength indicator RSSI is a measurement of the power present in a receiv...

Page 18: ...ated access point information MAC Address The MAC Address of the associated access point SSID Name The SSID name of the associated access point Channel The channel of the associated access point Band The Radio band of the associated access point Security Mode The security mode of the associated access point RSSI Received signal strength indicator RSSI is a measurement of the power present in a rec...

Page 19: ...ess point To configure the LAN settings of the access point follow these steps 1 Click the Configure LAN Settings link This page displays the LAN setting information 2 Configure the LAN settings Basic Setup Host Name Enter the host name of the access point You can use the host name to access the web based configuration utility through the network if a record of the host name exists in your DNS ser...

Page 20: ...P Address The access point s IP address as it appears on your local network Subnet Mask The access point s subnet mask Default Gateway The access point s default gateway address DNS 1 The access point s primary DNS server address DNS 2 The access point s secondary DNS server address Network Setup for IPv6 IPv6 Admin Mode Select Enable to enable IPv6 for your access point Connection Type Select DHC...

Page 21: ...cess point follow these steps 1 Click Setup Port Setting This page displays the Port Setting information 2 Configure the Port Setting Port Speed Duplex Mode Select a proper port speed from the drop down list Auto Negotiation Check the box to enable the function of auto negotiation Flow Control Check the box to enable flow control 3 Click Save ...

Page 22: ...e the function Authentication Web Server Enter the web server IP address or domain for authentication Authentication Web Key Enter the web key for authentication RADIUS Server IP Address Enter the IP address of the RADIUS server Monitored HTTP Port List The HTTP ports listed here will be monitored by Access point Add Allow to add a new HTTP port setting Delete Delete the selected HTTP port setting...

Page 23: ...follow these steps 1 Click Setup 802 1X Authentication This page displays the Password Strength setting information 2 Configure the 802 1X Authentication setting 802 1X Supplicant Check it to enable the function Authentication Methods Authentication via MAC Address To make an authentication via MAC Address click this button Authentication via Name and Password To make an authentication via name an...

Page 24: ...figuring Advanced Settings Configuring WDS Settings Configuring Basic Settings The Basic Settings page displays the basic wireless network settings To configure the wireless settings of the access point follow these steps 1 Click the Configure Wireless Settings link 2 Click on for Wireless Radio 3 From the Wireless Network Mode field select one of the following modes 802 11a Connects all the wirel...

Page 25: ...econds to scan through all the channels to find the best channel 5 From the Channel Bandwidth drop down menu select the appropriate bandwidth 20MHz or 40MHz or Auto to be used among your access point and client devices 6 Check the box of Default QoS Priority U APSD to enable the function 7 In the SSID Name and SSID Broadcast fields enter the SSIDs you want your access point to broadcast Enable Che...

Page 26: ...s of the access point To configure the wireless security settings of the access point follow these steps 1 Click the Edit Security Mode button 2 Configure the security settings Security Mode Select one of the security modes WEP WPA Personal WPA2 Personl WPA WPA2 Personal Mixed WPA Enterprise WPA2 Enterprise WPA WPA2 Enterprise Mixed RADIUS for the access point Each mode will have different setting...

Page 27: ... button 2 Configure the MAC Filter settings Connection Control Check it to control the network connection of specified client via MAC Filter Allow only following MAC Address to connect to wireless network Select this item to make the clients with the following MAC addresses connecting wireless network Prevent following MAC Address to connect to wireless network Select this item to block the client...

Page 28: ...access point To configure the wireless VLAN settings of the access point follow these steps 1 Click the Edit VLAN button 2 Configure the wireless VLAN settings VLAN ID Type a digit number as the VLAN ID Fixed Broadcast Multicast Rate Select a transmission rate as a limitation for such VLAN ID 3 Click Save ...

Page 29: ...chedule Such name is set in default Brickcom Status Check the box to enable such entry Date Check the date from Sunday to Saturday for such schedule Time of Day Determine the time for such schedule Configuring Wi Fi Protected Setup The Wi Fi Protected Setup page allows you to configure the Wi Fi Protected Setup WPS settings for the access point WPS was designed to help standardize and simplify way...

Page 30: ...is method only if the client device has the WPS push button Press the WPS button of the client device and then click the button on the right Option 2 Provide the PIN number of the client device You can find this number in the utility of the device Enter the number and click Enter Option 3 Enter the PIN number shown on the label at the bottom of the access point into the utility of the client devic...

Page 31: ... the access point follow these steps 1 Click Wireless Load Balancing 2 Configure the following advanced parameters for this access point Load Balancing Enable this feature to spread work between two or more access points to get optimal resource utilization throughput or response time Maximum Utilization Threshold Enter the desired utilization value for the SSID 3 Click Save ...

Page 32: ...is feature by checking the box Detected Rogue AP Click Add to add a new AP for the device to detect by typing the MAC address of the AP click Delete to delete the selected AP click Edit to modify the selected AP and click Export to export current settings to a file Known AP Click Add to add a known AP by typing the MAC address of the AP click Delete to delete the selected AP click Edit to modify t...

Page 33: ...eless advanced settings for the access point follow these steps 1 Click Wireless Advanced 2 In the Options section configure the following advanced parameters some only for Wireless n for this access point CTS Protection Mode Keep the default setting Auto so the access point can use this feature as needed when the Wireless N G products are not able to transmit to the access point in an environment...

Page 34: ...ore efficient networking while preventing your computer from dropping into power saving sleep mode Higher settings allow your computer to enter the sleep mode thus saving power but interferes with wireless transmissions The default is 1 ms RTS Threshold Enter an RTS threshold 1 2347 This setting determines how large a packet can be before the access point coordinates transmission and reception to ...

Page 35: ...uired Wireless Repeater the packets received from one remote access point can be repeated to another remote access point through WDS link Type the MAC address of the access points remotely to build WDS link with this access point Wireless Bridge The packets received from a WDS link will only be forwarded to local wired or wireless hosts Type the MAC addresses of other access points remotely to bui...

Page 36: ...33 wireless station 3 Click Save ...

Page 37: ...pgrading the Firmware Firmware Language Upgrade Configuring Download Backup Setting DHCP Auto Configuration Configuring System Log Configuring Email Alert Configuring Idle Session Timeout Configuring Reboot Configuring Access Management Discovering Discovery Configuring Access Point Configuring SNMP Configuring User Account The User Account page allows you to configure the user account ...

Page 38: ...password by entering it again in this field Guest Password User Name Modify the guest user name Password Modify the guest password Confirm Password Confirm the new password by entering it again in this field 3 To save the information please click Save Configuring Password Strength The Password Strength page allows you to configure the password strength To change the Password Strength settings of t...

Page 39: ...that you can set for the password The new password must be different than the current one If you want the new password is different with the old one please check this box Password Aging If you want to set the aging time for the password please check this box Password aging time Determine the time that such password will be invalid 3 To save the information please click Save ...

Page 40: ...s the alternate clock source Get Time zone from DHCP Check Enable to get the time zone from DCHP server Local Settings If you choose Use Local Settings as the clock source please type the local date and time in the corresponding fields NTP Server If you choose NTP Server as the clock source you have to specify one of the NTP servers as Use Default or defined manually by entering the IP address of ...

Page 41: ...nguage CAUTION Upgrading the firmware deletes all custom settings 1 Back up the configuration settings of your access points 2 Upgrade the access point s firmware a Download the firmware upgrade file from http www brickcom com b Click Administration Firmware Language Upgrade c In the Locate and select the upgrade file field enter the location of the firmware upgrade file or click the Browse button...

Page 42: ...eate a backup configuration file click Save Configuration to File and follow the on screen instructions Then click Save in this page 3 To restore the configuration of your access point a Make sure that the configuration file for the access point is on your computer b In the Restore Configuration field enter the location of the configuration file or click Browse and locate the configuration file c ...

Page 43: ...on via DHCP click Enable Backup TFTP Server Type the IP address as the backup TFTP server Backup Configuration File Type the file name for the backup configuration of the access point Last Configuration TFTP Server IP address Display the IP address of last backup TFTP server Last Auto Configuration File Name Display the file name for the last backup configuration of the access point 3 Click Save C...

Page 44: ...ber for the log to be recorded at one time Log Level Configuration Select the events about RAM memory Flash Memory SNMP Trap etc that you want the access point to keep a log Remote Log Settings Allow to record for the remote server Server Display the IP address of the remote server UDP Port Display the UDP port of the remote server Description A brief description of the remote server Add Add a new...

Page 45: ...g Email Alert If you want to have an e mail alert while encountering any problem please select Enable From Email Address Type an email address here that will receive alert message from the access point SMTP Server Type the IP address of the SMTP server SMTP Port Type the port number of the SMTP server Email Alert Threshold Give a number here as the email alert threshold SMTP Server Authentication ...

Page 46: ... configure the timeout for idle session To change the Idle Session Timeout settings of the access point follow these steps 1 Click Administration Idle Session Timeout This page displays the Idle Session Timeout setting information 2 Configure the Idle Session Timeout setting HTTP HTTPS Session Timeout Set the session timeout while the device is idle SSH Session Timeout Set the session timeout whil...

Page 47: ... point To reboot the access point follow these steps 1 Click Administration System Log Reboot 2 Click Reboot button 3 Click OK To restore default the access point follow these steps 1 Click Administration System Log Reboot 2 In the Restore To Factory Defaults button 3 Click OK ...

Page 48: ...ion Select the service that you want to manage Telnet Service Click Enable to use telnet command whenever you want SSH Service Click Enable to use SSH service whenever you want HTTP Service Click Enable to use HTTP service via Internet whenever you want HTTPS Service Click Enable to use HTTPS service via Internet whenever you want SSL Certification Import Export Export Click Export to export the S...

Page 49: ...e Discovery settings of the access point follow these steps 1 Click Administration Discovery 2 Configure the Discovery setting Simply click the check box for the item that you want to use 3 Click Save Configuring Access Control The Access Control page allows you to configure which clients can access into network ...

Page 50: ...ontrol 2 Configure the Access Control setting Access Control Click this box to enable the function Device Access Control List List the start IP and end IP of the device Add All to add a new access control list Delete Delete the selected access control list Edit Edit the selected access control list 3 Click Save ...

Page 51: ...of the access point and receive notification of any critical events as they occur on the access point To en able the SNMP support feature click Enabled Otherwise click Disabled The default is Disabled Version Select the version V1 V2 V3 for SNMP service System Contact Enter the name of the contact person such as a network administrator for the access point System Location Enter the location of the...

Page 52: ...e access point s SNMP information SNMP Trap Community Enter the password required by the remote host computer that will receive trap messages or notices sent by the access point SNMP Trusted Host You can restrict access to the access point s SNMP information by IP address Enter the IP address in the field provided If this field is left blank then access is permitted from any IP address SNMP Trap R...

Reviews: