background image

11

ASSEMBLy & OPERATION 

BEFORE FIRST USE

Remove any packaging material and 

promotional labels. Remove the blending 

leg from the mixer motor body and wash 

it in warm soapy water (refer to assembly 

instructions in this booklet). Rinse and dry 

thoroughly. Ensure no water remains inside 

the blending leg to avoid water running into 

the motor body when reattached.
Disassemble and wash the chopping blade, 

chopper bowl, chopper bowl lid, whisk, 

storage lid, and blending jug in warm soapy 

water, rinse and dry thoroughly. Ensure no 

water remains on the chopper bowl lid or 

whisk attachment to avoid water running 

into the motor body when reattached.

NOTE

The detachable blending leg, 

chopping bowl (without the gearbox), 

quad blade, variable masher, whisk 

can also be washed in the dishwasher. 

The whisk gear box, processor gear 

box, masher gear box and motor  

body are not dishwasher safe – see 

the care and cleaning section of this 

booklet for cleaning instructions of 

these parts.

This stick mixer is a versatile appliance 

that can be attached to:

• 

The stainless steel blending leg – for use 

as a stick mixer.

• 

The food processor bowl with quad 

blade, variable slicing disc, reversible 

shredding disc - for use as a mini  

food processor.

• 

The variable mashing leg – for use as 

mashing vegetables.

• 

The whisk attachment – for use as a 

hand whisk.

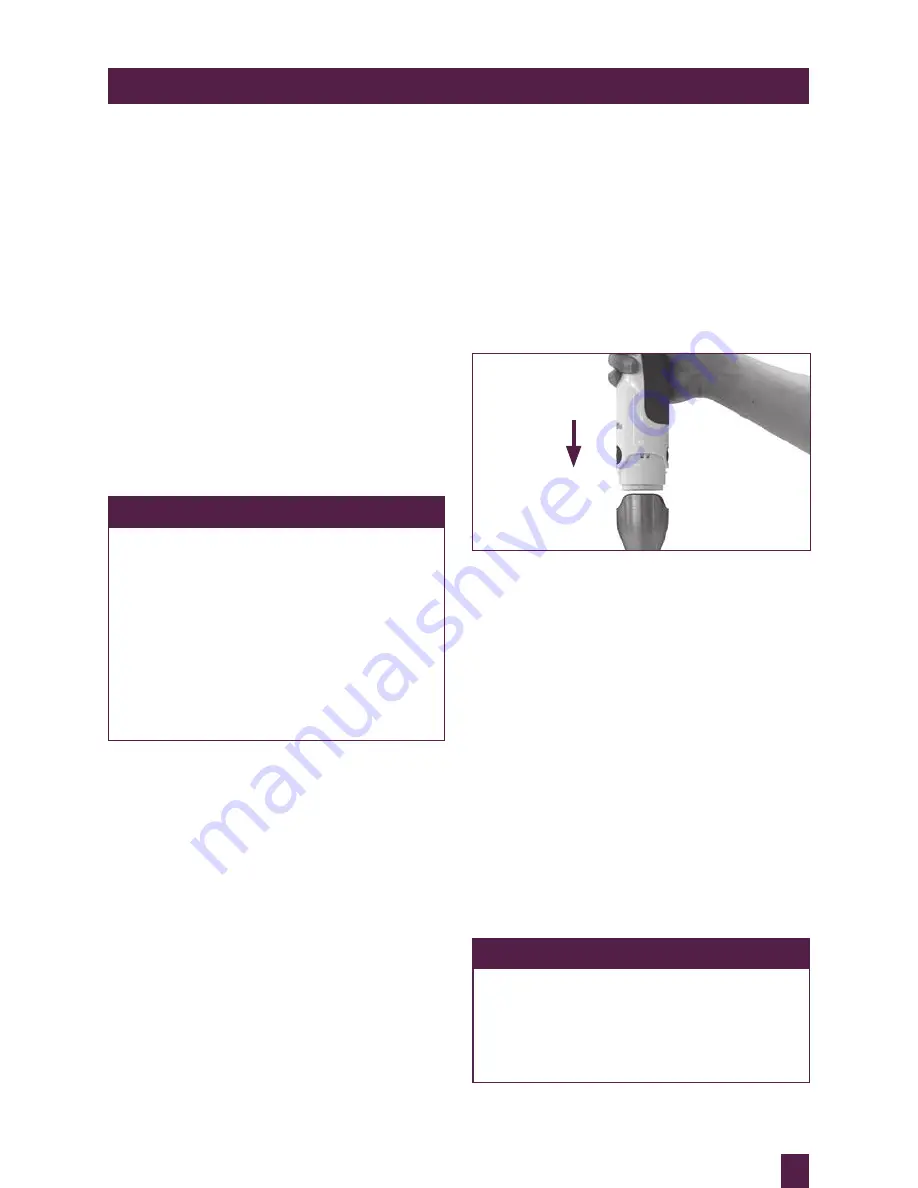
TO ATTACH THE BLENdING LEG

Hold the blending leg with the blades down, 

and align the top end of the blending leg 

with the corresponding end of the motor 

body and push until the blending leg clicks 

and locks onto the motor body. 
Always ensure blending leg is dry, and no 

water left inside, before reattaching.

USING AS A STICK MIxER

Ensure the blending leg is assembled to the 

motor body as detailed above.

1. 

Place food to be processed into a 

sufficiently large mixing bowl or 

saucepan (do not use the food processor 

bowl as this may damage either the stick 

mixer or the bowl). The bowl should only 

be ½ full or less when blending liquids  

or when making a puree of fruit  

and/or vegetables.

2. 

Insert the plug into a 230/240V power 

outlet and turn the power on.

3. 

Turn the dial at the top of motor body, 

select a speed from 1 to 15. 

NOTE

If selecting a higher speed, it is 

recommended that you start on  

a slow speed and then increase to  

high speed to avoid splattering and 

over-processing.

Summary of Contents for BSB530

Page 1: ...a BSB510 Breville Stick Mixer motor unit Alternatively any existing Breville BSB510 Stick Mixer motor unit can be used with this Model Pack BSB530 Issue E13 Australian Customers Mail PO Box 22 Botany NSW 2019 AUSTRALIA Phone 1300 139 798 Fax 02 9384 9601 Email Customer Service askus breville com au New Zealand Customers Mail Private Bag 94411 Greenmount Auckland NEW ZEALAND Phone 0800 273 845 Fax ...

Page 2: ...TYPESET V1 BSB530 the All In One Instruction Booklet ...

Page 3: ...TYPESET V1 CONGRATULATIONS on the purchase of your Breville product ...

Page 4: ...Breville recommends safety first 8 Know your Breville product 10 Assembly operation of your Breville product 21 Care cleaning storage of your Breville product 26 Troubleshooting 28 Food preparation guide 32 Recipes ...

Page 5: ...uld touch a heated oven If using the stick mixer to blend hot food in a saucepan over heat remove the saucepan from the heat source and ensure the power cord and body of appliance are also kept away from any heat source Take care when handling the stick mixer attachments and sharp cutting blades when emptying the bowl and during cleaning Remember the blade and attachments are very sharp and should...

Page 6: ...d for more than 30 seconds Always ensure the stick mixer is turned off the power is switched off at the power outlet and the cord is unplugged from the power outlet before attempting to move the appliance when not in use if left unattended and before disassembling cleaning or storing If food becomes lodged around the processing blade or in the blade guard release the ON button switch the power off...

Page 7: ...ressed to switch the motor off and the appliance is switched off at the power outlet and the power cord is unplugged before removing the lid from the processing bowl IMPORTANT SAFEGUARDS FOR ALL ELECTRICAL APPLIANCES Unwind the cord fully before use Do not let the cord hang over the edge of a table or counter touch hot surfaces or become knotted This appliance can be used by children aged from 8 y...

Page 8: ...han cleaning should be performed at an authorised Breville Service Centre This appliance is for household use only Do not use this appliance for anything other than its intended use Do not use in moving vehicles or boats Do not use outdoors The installation of a residual current device safety switch is recommended to provide additional safety protection when using electrical appliances It is advis...

Page 9: ...TYPESET V1 KNOW your Breville product ...

Page 10: ...ing Gear Box E Clear Lid F 1 6L Chopping Bowl G Feed Chute H Whisk I Stainless Steel Blending Leg J Detachable Mashing Gear Box K Detachable Mashing Leg L Quad Blade M Variable Slicing Disc N Reversible Shredding Disc O Storage Base P Spindle NOT SHOWN Quad Blade Cover C E D F I J H L G A B M O N P K ...

Page 11: ...TYPESET V1 ASSEMBLY OPERATION of your Breville product ...

Page 12: ...teel blending leg for use as a stick mixer The food processor bowl with quad blade variable slicing disc reversible shredding disc for use as a mini food processor The variable mashing leg for use as mashing vegetables The whisk attachment for use as a hand whisk To attach the blending leg Hold the blending leg with the blades down and align the top end of the blending leg with the corresponding e...

Page 13: ...s Remember when using the blending leg to stop the stick mixer and check food throughout the operation Use caution when blending hot food as it can splatter The stainless steel blending leg allows for hot food to be processed directly in the saucepan This makes blending soups and sauces very easy For safety reasons remove saucepan away from the heat before processing Ensure the body of the applian...

Page 14: ...and Lid 1 Remove the food processing bowl from the storage unit and place onto a bench ensuring that the surface is clean and level 2 Choose one of the following food processor attachments a Quad blade b Adjustable slicer c Reversible shredder 3 There is a common spindle that is used across all of the three food processor attachments When using the reversible shredder 1 Place the spindle into the ...

Page 15: ...ce the spindle in the centre of the food processing bowl CAUTION Caution should be taken when handling the adjustable slicing disc and ensure that blade is in the storage or 0 position 2 The adjustable slicing disc has 18 precise settings To adjust the settings hold the adjustable slicing disc by the edge on the opposite side to the cutting blade with one hand and turn the rotating collar to the d...

Page 16: ... 3 Place the lid into position and ensure that it is on correctly 4 Once the blade or disc has been selected for the food processor you can now process food Place the food inside the processing bowl If using the quad blade Do not exceed the maximum MAX marking 5 Insert the gear box into the lid of the food processor NOTE Always place the quad blade into the food processor prior to placing the food...

Page 17: ...appliance is unplugged Hold the motor body with one hand and using thumb and finger of the other hand press on the two EJECT buttons on either side of the motor body Pull the motor body away from the chopper bowl lid to detach To use the FOOD PROCESSOR For food preparation tips and recipes refer to the recipe section of this booklet 1 Insert the plug into a 230 240V power outlet and turn the power...

Page 18: ...eration NOTE When using the shredding or slicing disc do not allow the processing bowl to fill with food beyond the MAX level indicated Processing food beyond this level could damage parts of the bowl and lid ASSEMBLY OPERATION CAUTION DO NOT process hard foods such as coffee grains or chocolate in lumps as damage to the blade may result DO NOT process boiling or hot foods in the food processing b...

Page 19: ...ks and locks into place ASSEMBLY OPERATION 3 Rotate gearbox while holding outer leg to lock into place until it clicks 4 Align the mashing leg with the motor body and push the two parts together until it clicks 5 Place blade on underside of the mashing head To lock the blade rotate in a anticlockwise direction Blade will not attach if the leg is not attached to the motor body ...

Page 20: ...MASHING LEG 1 Ensure the trigger switch is released the power is turned off at power point and the appliance is unplugged 2 Before removing motor body remove masher blade by holding onto the blade and turning clockwise to unlock 3 Once blade is removed hold the motor body with one hand and using thumb and finger of the other hand press on the two EJECT buttons on either side of the motor body Pull...

Page 21: ... whisk to detach ASSEMBLY OPERATION RECOMMENDATIONS WHEN USING THE WHISK ATTACHMENT Do not allow the whisk to hit the bottom or sides of mixing bowl while the appliance is in operation as this may damage the whisk To incorporate air into the ingredients when whisking use a sufficiently deep wide container and move the whisk through the ingredients with a gentle raising and lowering action Release ...

Page 22: ...TYPESET V1 CARE CLEANING STORAGE of your Breville product ...

Page 23: ...ask FOOD PROCESSING BOWL FOOD PROCESSING BOWL LID QUAD BLADE ADJUSTABLE SLICING DISC REVERSIBLE SHREDDER Before cleaning turn the power off at the power outlet and then remove the plug Remove the motor body from the food processing bowl lid and gear box Remove the food processing bowl lid and quad blade processing discs from the food processing bowl NOTE The lid is dishwasher safe remove the remov...

Page 24: ... body 2 Once the blade is removed hold the motor body with one hand and using thumb and finger of the other hand press on the two EJECT buttons on either side of the motor body Pull the motor body away from the masher to detach 3 Unclip the gear box from motor body turn the masher leg to align and remove the inner and outer legs from the gear box together 4 The inner and outer legs can now be sepa...

Page 25: ...hwasher Do not use abrasive cleaners or steel wool Whisk gear box is not dishwasher safe Storage Before storage turn the power off at the power outlet and then remove the plug Ensure the appliance is clean and completely dry Attach assemble processing bowl lid to the processing bowl and place processing bowl onto the storage unit with all the attachments NOTE The adjustable slicing disc is stored ...

Page 26: ...25 NOTES ...

Page 27: ...TYPESET V1 TROUBLESHOOTING ...

Page 28: ...control grip is held vertically and firmly Masher leg won t attach onto masher drive Ensure mashing leg and gear box arrow graphics are vertically aligned Twist masher leg anticlockwise to lock for use Blades won t remove from potato masher Mashing leg must be assembled to gearbox and motor body to remove blade Rotate blade clockwise to remove Grating disc slows down when grating Grating has excee...

Page 29: ...TYPESET V1 FOOD PREPARATION CHART ...

Page 30: ...at a time depending on size Cucumber Food Processor Variable slicer 9 13 2 5mm 1 2 cucumber at a time depending on size Tomato Food Processor Variable slicer 9 11 4 6mm Use firm tomatoes Cabbage Food Processor Variable slicer 9 11 2 6mm Cut to size to fit shoot Leek Food Processor Variable slicer 9 13 2 6mm White part only Onion Food Processor Variable slicer 9 13 2 6mm Cut in half Chicken breast ...

Page 31: ...r 20 minutes before grating Parmesan Food Processor Grater fine 15 Must be well chilled Food Processor Quad blade 15 Cut into 1cm cubes Milkshakes smoothies fruit frappes cocktails Blending Leg 11 15 Use chilled milk Blend for 30 seconds at a time Soups baby food Blending Leg 11 15 Blend until smooth checking desired consistency every 30 seconds Ice Blending Leg Do not use chopping bowl for ice 15...

Page 32: ...isk 11 15 Whisk for 1 minute at a time rest for 1 minute between each use Nuts Food Processor Quad blade 15 250g for 30 seconds at time until desired consistency is achieved Wait 30 seconds between each interval Bread crumbs Food Processor Quad blade 15 2 3 slices cut into quarters Biscuit crumbs Food Processor Quad blade 15 250g max ...

Reviews: