background image

6 / 20

• Chemicals and liquids do not belong in children's hands! Don't drink! Clean hands thoroughly un-

der running water after use. In case of accidental contact with eyes or mouth, rinse with water. In
case of complaints, consult a doctor immediately and show the substances.

 CAUTION

Fire hazard!

Improper use of this product may result in fire. It is essential that you observe the following safety in-
formation in order to avoid fires.

• Never cover the ventilation slots or cooling fins of the device during operation or until it has cooled

down completely!

NOTICE

Danger of material damage!

Improper handling may result in damage to the unit and/or accessories. Therefore, use the device only
in accordance with the following safety information.

• Do not disassemble the device! In the event of a defect, please contact your dealer. They will con-

tact the Service Center and can arrange the return of this device for repair if necessary.

• Do not expose the device to high temperatures and protect it from water and high humidity.

• Do not subject the device to excessive vibrations.

• Only use accessories and spare parts for this device that comply with the technical specifications.

6 About this microscope

Since this microscope is a digital microscope, it is only suitable for visual observation to a limited ex-
tent.

It is equipped with a lens and a camera sensor for capturing images. The digital images can be viewed
directly on the built-in LCD display or optionally stored on a MicroSD memory card*.

*not included

7 Choice of location

Choose a suitable location before installation and commissioning.

Place the device on a stable, level and vibration-free surface.

Summary of Contents for 5809100

Page 1: ...Microscope Mikroskop Analyth LCD EN Instruction manual DE Bedienungsanleitung ...

Page 2: ...nt le code QR ou le lien correspondant NL Bezoek onze internetpagina via de volgende QR code of weblink voor meer informatie over dit product of beschikbare vertalingen van deze gebruiksaanwijzing ES Desearía recibir unas instrucciones de uso completas sobre este producto en un idioma determinado Entonces visite nuestra página web utilizando el siguiente enlace código QR para ver las versiones dis...

Page 3: ...English 4 Deutsch 12 ...

Page 4: ... 2 Validity note This documentation is valid for the products with the following article numbers 5809100 Manual version 0221 Manual designation Manual_5809100_Analyth LCD_en de_BRESSER_v022021a Always provide information when requesting service 3 About this Instruction Manual NOTICE These operating instructions are to be considered a component of the device Read the safety instructions and the ope...

Page 5: ...dry environment and do not touch the device with wet or damp body parts DANGER Danger of suffocation Improper use of this product may result in suffocation especially for children It is therefore imperative that you observe the following safety information Keep packaging materials plastic bags rubber bands etc away from children There is a danger of choking This product contains small parts that c...

Page 6: ...ty information Do not disassemble the device In the event of a defect please contact your dealer They will con tact the Service Center and can arrange the return of this device for repair if necessary Do not expose the device to high temperatures and protect it from water and high humidity Do not subject the device to excessive vibrations Only use accessories and spare parts for this device that c...

Page 7: ...iction adjustment 7 Fine focus 8 Incident lighting 9 On Off switch 10 DC connection socket power 11 Function lights incident light brightness 12 Function lights transmitted light brightness 13 Translucent lighting 14 Object plate exchangeable 15 Object clamps 16 Function light voltage 17 Tra button translucent lighting 18 Inc button incident lighting 19 Objective 20 Zoom ring 21 Microscope head 22...

Page 8: ...0 Turning on off the device 1 Move On Off switch to position I to turn on the device 2 Move On Off switch to O position to turn off the device 11 Adjusting the zoom The microscope optics have a zoom range from 0 7x to 4 5x The zoom range can be changed by turning the zoom ring NOTICE When changing the zoom range the focus may also need to be adjusted see also Fo cusing the object 12 Focusing the o...

Page 9: ... the more stiffly is the focus wheel 14 Working with the onscreen menu 1 Connect the mouse to the USB A port of the microscope 2 Move the On Off switch to the I position 3 Position the object on the object plate and set the appropriate illumination see Adjusting the illu mination 4 An image of the object is shown on the LCD display and the mouse pointer is visible 5 Move the mouse pointer to the l...

Page 10: ...a grid or scale bar as a cross For more information see Grid settings Color Adjusting the display of lines and labels for the measurement function Comparison A previously taken photo is placed next to the live image 15 Save recordings 1 Put the microscope into operation 2 Insert a suitable memory card into the memory card slot 3 CAUTION The contacts of the memory card must face to the back of the ...

Page 11: ...of an optionally available microscope slide with measuring scale is recommended 18 EC declaration of conformity A Declaration of conformity in accordance with the applicable directives and correspond ing standards has been prepared by Bresser GmbH The full text of the EC declaration of conformity is available at the following Internet address www bresser de down load 5809100 CE 5809100_CE pdf 19 D...

Page 12: ...umentation ist gültig für die Produkte mit den nachfolgend aufgeführten Artikelnummern 5809100 Anleitungsversion 0221 Bezeichnung dieser Anleitung Manual_5809100_Analyth LCD_en de_BRESSER_v022021a Informationen bei Serviceanfragen stets angeben 3 Zu dieser Anleitung HINWEIS Diese Bedienungsanleitung ist als Teil des Gerätes zu betrachten Lesen Sie vor der Benutzung des Geräts aufmerksam die Sicher...

Page 13: ... Beschädigungen Beschädigtes Gerät oder ein Gerät mit beschädigten stromführenden Teilen niemals in Betrieb nehmen Beschädigte Teile müssen umgehend von einem autorisierten Service Betrieb ausge tauscht werden Betreiben Sie das Gerät nur in vollkommen trockener Umgebung und berühren Sie das Gerät nicht mit nassen oder feuchten Körperteilen GEFAHR Erstickungsgefahr Bei unsachgemäßer Verwendung dies...

Page 14: ...s oder solange es noch nicht vollständig abgekühlt ist niemals ab HINWEIS Gefahr von Sachschäden Bei unsachgemäßer Handhabung können das Gerät und oder die Zubehörteile beschädigt werden Verwenden Sie das Gerät deshalb nur entsprechend den nachfolgenden Sicherheitsinformationen Bauen Sie das Gerät nicht auseinander Wenden Sie sich im Falle eines Defekts an Ihren Fach händler Er nimmt mit dem Servi...

Page 15: ...instellung 7 Feinfokussierung 8 Auflicht Beleuchtung 9 Ein Aus Schalter 10 DC Anschlussbuchse Spannung 11 Funktionsleuchten Auflicht Helligkeit 12 Funktionsleuchten Durchlicht Helligkeit 13 Durchlicht Beleuchtung 14 Objektplatte auswechselbar 15 Objektklemmen 16 Funktionsleuchte Spannung 17 Tra Taste Durchlicht Beleuchtung 18 Inc Taste Auflicht Beleuchtung 19 Objektiv 20 Zoom Ring 21 Mikroskop Kop...

Page 16: ...bewegen um das Gerät einzuschalten 2 Ein Aus Schalter in die Position O bewegen um das Gerät auszuschalten 11 Zoom Einstellung vornehmen Die Mikroskop Optik verfügt über einen Zoom Bereich von 0 7x bis 4 5x Durch Drehen am Zoom Ring kann der Zoom Bereich verändert werden HINWEIS Bei einer Änderung des Zoom Bereichs muss ggf auch die Fokussierung angepasst werden siehe auch Objekt fokussieren 12 Ob...

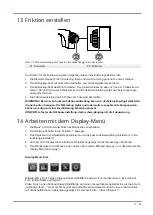
Page 17: ...onenten können so aufgrund einer Erschütterung Schaden nehmen HINWEIS Je fester die Friktionseinstellung desto schwergängiger ist die Fokussierung 14 Arbeiten mit dem Display Menü 1 Die Maus am USB A Anschluss des Mikroskops anschließen 2 Den Ein Aus Schalter in die Position I bewegen 3 Das Objekt auf der Objektplatte positionieren und die passende Beleuchtung einstellen sh Be leuchtung einstellen...

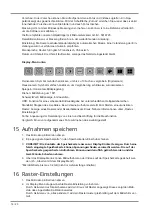
Page 18: ...rschiedlichen Helligkeitsbereichen Standbild Stoppen des Livebildes Es wird keine Aufnahme erstellt Zum Starten erneut anklicken Raster Anzeige eines Rasters oder Skalierbalkens als Kreuz Nähere Informationen unter Raster Einstellungen Farbe Anpassung der Darstellung von Linien und Beschriftung für die Messfunktion Vergleich Ein zuvor aufgenommenes Foto wird neben das Livebild gestellt 15 Aufnahme...

Page 19: ...ung helfen dabei Die Ob jekthöhe spielt dabei keine Rolle da sich der Arbeitsabstand bei der entsprechenden Vergrößerung nicht verändert Für Objektmessungen ist die Verwendung eines optional erhältlichen Objektträgers mit Messskala empfehlenswert 18 EG Konformitätserklärung Eine Konformitätserklärung in Übereinstimmung mit den anwendbaren Richtlinien und entsprechenden Normen ist von der Bresser G...

Page 20: ...ser fr Téléphone 00 800 6343 7000 Bresser France SARL Service après vente Pôle d Activités de Nicopolis 314 Avenue des Chênes Verts 83170 Brignoles France Prix d un appel local depuis la France ou Belgique Service NL BE Als u met betrekking tot het product vragen of eventuele klachten heeft kunt u contact opnemen met het service centrum bij voorkeur per e mail e mail info folux nl Teléfono 31 528 ...

Reviews: