8
EN
ATTENTION!
• Before installing the attachments, make sure that
the power plug is not connected to an electrical
outlet and that the operation mode switch knob (2)
is set to the «0» position.
• The continuous operation should not exceed 5-6
minutes, take a break for at least 10-15 minutes
after two operation cycles.
• To activate the kitchen machine turn the operation
mode switch knob (2) clockwise and set the required
attachment rotation speed.
•
You can add the required ingredients during the
operation through the opening (10) in the lid (9).
• To activate the kitchen machine for a short time
turn the operation mode switch knob (2) to the «P»
position and hold it. To turn the kitchen machine off
release the knob (2).
• Upon completion set the operation mode switch knob
(2) to the «0» position and disconnect the power plug
from the electrical outlet.
• Hold the motor unit (1) with your hand, push the lock
lever (3) upwards, the motor unit (1) will be fixed in
the upper position.
• Remove the installed attachment by turning it
clockwise (fig. 4).
•
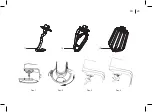
Turn the lid (9) and remove it (fig. 2).
• Remove the bowl (6) by turning it counterclockwise to
the «OPEN» position.
• Remove food from the bowl (6).
• Wash the used attachment and the bowl (6) with
warm water and a neutral detergent, rinse and dry.
CLEANING AND MAINTENANCE
•
After using the kitchen machine, turn it off by turning
the operation mode switch knob (2) to the «0»
position and disconnect the power plug from the
electrical outlet.
USING THE KITCHEN MACHINE
• Hold the motor unit (1) with your hand and push the
lock lever (3) upwards, the motor unit (1) will be fixed
in the upper position.
•
Set the bowl lid (9) in its installation place (4) (fig. 1).
•
Turn the lid (9) to fix it (fig. 2).
•
Set the bowl (6) in its installation place (7) and turn it
clockwise to the «LOCK» position until tight.
• Install one of the attachments (11, 12 or 13) on the
shaft (5), to do this, slightly press the attachment
upwards and turn it counterclockwise until tight (fig.
3, 4). Make sure that the attachment is properly fixed.
•
Place the required ingredients in the bowl (6).
• Press the lock lever (3) and hold it, press the upper
part of the motor unit (1), lower it to the operation
position and release the lever (3). Make sure that
the motor unit (1) is securely fixed in the operation
position.
• Connect the power plug into the mains socket.
Summary of Contents for BR1500
Page 1: ...Instruction manual Kitchen machine BR1500 BR1500 brayer ru...
Page 2: ...EN 3 DE 12 RU 22 KZ 32...
Page 4: ...4 EN 12 13 11 Pic 1 Pic 3 Pic 2 Pic 4...
Page 11: ...11 EN...
Page 13: ...13 DE 12 13 11 Add 1 Add 3 Abb 2 Add 4...
Page 22: ...22 RURU BR1500 1 2 3 4 5 6 7 8 9 10 11 12 13 1 2 3 3 8 10 7 6 4 5...
Page 23: ...23 RU 12 13 11 1 3 2 4...
Page 24: ...24 RU 5 6 10 15...
Page 25: ...25 RU 0...
Page 26: ...26 RU 3 60...
Page 28: ...28 RU 3 1 3 1 2 9 10 2 2 2 0 1 3 1 4 9 2 6 OPEN 6 6 2 0 9 6 1 8 1 1 8...
Page 29: ...29 RU 11 12 13 6 700 420 1 0 6 9 11 6 6 11 30 11 5 6...
Page 30: ...30 RU 9 12 6 6 12 30 12 5 6 4 9 13 6 4 6 13 5 6 2 2 1 1 2 1 3 1 4 3 5 1 220 240 50 1300 4 5...
Page 31: ...31 RU 3...
Page 32: ...32 KZ BR1500 1 2 3 4 5 6 7 8 9 10 11 12 13 KZ 1 2 3 3 8 10 7 6 4 5...
Page 33: ...33 KZ 12 13 11 1 3 2 4...
Page 34: ...34 KZ 5 6 10 15...
Page 35: ...35 KZ 0...
Page 36: ...36 KZ 3...
Page 38: ...38 KZ 4 9 2 6 OPEN 6 6 2 0 9 6 1 8 1 1 8 5 11 12 13 3 4 6 3 1 3 1 2 9 10 2 2 2 0 1 3 1...
Page 39: ...39 KZ 11 12 13 6 700 420 1 0 6 9 11 6 6 11 30 11 5 6...
Page 40: ...40 KZ 9 12 6 6 12 30 12 5 6 4 9 13 6 4 6 13 5 6 2 2 1 1 2 1 3 1 4 3 5 1 220 240 50 1300 4 5...
Page 41: ...41 KZ 3...
Page 42: ......
Page 44: ...brayer ru...


