background image

11

c)  Press the treatment button (5). The device will flash and a warm sensation should be felt.

If you find the treatment uncomfortable, you may reduce the light intensity using the gentle mode 
button (4). The gentle mode indicator lights up when it is activated. To deactivate it, press the gentle 
mode button again.  

The power bars flash to confirm a change in the light intensity setting.
When holding the gentle mode button (4) longer than 3 seconds, the device is deactivated.
After 10 minutes without use, the device is automatically deactivated. To re-activate, press 
any button.

d)  Move the treatment window to the next area to be treated and repeat. The device needs to recharge 

between flashes. This will take less than a second. 

e)  Ensure that the entire area receives treatment, but DO NOT treat an area twice (overlapping flashes).

If the device is used in high ambient temperatures for extended treatment sessions, short pauses in 
treatment may be seen to allow cooling. This is normal and operation will resume once the device is 
cooled.

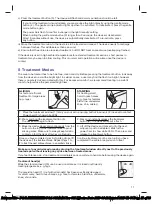
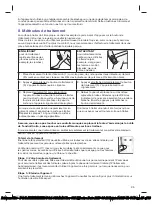
8 Treatment Modes 

The area to be treated has to be hair-free, clean and dry. Before pressing the treatment button, look away 
from the device to avoid the bright light. In seldom cases, a user may find the flash too bright, however 
there is no safety risk associated with this. For increased comfort, we recommend treating in a well-lit 
room to help reduce the perceived brightness.

GLIDING

for fast and efficient 
treatment of large areas 
(e.g. legs).

STAMPING 

for treating small, 
hard-to reach areas 
(e.g. face for females, 
bikini line, underarms, 
knee, chin, ankles)

1.   Place the treatment window (1) firmly on your skin, ensuring both skin sensors (2) have skin contact. 

Power bars (3) show white LEDs.

2.


Press and hold the treatment button (5). 
The device will begin to flash. 

2.  Press and instantly release the treatment 

button (5). The device will emit a flash.  

3.  Move the device slowly and continuously from the 

bottom to the top of the treatment area to avoid 
missing areas. Make sure to always keep full skin 
contact so that the device flashes continuously.  

3.  Lift off the device and place it onto the next 

adjacent spot to be treated. Wait for the 
power bars to show white LEDs. Then press and 
release the treatment button.

Once you have completed your first gliding stroke, lift 
the device off the treatment area. Repeat steps 1 to 
3 to treat the next adjacent area in a parallel stroke.

Continue treatment spot by spot until you have 
completed the entire area you wish to treat.

Make sure to avoid missed areas by placing the treatment window directly next to the previously 
treated spot without leaving any space between treated areas.  

If you feel intense pain, stop treatment immediately and consult your physician before using the device again.

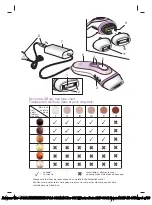
Treatment head(s)

While the standard head (10) can be used on all areas, it is ideal for efficiently 
treating large areas, e.g. legs.

The precision head (11) (not with all models) has been specifically designed 
for small, curvy, hard to reach areas, e.g. face for females, bikini line, underarms,
knee, shin, ankle. 

90746257_Victoria_Pro3_NA.indd   11

90746257_Victoria_Pro3_NA.indd   11

25.06.19   15:53

25.06.19   15:53

Business Use - P&G AUTHORIZED POA-00142426 Rev 001 Effective Date 2019-06-28 Printed 2019-12-06 Page 11 of 30

Business Use - P&G AUTHORIZED POA-00142426 Rev 001 Effective Date 2019-06-28 Printed 2019-12-06 Page 11 of 30

Summary of Contents for Silk expert Pro 3

Page 1: ...booklet 148 x 210 mm 30 pages incl 6 pages cover Cover 4 4c Content 2 2c Pantone Medium Purple U black Business Use P G AUTHORIZED POA 00142426 Rev 001 Effective Date 2019 06 28 Printed 2019 12 06 Pa...

Page 2: ...nberg Germany Allemagne www braun com www service braun com 90746257_Victoria_Pro3_NA indd 2 90746257_Victoria_Pro3_NA indd 2 25 06 19 15 53 25 06 19 15 53 Business Use P G AUTHORIZED POA 00142426 Rev...

Page 3: ...cace pour Please note that the skin tones above do not relate to the Fitzpatrick scale Veuillez noter que les teints de la peau ci dessus ne sont pas les m mes que ceux de la classification de Fitzpat...

Page 4: ...eaning Maintenance and Storage 12 10 Travelling with the device 12 11 Troubleshooting 13 12 Labels and Symbols 14 13 Technical Specifications 14 14 Support 15 15 Warranty 15 90746257_Victoria_Pro3_NA...

Page 5: ...und 6 weeks into the 12 week treatment program you should see a reduction in hair growth However many hairs may still not have been treated in their growth phase It is important to continue the weekly...

Page 6: ...se individuals DO NOT use on tattoos or permanent make up in the treatment area DO NOT use on beard facial hair for men 3 2 Warnings DO NOT use if you have a known sensitivity to sunlight photosensiti...

Page 7: ...r than skin DO NOT operate the device if the mains plug is not easily accessible You should be able to disconnect at any time WARNING No modification of this equipment is allowed Do not use any other...

Page 8: ...skin redness has disappeared Skin redness which does not disappear within minutes and lasts 24 48 hours Stop using the device immediately and consult your physician before using it again Pain or disc...

Page 9: ...ent see table below Actual results did vary from person to person Number of subjects at 6 months post treatment 50 Hair reduction at 6 months post treatment 43 9 Number of subjects at 12 months post t...

Page 10: ...ice will not operate if only one skin tone sensor is in contact with skin Once both skin tone sensors measure a valid skin tone the pre set output power is displayed on the LED Power Bars 3 located on...

Page 11: ...Place the treatment window 1 firmly on your skin ensuring both skin sensors 2 have skin contact Power bars 3 show white LEDs 2 Press and hold the treatment button 5 The device will begin to flash 2 P...

Page 12: ...ass filter 9 can get hot during use DO NOT touch or clean the filter for at least 5 minutes after use to allow it to cool down To ensure maximum performance keep the heads 10 11 with their built in re...

Page 13: ...not flash Center gentle mode light is flashing Device is deactivated Press any button to re activate it First LED on power bars flashes red Head 10 or 11 has been taken off Re attach it The power bars...

Page 14: ...circuit different from that to which the receiver is connected Consult the dealer or an experienced radio TV technician for help Follow instructions for use WEEE waste disposal mark of the European U...

Page 15: ...MERCHANTABILITY OR FITNESS FOR ANY PARTICULAR PURPOSE ARE LIMITED IN DURATION TO 1 YEAR FROM DATE OF ORIGINAL PURCHASE IN NO EVENT WILL BRAUN INC BE RESPONSIBLE FOR CONSEQUENTIAL DAMAGES RESULTING FR...

Page 16: ...e No refunds will be made for any device damaged by accident neglect or unreasonable use Your device must be shipped in its original packaging with your original sales slip indicating the date of purc...

Page 17: ...appareil 23 8 M thodes de traitement 25 9 Nettoyage entretien et entreposage 26 10 Voyager avec l appareil 26 11 D pannage 26 12 tiquettes et symboles 27 13 Caract ristiques techniques 27 14 Soutien 2...

Page 18: ...ient pas en phase de croissance anag ne lors du traitement au moment o la lumi re intense puls e est la plus efficace Environ la 6 e semaine du traitement de 12 semaines vous devriez constater une r d...

Page 19: ...les verrues situ s sur les surfaces que vous d sirez traiter Utiliser l appareil pourrait entra ner des blessures cutan es ou empirer les conditions pr existantes Vous pourriez prouver des effets sec...

Page 20: ...r sur le bouton de traitement S CURIT LECTRIQUE ET INCENDIE Comme avec tout appareil lectrique certaines pr cautions doivent tre prises pour assurer votre s curit NE PAS essayer d ouvrir l appareil Vo...

Page 21: ...oussent Cet appareil n est pas recommand pour les poils roux blonds ou gris car il n est pas efficace sur ces couleurs 4 Risques potentiels effets secondaires et r actions cutan es L utilisation de ce...

Page 22: ...ur la surface trait e apr s le traitement Dans tous les cas la peau trait e est revenue la normale dans les 7 jours 5 Avantages L appareil est con u pour r duire de fa on permanente les poils ind sira...

Page 23: ...s situ s en bas du cou sur les bras les aisselles la ligne de bikini l estomac et les jambes TEINT DE LA PEAU Cet appareil est con u pour tre utilis sur des teints p les moyens et fonc s allant inclus...

Page 24: ...lumi re contact avec la peau requis U l appareil ne r ussit pas s activer lumi re rouge teint de peau non valable U l appareil ne r ussit pas s activer Gr ce aux d tecteurs intelligents int gr s Senso...

Page 25: ...blanche Ensuite appuyez puis rel chez le bouton de traitement Lorsque vous aurez pass une premi re fois en glissant retirez l appareil de la surface traiter R p tez les tapes 1 3 pour traiter la surf...

Page 26: ...ppuyez sur n importe quel bouton pour l activer Assurez vous que les deux d tecteurs de teint sont pleinement en contact avec la peau Si n cessaire d placez l appareil de sorte que les deux d tecteurs...

Page 27: ...urs des mesures suivantes afin de r gler le probl me R orienter ou d placer l antenne de r ception Accro tre la distance s parant l appareil et le r cepteur Brancher l appareil dans une prise ou un ci...

Page 28: ...afin d tre dirig vers le centre de service apr s vente agr Braun le plus proche La pr sente garantie ne couvre pas tout produit endommag par une chute une modification l utilisation d un courant inap...

Page 29: ...e 90746257_Victoria_Pro3_NA indd 29 90746257_Victoria_Pro3_NA indd 29 25 06 19 15 53 25 06 19 15 53 Business Use P G AUTHORIZED POA 00142426 Rev 001 Effective Date 2019 06 28 Printed 2019 12 06 Page 2...

Reviews:

Related manuals for Silk expert Pro 3