13
Attaching the working bowls
The food processor bowl
7
is operated
on the large drive place of the motor
block
1
. The chopper bowl
j
is opera-
ted on the small dirve place.
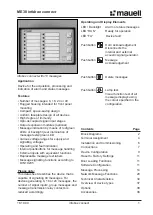
1. With the motor switched off, place
the respective bowl onto its drive place
matching the arrow on the bowl with
the arrow on the motor block (A).
1
2
1
2
A
2
• • •
8
CombiMax 700
6
• • •
14
2
• • •
4
off/0
3
5
6
6
• • •
14
pulse
off/0
B
pulse
off/0
1
1
2
C
Then turn the bowl in the «function»
direction until the lower fixed stop is
reached. The bowl on the other drive
place must be in the lifted position.
If the other drive place is free, put on
the protective cover
m
.
2. Put the attachment needed (see
instructions for each of the attachments)
onto the drive shaft of the bowl and
push it down as far as it will go (B).
When inserting the blade
l
onto the
chopper bowl
j
, push it down until it
audibly snaps in place.
3. Put the lid onto the bowl matching
the arrow on the lid with the arrow on
the bowl (C).
N.B.
When attaching the lid
q
of the chopper
bowl
j
, it must be provided with the
seal ring .
Removing the working bowls
Switch off the appliance. Turn the lid
anti-clockwise and lift it off. Then turn
the bowl in the «click» direction until the
arrow on the bowl matches the arrow on
the motor block and lift off the bowl.
When removing the blade from a bowl,
take hold of it by the knob and pull it off.
Caution: The blades are very sharp.
The blade
n
comes with a protective
cover. If not in use, store the blade on
the protective cover.
Cleaning
First, always switch off the motor and
unplug the appliance. Clean the motor
block
1
with a damp cloth only.
All parts can be cleaned in the dish-
washer. If necessary, clean all parts
thoroughly with a spatula or a brush
before rinsing them.
Color-intensive food (e.g. carrots) may
leave stains on the plastic parts; wipe
them off with cooking oil before cleaning
with water.
For cleaning the lid
q
, first remove the
seal ring . Put the seal ring back in
place after cleaning. You can use the
seal ring from both sides.
Do not use sharp objects for cleaning
purposes.
Clean the blades and the inserts very
carefully – they are very sharp.
ß
11
a
ß
11
a
Using the food processor
bowl
7
When using the food processor bowl,
always insert the required attachments
before adding ingredients.
1. Kneading
For kneading you can use the kneading
hook
v
or the blade
n
. For best results,
we recommend using the kneading
hook which is specially designed for
making yeast dough, pasta and pastries.
Yeast dough (bread/cake)
Max. 500 g flour plus other ingredients
Speed 6, 1
1
/
2
minutes
Pour the flour into the food processor
bowl, then add the other ingredients –
except liquids.
Put on the lid
8
and lock in place.
Then choose speed 6 and switch the
appliance on.
Add liquids by pouring them through
the filling tube of the lid while the motor
is running.
When kneading with the blade
n
, do
not add ingredients like raisins, candied
peel, almonds, etc. which are not
supposed to be cut. These have to be
added manually after having taken the
kneaded dough out of the food proces-
sor bowl.
Pasta dough
Max. 500 g flour plus other ingredients
Speed 6, 1
1
/
2
minutes
Pour the flour into the food processor
bowl, then add the other ingredients –
except liquids.
Pour the required amount of liquid
through the filling tube in the lid when
the motor is running.
Do not add any liquid after the dough
has formed into a ball as then the liquid
will no longer be absorbed evently.
Pastries
Max. 500 g flour plus other ingredients
Speed 6, approx. 1 minute
Pour flour into the food processor bowl,
then add the other ingredients. For best
results, be butter used must not be too
hard, nor too soft.
Put on the lid
8
and lock in place.
Choose speed 6 and switch on the
appliance.
Stop kneading the dough shortly after
a ball has formed. Otherwise the pastry
dough will become too soft.
Then turn the lid clockwise guiding its
nose into the safety lock opening of the
motor block
1
until it audibly snaps in
place.
98907296_K700_S06-116 15.04.2009 14:03 Uhr Seite 13