Russell Hobbs RHFP750, Instructions & Warranty
The Russell Hobbs RHFP750 brings convenience to your kitchen with its advanced features and sleek design. Easily prepare delicious meals with the help of its user-friendly manual, which includes comprehensive instructions & warranty information. Download the manual for free from our website manualshive.com and unlock the full potential of this exceptional product.
Share
Download


Reviews:
No comments
Related manuals for RHFP750
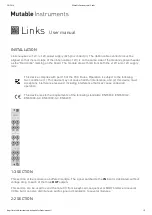
Links
Brand: Mutable Instruments Pages: 2

DBMAX
Brand: TC Electronic Pages: 61

Theater 2000
Brand: Spectrum Research Pages: 10

openGear GPI-8941 Series
Brand: Ross Pages: 92

RX-7032VSL
Brand: JVC Pages: 204

PS810
Brand: Primada Pages: 32

PFP600
Brand: Prima Pages: 7

MGP 464 Pro 3G-SDI
Brand: Extron electronics Pages: 120

VT-1436
Brand: Vitek Pages: 24

COMPACT DJ300
Brand: Moulinex Pages: 6

Masterchef 5000
Brand: Moulinex Pages: 222

KFP1333
Brand: KitchenAid Pages: 304

KFP80 Essentials
Brand: Kambrook Pages: 16

BFP820
Brand: Sage Pages: 168

WFP16SCD
Brand: Waring Pages: 35

GLADEN ONE
Brand: Mosconi Pages: 4

dbx ZonePRO 640
Brand: Harman Pages: 56

Atmosphere AZM4
Brand: AtlasIED Pages: 70


