•
Place the appliance on a stable, level surface
(like a table or the floor).
Note:
If you use filtering devices, make absolutely sure
the water obtained is neutral ph.
Low Water
•
When the water level is low, the icon is
permanently on.
•
The temperature control LED (12) is blinking and
the icon related to the selected setting
/
/
turns off.
•
If you want to continue steam ironing, refill the
tank of the steam station (A).
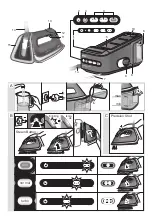
(B) Start ironing
•
Place the iron on the iron rest (5) or on its heel
rest (15), plug in the appliance and press the on/
off switch on the station (2).
•
Select the setting (3) on the ironing system most
suitable for the garments to be ironed.
•
The iron will start to heat up: Whilst this is
happening, the temperature control LED (12) on
the iron will flash.
•
The related icon in the display (1) will start to blink
until steam is ready.
•
Once the temperature setting is reached, the
temperature control LED is permanently on.
• For steam ironing
press the steam button (11)
below the iron handle. Steam will come out from
all the holes in the soleplate.
The ultimate iCare technology provides the right
combination of temperature and steam.
The interface (3) has 3 settings:
eco
It is suggested for most delicate garments like
synthetics and blended fabrics. This setting allows
less power consumption.
normal
It is suggested for garments like wool, polyester
and silk.
turbo
It is suggested for garments that need more
powerful steam, like cotton, linen and jeans.
Note: Due to higher temperature in the turbo mode,
do not leave unattended the iron on garments to
avoid any damage.
To switch from one setting to another press the
dedicated button (3).
Note: When the ironing system is switched on, it will
always be set to the normal steam mode,
independently on the last setting chosen.
• Double trigger
: Press the steam button (11) or
the precision shot button (13) twice in quick
succession within 1 second . There will be a
continuous steam emission for a few
seconds. Press the steam button (11) or the
precision shot button (13) once again to stop the
function.
• For dry ironing
select the setting most suitable
for the garments to be ironed, then iron without
pressing the steam button (11).
Please note that after 10 minutes of dry ironing,
the iron switches to the auto-off mode.
• Vertical steam
: The iron can also be used for
steaming hanging clothes (B).
•
The special
Saphir coating of the soleplate
guarantees an excellent scratch resistance.
•
The unique round shape of the
Saphir 3D
soleplate
ensures best gliding results on difficult
parts (e. g. buttons, pockets and tough wrinkles).
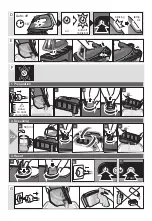
(C) Precision shot
•
Press the precision shot button (13) completely
down.
•
Steam will come out of the tip area of the
soleplate only.
•
To stop this function just release the button (13).
•
If you don’t press it down completely, some
steam may also come out from the rear steam
holes in the soleplate.
(D) Iron Auto-Off
When the iron is in the auto-off mode, the icon is
flashing and the temperature control LED (12) is off.
The iron will turn off to reduce power consumption.
It is activated if after 10 minutes:
•
there has been no steam emission.
•
the icon is activated and water tank is not
refilled.
To turn the iron on again, the ON/OFF (2) button
has to be pressed. Before starting ironing again wait
until the temperature control LED (12) is
continuously on.
After ironing
•
Press the On/Off button to turn off the appliance (2).
•
Unplug and let the appliance cool down before
storing.
•
Empty the water tank.
•
Lock the iron.
9
DLB236337_CareStyle_5_IS5055_Use_Instruction_INT.indb 9
16.06.15 16:03
Summary of Contents for CareStyle 5 Pro IS 5055
Page 75: ...8 8 1 2 On Off 3 eco normal turbo 4 5 6 7 8 9 10 11 12 13 14 15 74...
Page 77: ...C 13 13 D LED 12 10 ON ON OFF 2 12 On Off 2 E F 15 10 4 8 9 500 ml 2 4 2 4 G 76...
Page 78: ...on off max Braun Braun Braun LED ON off Braun Braun 77...
Page 79: ...Ca 8 1 2 3 4 5 6 C 7 8 9 10 11 12 Te 13 14 15 A 6 max min 78...
Page 82: ...Max Braun Braun Braun Braun Braun 81...
Page 83: ...8 8 1 2 3 eco normal turbo 4 5 6 7 8 9 10 11 12 13 14 15 82...
Page 86: ...Braun Braun Braun Braun Braun 85...
Page 87: ...8 8 1 2 3 eco normal turbo 4 5 6 7 8 9 10 11 12 13 14 15 86...
Page 89: ...D 12 10 2 12 2 E F 15 10 4 8 9 500 2 4 2 4 G 0 800 503 507 88...
Page 90: ...Braun Braun Braun Braun Braun 89...
Page 91: ...90 8 8 1 On Off 2 3 4 5 6 7 8 9 10 11 12 13 14 15 A 6 50 50 12 LED B 15 5 2 3 12 1...
Page 94: ......
Page 95: ......

