background image

27

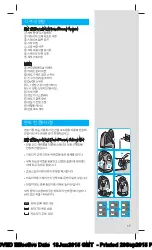
Description

Clean&Renew station

1

 Cleaning 

fl

 uid display

2

  Lift button for cartridge exchange

3

 Station-to-shaver contacts

4

 Start button

D

  Fast clean button 

5

  Cleaning program indicators

6

  Station power socket 

7

 Cleaning cartridge

Shaver

8

  Foil & Cutter cassette

9

  Cassette release button

0

  Shaver head lock switch 

q

  Pop-out long hair trimmer

w

 On/o

  switch

e

   –  setting button (sensitive)

r

  +  setting button (intensive)

t

 Reset button

z

 Shaver display

u

 Shaver-to-station contacts 

i

  Shaver power socket

o

 Travel case

p

  Special cord set

Before shaving

Prior to 

fi

 rst use you must connect the shaver to 

an electrical outlet using the special cord set 

p


or alternatively proceed as below.

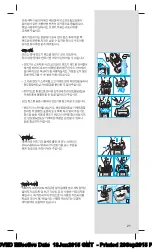
Installing the Clean&Renew station

• Using the special cord set 

p

, connect the 

station power socket 

6

 to an electrical outlet.

• Press the lift button 

2

 to open the housing.

• Hold the cleaning cartridge 

7

 down on a 

fl

 at, 

stable surface (e.g. table).

• Carefully remove the lid from the cartridge.
• Slide the cartridge into the base of the station 

as far as it will go.

• Slowly close the housing by pushing it down 

until it locks.

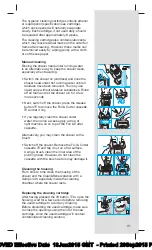
The cleaning 

fl

 uid display 

1

 will show how much 

fl

 uid is in the cartridge:

  up to 30 cleaning cycles available
  up to 7 cleaning cycles remaining
  new cartridge required

fast clean


fast clean


fast clean


97355214_799cc-7_CN-KR_S4-38.indd   27

97355214_799cc-7_CN-KR_S4-38.indd   27

03.06.15   09:27

03.06.15   09:27

CSS  APPROVED Effective Date  18Jun2015 GMT  - Printed 29Sep2015 Page 27 of 38

Summary of Contents for 799cc-7 Wet & Dry

Page 1: ...ies 7 7 5696 97355214 VI 15 97355214_799cc 7_CN KR_S1 indd 1 97355214_799cc 7_CN KR_S1 indd 1 03 06 15 09 19 03 06 15 09 19 Stapled booklet 110 x 200 mm 38 p incl 6 p cover 2 2c HKS43N black OVED Effective Date 18Jun2015 GMT Printed 29Sep2015 P ...

Page 2: ...ße 145 61476 Kronberg Germany www braun com www service braun com 97355214 XI 15 China Korea GB 97355214_799cc 7_CN KR_S2 indd 1 97355214_799cc 7_CN KR_S2 indd 1 03 06 15 09 21 03 06 15 09 21 OVED Effective Date 18Jun2015 GMT Printed 29Sep2015 P ...

Page 3: ...12 15 14 17 18 19 7 Series 7 Series 7 Series 7 16 trim m er trim m er trim m er S e ri e s 7 S e ri e s 7 S e ri e s 7 13 wet dry wet dry 20 97355214_799cc 7_CN KR_S3 indd 1 97355214_799cc 7_CN KR_S3 indd 1 03 06 15 09 22 03 06 15 09 22 OVED Effective Date 18Jun2015 GMT Printed 29Sep2015 P ...

Page 4: ...4 97355214_799cc 7_CN KR_S4 38 indd 4 97355214_799cc 7_CN KR_S4 38 indd 4 03 06 15 09 27 03 06 15 09 27 OVED Effective Date 18Jun2015 GMT Printed 29Sep2015 P ...

Page 5: ...5 fast clean fast clean fast clean 2 1 97355214_799cc 7_CN KR_S4 38 indd 5 97355214_799cc 7_CN KR_S4 38 indd 5 03 06 15 09 27 03 06 15 09 27 OVED Effective Date 18Jun2015 GMT Printed 29Sep2015 P ...

Page 6: ...6 trimm er Serie s 7 97355214_799cc 7_CN KR_S4 38 indd 6 97355214_799cc 7_CN KR_S4 38 indd 6 03 06 15 09 27 03 06 15 09 27 OVED Effective Date 18Jun2015 GMT Printed 29Sep2015 P ...

Page 7: ...t t e r y h y g i e n e b a t t e r y h y g i e n e b a t t e r y 97355214_799cc 7_CN KR_S4 38 indd 7 97355214_799cc 7_CN KR_S4 38 indd 7 03 06 15 09 27 03 06 15 09 27 OVED Effective Date 18Jun2015 GMT Printed 29Sep2015 P ...

Page 8: ...C 50 C release 90 lock lo c k tr lock 1 2 trimmer lo ck trim mer 97355214_799cc 7_CN KR_S4 38 indd 8 97355214_799cc 7_CN KR_S4 38 indd 8 03 06 15 09 27 03 06 15 09 27 OVED Effective Date 18Jun2015 GMT Printed 29Sep2015 P ...

Page 9: ...lease Series 7 Series 7 Series Series click release release release Series 7 Series 7 new old 97355214_799cc 7_CN KR_S4 38 indd 9 97355214_799cc 7_CN KR_S4 38 indd 9 03 06 15 09 27 03 06 15 09 27 OVED Effective Date 18Jun2015 GMT Printed 29Sep2015 P ...

Page 10: ...y y g g g y y n e e b b b t t t t e e e r y y release Series 7 70S 70B 70S 70B 97355214_799cc 7_CN KR_S4 38 indd 10 97355214_799cc 7_CN KR_S4 38 indd 10 03 06 15 09 27 03 06 15 09 27 OVED Effective Date 18Jun2015 GMT Printed 29Sep2015 P ...

Page 11: ...11 97355214_799cc 7_CN KR_S4 38 indd 11 97355214_799cc 7_CN KR_S4 38 indd 11 03 06 15 09 27 03 06 15 09 27 OVED Effective Date 18Jun2015 GMT Printed 29Sep2015 P ...

Page 12: ...12 97355214_799cc 7_CN KR_S4 38 indd 12 97355214_799cc 7_CN KR_S4 38 indd 12 03 06 15 09 27 03 06 15 09 27 OVED Effective Date 18Jun2015 GMT Printed 29Sep2015 P ...

Page 13: ...13 97355214_799cc 7_CN KR_S4 38 indd 13 97355214_799cc 7_CN KR_S4 38 indd 13 03 06 15 09 27 03 06 15 09 27 OVED Effective Date 18Jun2015 GMT Printed 29Sep2015 P ...

Page 14: ...14 97355214_799cc 7_CN KR_S4 38 indd 14 97355214_799cc 7_CN KR_S4 38 indd 14 03 06 15 09 27 03 06 15 09 27 OVED Effective Date 18Jun2015 GMT Printed 29Sep2015 P ...

Page 15: ...15 97355214_799cc 7_CN KR_S4 38 indd 15 97355214_799cc 7_CN KR_S4 38 indd 15 03 06 15 09 27 03 06 15 09 27 OVED Effective Date 18Jun2015 GMT Printed 29Sep2015 P ...

Page 16: ...16 ዽ ዽ 97355214_799cc 7_CN KR_S4 38 indd 16 97355214_799cc 7_CN KR_S4 38 indd 16 03 06 15 09 27 03 06 15 09 27 OVED Effective Date 18Jun2015 GMT Printed 29Sep2015 P ...

Page 17: ...ၡ ᆼ ඓ ႖ ა๗ຫጃ fast clean fast clean fast clean 2 1 97355214_799cc 7_CN KR_S4 38 indd 17 97355214_799cc 7_CN KR_S4 38 indd 17 03 06 15 09 27 03 06 15 09 27 OVED Effective Date 18Jun2015 GMT Printed 29Sep2015 P ...

Page 18: ...18 trimm er Serie s 7 97355214_799cc 7_CN KR_S4 38 indd 18 97355214_799cc 7_CN KR_S4 38 indd 18 03 06 15 09 27 03 06 15 09 27 OVED Effective Date 18Jun2015 GMT Printed 29Sep2015 P ...

Page 19: ... b a t t e r y h y g i e n e b a t t e r y h y g i e n e b a t t e r y 97355214_799cc 7_CN KR_S4 38 indd 19 97355214_799cc 7_CN KR_S4 38 indd 19 03 06 15 09 27 03 06 15 09 27 OVED Effective Date 18Jun2015 GMT Printed 29Sep2015 P ...

Page 20: ...elease 90 lock lo c k tr lock 1 2 trimmer lo ck trim mer 97355214_799cc 7_CN KR_S4 38 indd 20 97355214_799cc 7_CN KR_S4 38 indd 20 03 06 15 09 27 03 06 15 09 27 OVED Effective Date 18Jun2015 GMT Printed 29Sep2015 P ...

Page 21: ...se Series 7 Series 7 Series Series click release release release Series 7 Series 7 new old 97355214_799cc 7_CN KR_S4 38 indd 21 97355214_799cc 7_CN KR_S4 38 indd 21 03 06 15 09 27 03 06 15 09 27 OVED Effective Date 18Jun2015 GMT Printed 29Sep2015 P ...

Page 22: ... a t t e r y h y y y g g g y y n e e b b b t t t t e e e r y y release Series 7 70S 70B 70S 70B 97355214_799cc 7_CN KR_S4 38 indd 22 97355214_799cc 7_CN KR_S4 38 indd 22 03 06 15 09 27 03 06 15 09 27 OVED Effective Date 18Jun2015 GMT Printed 29Sep2015 P ...

Page 23: ...23 97355214_799cc 7_CN KR_S4 38 indd 23 97355214_799cc 7_CN KR_S4 38 indd 23 03 06 15 09 27 03 06 15 09 27 OVED Effective Date 18Jun2015 GMT Printed 29Sep2015 P ...

Page 24: ...24 97355214_799cc 7_CN KR_S4 38 indd 24 97355214_799cc 7_CN KR_S4 38 indd 24 03 06 15 09 27 03 06 15 09 27 OVED Effective Date 18Jun2015 GMT Printed 29Sep2015 P ...

Page 25: ...25 97355214_799cc 7_CN KR_S4 38 indd 25 97355214_799cc 7_CN KR_S4 38 indd 25 03 06 15 09 27 03 06 15 09 27 OVED Effective Date 18Jun2015 GMT Printed 29Sep2015 P ...

Page 26: ...f they have been given supervision or instruction concerning the safe use of the appliance and understand the hazards involved Children shall not play with the appliance Cleaning and user maintenance shall not be made by children unless they are older than 8 years and supervised To prevent the cleaning fluid from leaking ensure that the Clean Renew station is placed on a flat surface When a cleani...

Page 27: ...e special cord set p or alternatively proceed as below Installing the Clean Renew station Using the special cord set p connect the station power socket 6 to an electrical outlet Press the lift button 2 to open the housing Hold the cleaning cartridge 7 down on a flat stable surface e g table Carefully remove the lid from the cartridge Slide the cartridge into the base of the station as far as it wi...

Page 28: ...uid is flushed through the shaver head and a heat drying process dries the shaver Depending on the program selected the total cleaning time will range from 32 to 43 minutes The cleaning programs should not be inter rupted Please note that whilst the shaver is drying the shaver head may be hot and wet When the program is finished the blue indicator will light up Your shaver is now clean and ready f...

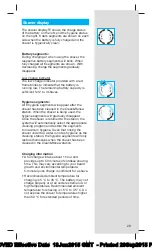
Page 29: ...ll automatically select the appropriate cleaning program and restore the segments to maximum hygiene Given that rinsing the shaver under tap water is not as hygienic as the cleaning station the hygiene segments will only restore themselves when the shaver has been cleaned in the Clean Renew station Charging information A full charge will take about 1 hour and provides up to 50 minutes of cordless ...

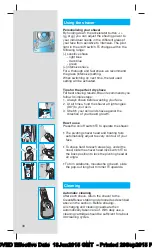
Page 30: ...direction of your beard growth How to use Press the on off switch w to operate the shaver The pivoting shaver head and floating foils automatically adjust to every contour of your face To shave hard to reach areas e g under the nose slide the shaver head lock switch 0 to the back position to lock the pivoting head at an angle To trim sideburns moustache or beard slide the pop out long hair trimmer ...

Page 31: ...ce a week apply a drop of light machine oil on top of the Foil Cutter cassette Alternatively you may clean the shaver with a brush Switch off the shaver Remove the Foil Cutter cassette 8 and tap it out on a flat surface Using a brush clean the inner area of the pivoting head However do not clean the cassette with the brush as this may damage it Cleaning the housing From time to time clean the housi...

Page 32: ...The manual reset can be done at any time Accessories Available at your dealer or Braun Service Centres Foil Cutter cassette 70S 70B Cleaning cartridge Clean Renew CCR Environmental notice Product contains batteries and or recyclable electric waste For environment protection do not dispose of in household waste but for recycling take to electric waste collection points provided in your country The ...

Page 33: ... 1 Renew Foil Cutter cassette 2 For a thorough and fast shave we recommend the green intensive setting 3 Soak the Foil Cutter cassette into hot water with a drop of dish liquid Afterwards rinse it properly and tap it out Once dry apply a drop of light machine oil on the foil Shaver turns off with fully charged battery Foil and cutter are worn which requires more power than the motor can deliver Th...

Page 34: ...s not placed properly in the Clean Renew station 2 Cleaning cartridge contains not enough cleaning fluid display lights red 3 Appliance is in stand by mode 1 Insert shaver into the Clean Renew station contacts of the shaver need to align with contacts in the station 2 Insert new cleaning cartridge 3 Press start button again Increased consumption of cleaning fluid Drain of the Clean Renew station i...

Reviews: