2 YEAR WARRANTY
PG6024AU
5-IN-1 TITANIUM
MULTI-GROOMING KIT
To register your product go to
www.remington-products.com.au
www.remington.co.nz
USE & CARE
MANUAL
PLEASE READ
PRIOR TO USE
Page 1: ...2 YEAR WARRANTY PG6024AU 5 IN 1 TITANIUM MULTI GROOMING KIT To register your product go to www remington products com au www remington co nz USE CARE MANUAL PLEASE READ PRIOR TO USE ...
Page 2: ...id If an appliance falls into water unplug it immediately Do not reach into the water Unplug the charging adaptor from the electrical outlet immediately after fully charging Do not use while bathing or in the shower Unplug and switch off this appliance before cleaning it Use this appliance only for its intended use as described in this manual Do not use attachments not recommended by Remington Nev...
Page 3: ...al capabilities Do not use on people who are asleep Misuse may cause injury Never operate this appliance if it has a damaged cord or plug if it is not working correctly if the charging adaptor has been damaged or dropped into water Do not use an extension cord or a voltage converter with this appliance Do not wrap the cord around the appliance WARNING For recharging the battery only use the adapto...
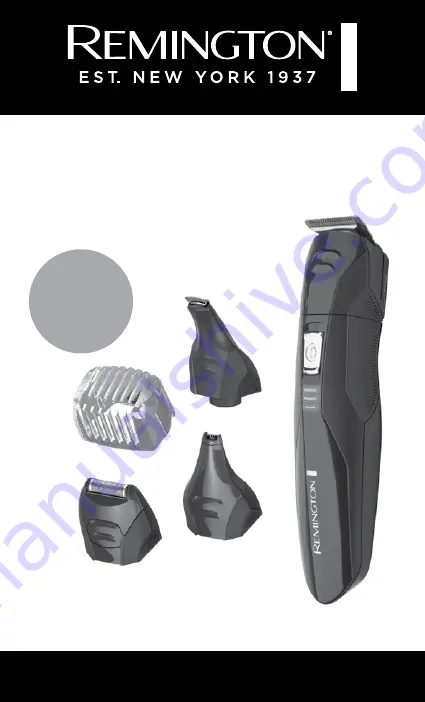
Page 4: ... this manual you will find tips on using and caring for your multi groomer KEY PARTS 1 32mm Trimmer Head with Titanium Coated Blade 2 On Off Switch 3 Charging Indicator 4 Groomer Handle 5 Adjustable Comb Attachment 2 16mm 6 Arc Detail Trimmer Head 7 Nose Ear Eyebrow Trimmer Head 8 Mini Foil Shaver Head ALSO INCLUDES Charging Adaptor Pouch 4 5 7 2 1 3 6 8 ...
Page 5: ...On Off switch is OFF Plug the adaptor into your groomer and then plug the charging adaptor unit into a domestic power outlet The Charging Indicator will illuminate when it is connected to the power source the light will remain on until it is disconnected from the power source even when it is fully charged The batteries cannot be overcharged but it is recommended that charging be discontinued and t...
Page 6: ... line X X X Ear X Eyebrow X X Moustache X X X Nape of neck X X Nose X Sideburns X X X X ATTACHING AND REMOVING THE GROOMING HEADS Ensure that the groomer is switched off before fitting or removing heads To remove rotate the head anti clockwise until it unlocks and then lift off To fit place the desired head on top of the groomer and rotate head clockwise to lock into place ATTACHING AND REMOVING A...
Page 7: ...ry and free of lotions or other liquids Comb outward to obtain maximum height length and facing in the same direction Step 1 Nape of the neck 1 Using a hand held mirror is necessary if self trimming 2 Fit the 32mm trimmer head and adjustable comb 3 Set the adjustable comb to 4 mm or 6 mm 4 Hold the groomer with the blade teeth pointing upwards Begin starting at the centre of the head at the base o...
Page 8: ...resting lightly against the skin use slow controlled movements to create contoured lines Beard Line Arc Detail Trimmer Head 1 Hold the groomer with either the 32mm trimmer or arc detail trimmer blade facing you 2 Start with the edge of the beard line and with the cutting blades resting lightly against your skin Use downward motions towards the edge of the beard line to trim the beard line to the d...
Page 9: ...urn the groomer on 2 Carefully insert the groomer s cutting unit no more than 6mm into nostril 3 Rotate the groomer in a circular motion while gently moving in and out of nose CLEANING CARE MAINTENANCE Note Always clean the groomer heads and attachment immediately after use to ensure maximum performance and a proper operating life Cleaning Mini Foil Shaver Head Note Do not rinse or lubricate the m...
Page 10: ... hydride battery Once the trimmer has reached the end of its life to ensure proper disposal of the product please take the appliance to a recycling centre where the internal rechargeable battery should be removed by a professional and recycled separately For more information about recycling of electrical and battery operated appli ances please contact your local council office or your household wa...
Page 11: ...which the consumer has under either the Australian Consumer Law or the CGA The original purchaser of the Goods is provided with the following Warranty subject to the Warranty Conditions 3 We warrant the Goods for all parts defective in workmanship or materials for the period of two 2 years from the date of purchase Warranty Period If the Goods prove defective within the Warranty Period by reason o...
Page 12: ...ical voltage requirements as specified in the ratings label located on the Goods 11 This warranty does not cover the cost of claiming under the warranty or transport of the Goods to and from the Supplier or us 12 This warranty is only valid and enforceable in Australia against Spectrum Brands Australia Pty Ltd and in New Zealand against Spectrum Brands New Zealand Limited Contact us or the Supplie...