background image


11.


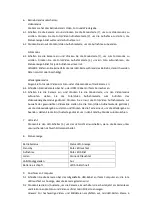
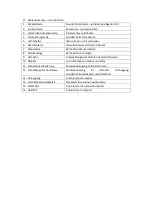
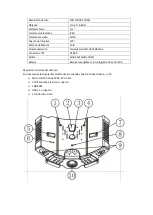
Controls and Functions 

1.


Reset button 

Restart camera after crash 

2.


POWER button 

Turn camera on/off   

3.


Photo/Video recording button 

Recording videos/taking photos 

4.


Formatting button 

Format microSD card 

5.


LED switch 

Turn LED lights on/off   

6.


MIC button 

Capture sound in video/photo modes 

7.


MODE button 

Switch operating mode 

8.


Status indicator 

Indicate operating status 

9.


LED lights 

Light up in poor light surroundings 

10.


Lens 

To capture videos and take photos 

11.


Cap buckle 

To fasten the camera on a cap 

12.


USB Cover 

Cover for USB port 

13.


AV Out 

Connection for TV 

14.


microSD slot 

Slot for external memory card 

15.


HDMI interface 

Connection for TV/computer 

16.


USB port 

Connection for computer 


Summary of Contents for 57520

Page 1: ...Reinigungsmittel zum Reinigen des Geräts verwenden Sie nur ein weiches feuchtes Tuch WARNUNG Zur Vermeidung von Feuer Explosion und Stromschlag setzen Sie die Kamera nicht übermäßiger Hitze oder Wasser aus die Kamera ist NICHT wasserdicht Demontieren Sie das Gerät nicht Das kann zu Stromschlag oder Schäden am Gerät führen Sie verlieren außerdem Ihren Garantieanspruch Betriebsumgebung Die Kamera is...

Page 2: ...n Werkseinstellungen zurück Nach dem Einschalten sollten alle Funktionen wieder normal arbeiten 4 Lieferumfang 1 Kamera 1 AV Kabel 1 USB Kabel 1 Bedienungsanleitung 5 Datum Uhrzeit einstellen 5 1 Schalten Sie die Kamera ein und schließen Sie sie über AV oder HDMI Kabel an Ihrem Fernseher an 5 2 Halten Sie die Ein Austaste 2 zum Aufrufen des Menüs Date Time gedrückt 5 3 Drücken Sie die Foto Video A...

Page 3: ...en Videomodus aufzurufen Halten Sie die Foto Video Aufnahmetaste zum Aufrufen des Videowiedergabemodus gedrückt Drücken Sie erneut die Foto Video Aufnahmetaste zur Auswahl des gewünschten Videoclips Halten Sie die Foto Video Aufnahmetaste gedrückt um die Videowiedergabe zu starten und drücken Sie die Taste erneut um die Wiedergabe zu beenden Halten Sie die Ein Austaste gedrückt um in den Stand by ...

Page 4: ...m unendlich Bildformat JPEG Videoformat MOV Objektivwinkel 120 Weißabgleich Auto Speicher microSD Karte max 32 GB Computerschnittstelle USB2 0 Videoausgang AV Ausgang HDMI Port Akku Integrierter Li Ionen Akku 1150 mAH Mindest Systemanforderungen Microsoft Windows 2000 XP oder Vista CPU Pentium4 2 8 GHz oder höher 1 GB RAM USB1 1 oder höher 2 GB freie Kapazität Festplatte ...

Page 5: ......

Page 6: ...odustaste Betriebsmodus umschalten 8 Statusanzeige Betriebsstatus anzeigen 9 LED Licht Ausleuchtung bei schlechten Lichtverhältnissen 10 Objektiv Zur Aufnahme von Videos und Fotos 11 Schirmmützenhalterung Kamerabefestigung an Schirmmützen 12 Schutzkappe für Anschlüsse Schutzabdeckung für USB Port AV Ausgang microSD Kartensteckplatz und HDMI Port 13 AV Ausgang Anschluss für Fernseher 14 microSD Kar...

Page 7: ...den Sie den Akku wenn er als erschöpft angezeigt wird Laden Sie Dateien von der Kamera herunter Bilder sind in Entfernung unscharf Objekte sind außerhalb des Fokusbereichs Nehmen Sie innerhalb des Fokusbereichs auf Speicherkarte funktioniert nicht Videos die nicht im AVI Format sind werden auf der Karte nicht gespeichert Formatieren Sie die Speicherkarte Sichern Sie Dateien vor der Formatierung Ve...

Page 8: ...sive heat or water the camera is NOT waterproof Do not disassemble the product This may cause electric shock or equipment damage It will also void your warranty Operating Environment The camera is designed for use in temperatures ranging from 0 C to 45 C 32 F to 113 F Do not use the camera in the following conditions Damp or dusty places High temperature or direct sunlight Very low temperatures St...

Page 9: ...utton 3 to toggle between Date and Time 5 4 Press the Power button 2 to set date and time year 2010 2030 Exit the menu by selecting Yes No option Select Yes to confirm or select No to cancel the setting and return to the preview mode 6 Switching Operating Mode Video Mode This camera has three operating modes Video Photo and Playback 6 1 Switch the camera on and press the Mode button 7 to scroll to...

Page 10: ... to return to Standby mode 7 LED Light Press the LED switch 5 to switch the LED lights on when the camera is working in poor ambient light 8 Status Indicator Operating Status Indicator Lamp Status Standby Red light on Recording Red light flashing Charging Green light on Fully charged Off Low power Quick flashing 9 Connecting to Computer 9 1 Use the supplied USB cable to connect the camera to your ...

Page 11: ...Out HDMI Out Battery Built in rechargeable lithium ion battery 1150mAH Minimum System Requirements The following features should be required when the device is connected to a computer Microsoft Windows 2000 XP or Vista CPU Pentium4 2 8GHz or higher 1GB RAM USB1 1 or above 2GB hard disk ...

Page 12: ...C button Capture sound in video photo modes 7 MODE button Switch operating mode 8 Status indicator Indicate operating status 9 LED lights Light up in poor light surroundings 10 Lens To capture videos and take photos 11 Cap buckle To fasten the camera on a cap 12 USB Cover Cover for USB port 13 AV Out Connection for TV 14 microSD slot Slot for external memory card 15 HDMI interface Connection for T...

Page 13: ...g The memory card is full Charge the battery Charge the battery when low power is indicated Download files from the camera Distant images are out of focus Objects are beyond focus range Record within focus range Memory card function does not work Videos not in AVI format are not saved on the card Format the memory card Backup before formatting Blurry image The camera is not held steadily The lens ...

Page 14: ...solamente un paño suave humedecido ADVERTENCIA Para reducir el riesgo de incendio explosión o descargas eléctricas no deje la cámara expuesta al agua la cámara NO es impermeable o al calor excesivo No desmonte el producto Si lo hace puede provocar una descarga eléctrica o averiar el equipo Esto también anulará su garantía Entorno operativo La cámara está diseñada para utilizarse en un margen de te...

Page 15: ...la fecha y la hora 5 1 Encienda la cámara y conéctela al TV usando el cable AV o el cable HDMI 5 2 Mantenga pulsado el botón de encendido 2 para entrar en el menú de fecha y hora 5 3 Pulse el botón de captura de foto grabación de vídeo 3 para cambiar entre fecha y hora 5 4 Pulse el botón de encendido 2 para ajustar la fecha y la hora año 2010 2030 Salga del menú seleccionando la opción Yes No Sele...

Page 16: ...ulsado el botón de captura de foto grabar vídeo para iniciar la reproducción de vídeo púlselo otra vez para parar la reproducción Mantenga pulsado el botón de encendido para regresar al modo en espera 7 Luz LED Pulse el interruptor LED 5 para encender las luces LED de la cámara cuando tenga poca luz ambiental 8 Indicador de estado Estado de funcionamiento Indicador de estado de la lámpara En esper...

Page 17: ...lmacenamiento Tarjetya microSD de 32GB máx Conexión al PC USB2 0 Salida Salida AV Salida HDMI Batería Batería recargable Li ion integrada de 1150 mAh Requisitos mínimos del sistema Son necesarias las siguientes características cuando conecte el dispositivo a un PC Microsoft Windows 2000 XP o Vista CPU Pentium4 2 8 GHz o superior 1GB RAM USB1 1 o superior 2 GB de disco duro ...

Page 18: ... Botón MIC Captura el sonido en los modos vídeo foto 7 Botón selector del modo Cambia el modo de funcionamiento 8 Indicador de estado Indica el estado de funcionamiento 9 Luces LED Iluminan en entornos con poca luz 10 Objetivo Captura vídeos y hace fotos 11 Pinza para gorra Para sujetar la cámara a una gorra 12 Tapa USB Protege el puerto USB 13 Salida AV Conexión para el TV 14 Ranura microSD Ranur...

Page 19: ...ía Cargue la batería cuando tenga indicación de poca carga Descargue archivos desde la cámara Las imágenes lejanas están desenfocadas Los objetos están más lejos del alcance del enfoque Grabe dentro del alcance del enfoque La función de tarjeta de memoria no funciona Los vídeos que no estén en formato AVI no se guardan en la tarjeta Formatee la tarjeta de memoria Haga una copia de seguridad antes ...

Reviews: