background image

AVS

 Series

37

5.0

 Maintenance 


Troubleshooting Guide

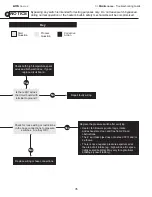
Check to make sure gas pressure is 

within minimum and maximum inputs as 

indicated on the heater’s rating plate.  

Is gas pressure OK?

Check to make sure 

gas pressure is within 

minimum and maximum 

inputs, as indicated 

Yes

Replace gas valve.

No

Correct problem.

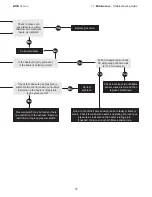
Is the heater properly grounded?   

Is the heater’s polarity correct?

No

Yes

With microampmeter, check 

DC ampperage at flame rods.   

Is it 1.0 microamps?

No

Check to make sure both flame 

sensor wires are OK and then 

replace circuit board.

One or both of the flame sensing rods are faulty or flame is 

weak.  Check to make sure heater is operating at proper gas 

pressure as indicated on the heater’s rating plate.   

If needed, replace one or both flame sensing rods.

Yes

Pressure switch may be faulty or there 

is a restriction in the exhaust.  Remove 

restriction or replace pressure switch.

Yes

No

Correct 

problem.

Summary of Contents for AVS-40N

Page 1: ...ble vapors and liquids in the vicinity of this or any other appliance may result in re or explosion Do not store or use gasoline or other ammable vapors and liquids in the vicinity of this or any othe...

Page 2: ...n Guidelines 11 Heater Packaging 12 Heater Mounting Requirements and Weights 12 Heater Assembly 13 Preparing Points for Hanging 14 Hanging Pre Assembled Unit 16 Venting 18 Combustion Air Requirements...

Page 3: ...the responsibility of the installer Notify your product representative or Brant Radiant Heaters Limited of any discrepancy or missing kit contents prior to installing unit Model Number Gas Type BTU h...

Page 4: ...UN LOGEMENT MAX MOUNTING ANGLE 0 DEGREES 45 DEGREES C1 3 11 AVS 80P 80 000 SAM PLE 7 9 9 F J F N LLTB014 Mount Level k k q X q X Z F F F Z F N LLTB035 Located on top panel F N LLAC Air Metering Ori c...

Page 5: ..._ _ _ __ __ __ _ _ _ _ 7 7 7 7 _ _ SIDE VIEW END VIEW Electrical Label Located inside service panel F N LLV3EP17 F N LLLOGO11 Logo Label CLEARANCE TO COMBUSTIBLES in and V V A END VIEW X SIDE VIEW F F...

Page 6: ...rning Symbols Safety is the most important consideration during installation operation and maintenance of the tube heater You will see the following symbols and signal words when there is a hazard rel...

Page 7: ...ater system in residential indoor spaces may result in property damage serious injury or death 2 0 Safety Applications Standards Certi cations and Regulations WARNING Applications This is not an explo...

Page 8: ...thermostat or in a conspicuous location The stated clearance to combustibles represents a surface temperature of 90 F 32 C above room temperature Building materials with a low heat tolerance such as...

Page 9: ...ilure to comply with the stated clearances to combustibles may result in personal injury property damage and or death Failure to mount the appliance level may result in personal injury property damage...

Page 10: ...ntake ducts Inspect and evaluate the mounting conditions vent locations gas supply and wiring Refer Chart 3 1 on page 11 for the recommended mounting heights and coverages for the model being installe...

Page 11: ...0 N P 60 000 6 to 8 24 x 28 AVS 80 N P 80 000 6 to 9 26 x 32 3 0 Installation Recommended Mounting Heights and Coverages Application Guidelines Figure 3 1 Application Guidelines For houses 400 feet lo...

Page 12: ...VS 60 N P 106 3 or 4 103 lbs 3 AVS 80 N P 106 3 or 4 103 lbs 3 Shipping Dimensions B Burner Control Box 15 31 5 L x 17 5 W x 15 5 H T Emitter Assembly and Re ector Box 88 91 L x 31 W x 14 H NOTE See K...

Page 13: ...re ectors TP 6088 parallel to each other 2 Place U end re ector end cap TP 6084A at one end and burner re ector end cap TP 6085A at the opposite end with the over under tabs facing the re ector 3 Mov...

Page 14: ...studs 2 Lower the U end re ector end cap TP 6084A down over the tubes while shifting the re ector assembly towards the burner control box see Detail C Step 2 3 Secure burner re ector end cap TP 6085A...

Page 15: ...re mounting surface If necessary attach additional support blocks and drill holes Figure 3 5 3 Fasten beam clamp screw hook or other type of suspension anchor to hanging point 4 Attach and close S hoo...

Page 16: ...nually or with a winch system 2 Attach two chains to exchanger connection hanging bracket TP 6079 Secure S hooks 3 Attach the third chain located furthest from the gas and electrical connections to th...

Page 17: ...ng the Heater Side View Figure 3 8 Hanging the Heater Burner Box Back View Mount Heater Level Side to Side Mount Heater Level Front to Back Figure 3 9 Hanging the Heater Exhaust End View Final Check L...

Page 18: ...o CAN CGA B149 1 Installation Code for Gas Burning Appliances The heating system may operate either vented or unvented Venting can terminate through the sidewall horizontal or the roof vertical and be...

Page 19: ...to accomplish the air displacement Local codes may require that the mechanical exhaust system be interlocked with the electrical supply line to the heaters enabling both to function simultaneously Exh...

Page 20: ...om of the vent terminal must be located a minimum of 12 in 30 cm above grade level and must extend beyond any combustible overhang Vents adjacent to public walkways must terminate a minimum of 7 ft 2...

Page 21: ...g vent pipes higher than adjacent air intake duct Venting may utilize standard B vent cap The vent terminal must extend a minimum of 2 ft 6 m above the roof Figure 3 12 Rooftop Venting Side View Vent...

Page 22: ...meter double wall Type B vent and 6 in vent cap must be used Common vented heaters must be controlled with the same thermostat Do not operate individually Figure 3 14 Common Sidewall Venting Top View...

Page 23: ...of the following apply Chemicals such as chlorinated or uorinated hydrocarbons typical sources are refrigerants solvents adhesives degreasers paints paint removers lubricants pesticides etc High humid...

Page 24: ...4 must be installed to prevent blockage Locate the intake where dirt steam snow etc will not contaminate or clog the intake screen Separate air intake duct from vent pipe a minimum of 4 ft Also place...

Page 25: ...nsumption of all heaters being installed as well as any other gas appliances being connected to the supply line Check that the main gas supply line is of proper diameter to supply the required fuel pr...

Page 26: ...ial an intermediate connection device that allows for heater expansion must be used The gas outlet must be in the same room as the appliance and accessible It may not be concealed within or run throug...

Page 27: ...h an open ame or other sources of ignition may lead to a re or explosion and cause serious injury or death Test in accordance with NFPA or local codes 4 Figure 3 19 Gas Connection Approved Flexible Ga...

Page 28: ...d with a three prong pig tail Refer to Field Wiring Diagram see Figure 3 22 WARNING Improper installation adjustment alteration service or maintenance can cause property damage serious injury or death...

Page 29: ...in accordance with national state provincial and or local codes In the United States refer to the most current revisions to the ANSI NFPA 70 Standard and in Canada refer to the most current revisions...

Page 30: ...s appliance Check existing wiring replace if necessary NOTE If any of the original wire supplied with the appliance must be replaced it must be replaced with wiring material having a temperature ratin...

Page 31: ...AVS Series 31 3 0 Installation Electrical Requirements Internal Wiring Diagrams Figure 3 24 Internal Block Wiring Diagram Z Z F F F F F F F Z X F X F F Z X F F...

Page 32: ...et the thermostat to the lowest setting Turn OFF all electrical power to the appliance Turn manual shutoff clockwise to OFF Wait ve 5 minutes to clear out any gas If you smell gas STOP Follow the safe...

Page 33: ...is achieved the differential pressure switch closes sending power to the ignition module After a seven second pre purge the spark igniters and the solenoid of the gas valve are simultaneously energize...

Page 34: ...o Continued on page 36 Does the unit spark Is there 24V at the blue and yellow secondary side of the internal transformer and common on the pressure switch No No Is there 24V at the N O terminal of th...

Page 35: ...emperature spark wires and both electrodes If good replace circuit board Check for loose wiring or restrictions in the hose connections to pressure switches Are they OK No Replace wiring or hose conne...

Page 36: ...ds after power to heater Is there 24V to valve for 15 seconds Yes The following can cause the heater to shut down Improper grounding High winds Dirty environment Fluctuating gas pressure Do the burner...

Page 37: ...heater s polarity correct No Yes With microampmeter check DC ampperage at ame rods Is it 1 0 microamps No Check to make sure both ame sensor wires are OK and then replace circuit board One or both of...

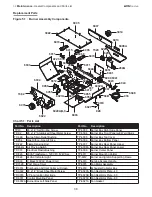
Page 38: ...r TP 828 24VAC Indicator Light TP 6012 Burner and Ignition Supporting Frame TP 933 6 Black 120VAC Power Cord TP 6013 Service Access Handle TP 1528 Post Purge Timer TP 6015 Fan Motor Assembly TP 3014 C...

Page 39: ...ipe w Foot Mounts TP 6080 4 Vent Adapter Fitting TP 6047 5 x 1 2 Gas Inlet Pipe TP 6082 Radiant U Tube Assembly w Baf e and Plate TP 6048 1 2 Gas Inlet Street Elbow TP 6084A U End Re ector End Cap TP...

Page 40: ...de air intake ducts for combustion is recommended Combustion air intake system when applicable Check for blockage and or leakage Check the outside termination and the connection at the heater Heat exc...

Page 41: ...AVS Series 41 Date Maintenance Performed Replacement Parts Required Maintenance Log 5 0 Maintenance Maintenance Log Inspection...

Page 42: ...AVS Series 42 Notes...

Page 43: ...t Heaters Limited has made a diligent effort to provide product information and illustrate the products in this literature accurately however such information and illustrations are for the sole purpos...

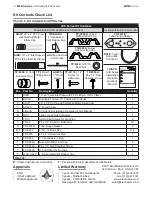
Page 44: ...ange Gasket 2 B T TP 6022 5 16 18 Keps Nut 9 4 T TP 6075 81 x 4 Spiral Vent Pipe 1 T TP 6080 4 Vent Adapter Fitting 1 T TP 6085A Burner Re ector End Cap 2 T TP 6086A 8 x 1 2 Red Shoulder Screw 4 T TP...

Reviews: