background image


MANUAL P/N 900000106 REV A 

14 

 
4.2.2


Web Browser 

 
To connect to the unit using the web browser, follow the steps given below. 

1.


Connect one end of an Ethernet cable to the FTSU-100D Network Port. 

2.


Connect the other end of the Ethernet cable to your network. 

3.


Open a web browser, type the IP Address of the FTSU-100D unit in the Address bar, and press 
<Enter>.  For example, type 192.168.1.1 or 

http://192.168.1.1

 and press <Enter>. 

4.


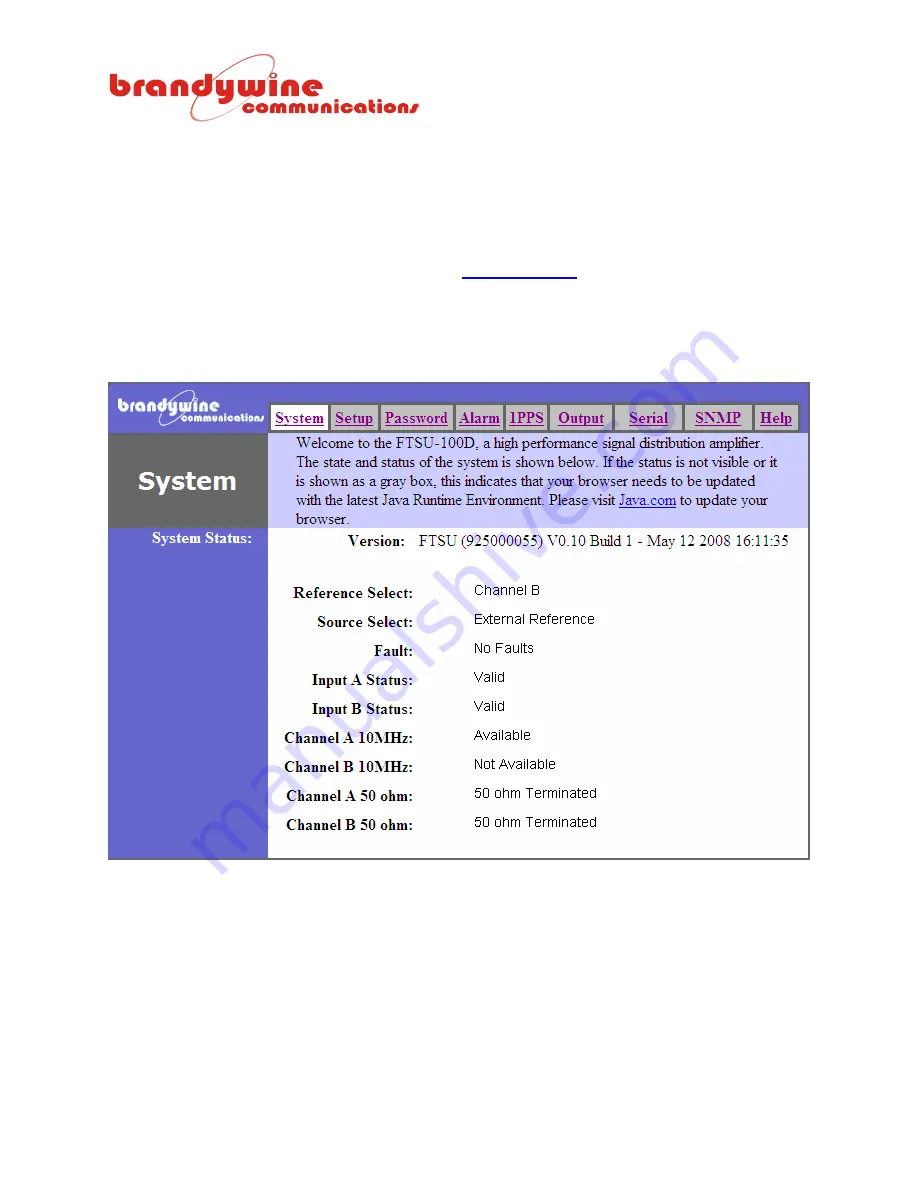
Figure 2 will be displayed. 

5.


Configure the FTSU-100D unit.  For more information on FTSU-100D configuration, refer to the 
Configuration section of the user guide.  


Figure 2 FTSU-100D System Screen 

Summary of Contents for 001-0187

Page 1: ...106 REV A User Guide Frequency and Time Synthesizer Unit Model FTSU 100D P N 001 0187 Revision A March 2010 Brandywine Communications 1153 Warner Ave Tustin CA 92780 714 755 1050 714 755 0175 http www...

Page 2: ...2 MANUAL P N 900000106 REV A Revision History REVISION DATE COMMENTS A 03 29 2010 Initial Release...

Page 3: ...equilateral triangle is intended to alert the user to the presence of un insulated dangerous voltage within the product s enclosure The dangerous voltage may be of sufficient magnitude to constitute a...

Page 4: ...4 MANUAL P N 900000106 REV A This page intentionally left blank...

Page 5: ...Installation 10 3 1 Unpacking 10 3 2 Installation 10 3 3 Connections 11 3 3 1 Power 11 3 3 2 Other Connections 11 4 Getting Started 12 4 1 Powering Up the FTSU 100D 12 4 2 Setting the Network Address...

Page 6: ...ble Accuracy 5x10 12 24 hour average Short term stability Allan variance 2x10 11 1 s 4x10 11 10 s 8x10 11 100 s Phase noise 120 dBc Hz 10 Hz 140 dBc Hz 100 Hz 150 dBc Hz 1000 Hz Harmonic distortion 30...

Page 7: ...erence Available PLL and or reference PLL Locked Holdover Fault Red Indicates monitored parameter is out of range 1 5 Environmental Temperature Unit Operating 0 50 C Storage 40 to 85 C Humidity Unit 1...

Page 8: ...tputs SHIELD GND J17 J18 J19 J20 J21 J22 J23 J24 QMA CENTER 1PPS Outputs SHIELD GND J25 J26 QMA CENTER 1PPS Inputs SHIELD GND J27 J28 QMA CENTER 10 MHz Reference inputs SHIELD GND STATUS INPUT OUTPUT...

Page 9: ...s from the reference generator The FTSU 100D provides automatic changeover should one of the source inputs fail Manual source select override is available on the front panel A variety of status indica...

Page 10: ...INCORRECT AC LINE SETTING IS USED WARNING REMOVE THE POWER CORD FROM THE FTSU 100D BEFORE ADJUSTING THE LINE VOLTAGE If the AC line setting is incorrect detach the power cord from the power entry modu...

Page 11: ...eference signals to the appropriate connectors on the rear panel CAUTION FOR CORRECT OPERATION REFERENCE FREQUENCY A AND REFERENCE FREQUENCY B MUST BE THE SAME FREQUENCY WHICH IS TYPICALLY 10 MHz Conn...

Page 12: ...ls it will be automatically switched to Reference B Place the Source Select Switch in the PLL position This is the normal mode of operation for the FTSU 100D and this indicates that the reference freq...

Page 13: ...unit click the button 7 Wait 15 seconds for the settings to be loaded into the FTSU 100D unit and for the FTSU 100D unit to restart 8 Verify that the FTSU 100D unit has the correct network settings a...

Page 14: ...other end of the Ethernet cable to your network 3 Open a web browser type the IP Address of the FTSU 100D unit in the Address bar and press Enter For example type 192 168 1 1 or http 192 168 1 1 and p...

Page 15: ...ads link 3 Click on the Java Download link 4 Download Java 5 Complete the installation process Please note that the oldest acceptable Java software version number is 1 4 2_05 To check the Java softwar...

Page 16: ...tem The System tab consists of the System Status This tab allows the user to view the state and status of the FTSU 100D system Figure 3 FTSU 100D System Screen The System Status section consists of te...

Page 17: ...All values changed are written to non volatile memory To undo all modifications made to the Setup screen click the Reset button This loads the system defaults Figure 4 Setup Screen 5 1 2 1 System The...

Page 18: ...s the user to define sub networks The Device Gateway is a 32 bit number used as the point of entrance from one network to another Please note that once the IP address is changed using the web browser...

Page 19: ...n click the Reset button IMPORTANT INFORMATION The default user name and password for the system is BRANDYWINE The user must always enter a user name and password when submitting changes to the system...

Page 20: ...MANUAL P N 900000106 REV A 20 5 1 4 Alarm The Alarm tab consists of the Index and the Fault Detected sections Figure 6 Alarm Screen...

Page 21: ...MANUAL P N 900000106 REV A 21 5 1 5 1 PPS The 1 PPS tab consists of three sections the 1PPS Output Width 1PPS Delay and 50 ohm Load Figure 7 1PPS...

Page 22: ...7 nanoseconds would be entered as 327 Likewise to advance a 1PPS output signal enter a positive value in the appropriate box To advance a 1PPS signal by 85 nanoseconds a value of 85 should be entered...

Page 23: ...ab consists of the Output Setup for the 10MHz and 70MHz outputs To save all modifications made to each output click the button Figure 8 Output Each high frequency output has three adjustable settings...

Page 24: ...allow the user to set low and high alarm thresholds to each output signal If these values are exceeded an alarm will result 5 1 7 Serial The Serial Settings tab sets the Serial Port Configuration This...

Page 25: ...ilities listed below FTSU 100D status monitoring via SNMP FTSU 100D control via SNMP Figure 10 is displayed when the SNMP sub tab is selected The SNMP consists of three sections the Community Trap Add...

Page 26: ...sists of one field the Trap IP The Trap Address allows the user to enter the IP address of the trap Once the trap address is entered it is stored in non volatile memory and will be recalled when the F...

Page 27: ...the system Help links are located throughout the entire system so the user has access to the Help screen whenever the user encounters a problem Once the user clicks on the Help link the user will be a...

Page 28: ...Update program from the NetBurner website located at http www netburner com support public_downloads html 1 Double click on the AutoUpdate icon and Figure 12 will be displayed Figure 12 AutoUpdate Scr...

Page 29: ...le Name field will be completed for you Figure 14 Open Screen 4 Now click on the Reboot when complete check box 5 To close the application click the Dismiss button 6 To upload the new firmware click t...

Page 30: ...MANUAL P N 900000106 REV A 30 Figure 16 AutoUpdate Complete Screen...

Page 31: ...e output signals is outside its allowable threshold values 2 One or both of the input signal sets are faulty 3 PLL is not locked 1 Check alarm screen to verify cause of fault 2 Check alarm screen to v...

Page 32: ...MANUAL P N 900000106 REV A 32 8 Drawings FIGURE DESCRIPTION 1 FTSU 100D Front Panel 2 FTSU 100D Rear Panel Table 21 FTSU 100D Drawings...

Page 33: ...MANUAL P N 900000106 REV A 33 Figure 1 FTSU 100D Front Panel Figure 2 FTSU 100D Rear Panel...

Reviews: