background image


14 


3/ USING YOUR APPLIANCE 


A. Before using the oven for the first time 
 

Heat the oven with nothing inside it. 
1.    Insert the tray and wire rack. 
2.    Set the cooking function switch to "UPPER & LOWER", set the temperature control knob to "250 " and 

heat the empty oven for about 10 minutes.   

 
There may be some smoke and a burning smell at first, but this is not a malfunction. 
 

B. Temperature control 


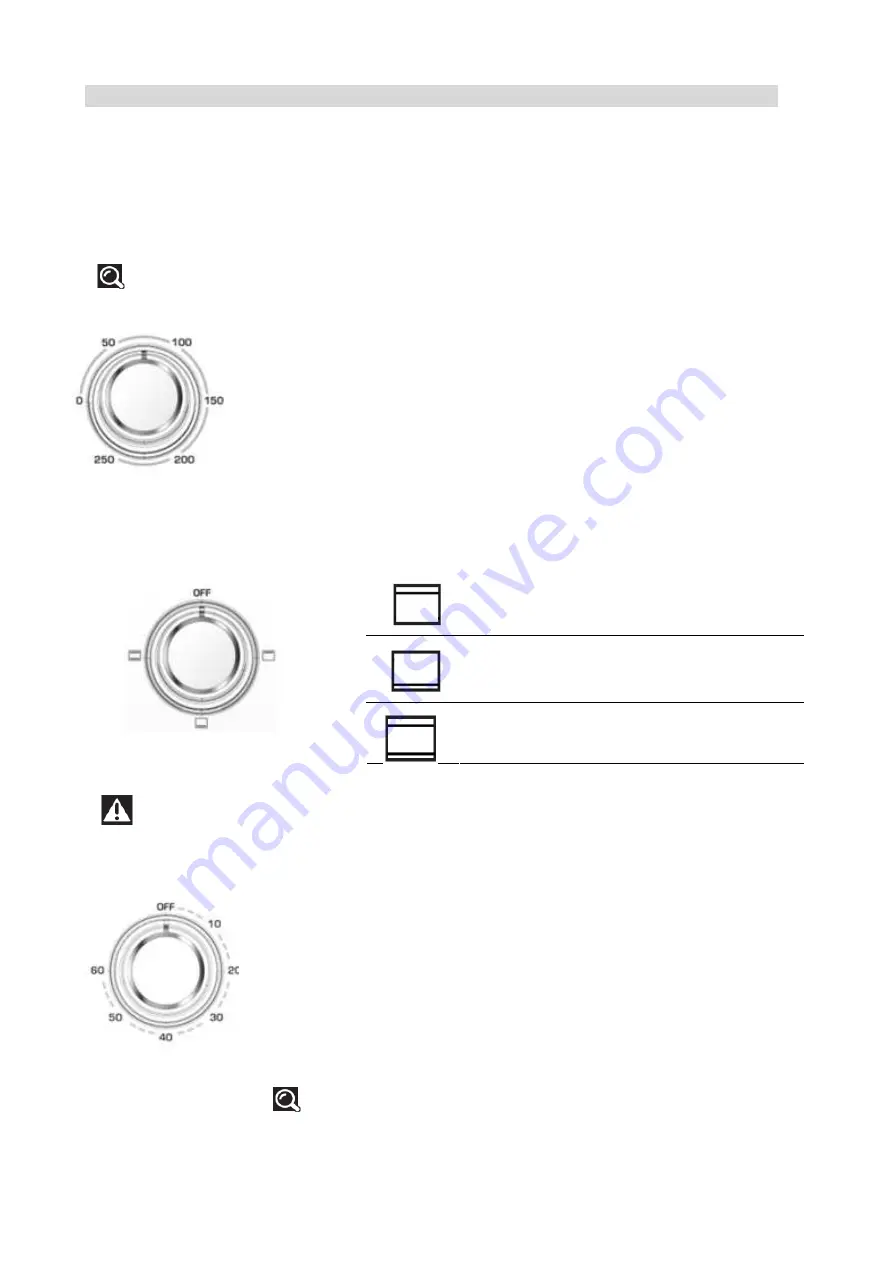
Set the Temperature Control Dial to the suitable temperature for the dish you 
are cooking. 
Set  the  “Temperature  Control”  by  turning  the  knob  clockwise  to  the  suitable 
temperature  for  the  dish  you


are  cooking.  (Temperature  Control  range  up  to 

250°C) 


B. Cooking function selection 


Select the suitable cooking function for the


dish you are cooking.


Upper heating   


Lower heating 


Upper + lower heating 


Beware of hot dripping fat!                             


D. Cooking time setting 


1. Move the “Timer” arrow to the number which indicates the cooking time 
(minutes) depending on the dish you are cooking.   
 
2. Set the “Timer” by turning it clockwise.   
You can check whether the heating elements are working or not by looking 
at the front Indicator light. 
The oven will turn off automatically at the end of the selected time and a 
bell will ring.   
3.  The  oven  can  be  turned  off  manually  during  cooking  by  turning  the 
“Timer” anti-clockwise to the "OFF" position. 

Note

 :   

If  the  inside  of the  oven  is  dirty,  cooking  may  take  slightly  longer 

than usual. 

Summary of Contents for FC-26CB

Page 1: ...FR MANUEL D INSTRUCTION EN INSTRUCTION MANUAL Four compact 26L Compact oven 26L FC 26CB FC 26CW ...

Page 2: ...u four compact BRANDT Bien entendu dans un souci permanent de satisfaire le mieux possible vos exigences vis à vis de nos produits notre service consommateurs est à votre disposition et à votre écoute pour répondre à toutes vos questions ou suggestions Et connectez vous aussi sur notre site www brandt com où vous trouverez tous nos produits ainsi que des informations utiles et complémentaires BRAN...

Page 3: ...tion sur le plan de travail 5 B Le raccordement électrique 5 C Description de votre appareil 5 3 UTILISATION DE VOTRE APPAREIL 6 A Avant d utiliser l appareil pour la première fois 6 B Réglage du thermostat 6 C Sélection du mode de cuisson 6 D Réglage de la durée de cuisson 6 E Conseils d utilisation 7 4 ENTRETIEN ET NETTOYAGE DE VOTRE APPAREIL 8 ENGLISH INSTRUCTION MANUAL 9 ...

Page 4: ...ure N aspergez pas le cordon d alimentation et ne manipulez pas l appareil avec les mains mouillées Débranchez toujours le cordon après utilisation ou lorsque l appareil est laissé sans surveillance S il reste branché un dysfonctionnement peut provoquer un incendie Lorsque vous cuisinez des plats à l huile tels qu un poulet rôti il est recommandé d utiliser 2 feuilles d aluminium afin de réduire l...

Page 5: ...ourrait le déformer le briser etc B Le raccordement électrique L alimentation électrique doit provenir d une prise correctement branchée Insérez entièrement la fiche dans la prise Dans le cas contraire elle pourrait chauffer anormalement N utilisez pas de prise d éclairage Ne branchez jamais plusieurs fiches sur une même prise C Description de votre appareil Le four 1 Boîtier 2 Cavité 3 Gradins 4 ...

Page 6: ...er Réglez la Commande de la température en la tournant dans le sens des aiguilles d une montre pour sélectionner la température appropriée en fonction du plat que vous allez cuisiner températures entre 100 C et 250 C C Sélection du mode de cuisson Voûte Sole Sélectionnez l élément chauffant approprié en fonction du plat que vous allez cuisiner Voûte et sole Attention à la graisse chaude D Réglage ...

Page 7: ...250 2 5 Hamburger 2 3 200 3 5 Poisson 200 7 10 Jambon 2 cm 200 7 12 Saucisse 3 4 200 250 8 10 Gâteau 150 20 30 Steak 1 2 cm 250 10 15 Poulet Demi poulet 180 200 30 40 E Conseils d utilisation Plateau de cuisson et grille Accessoire Aliments à titre informatif uniquement Comment utiliser la pince Plateau de cuisson Ailes de poulet grillées steak haché gratin gâteau presque tous les autres aliments ...

Page 8: ... à l eau claire Afin de ne pas rayer la surface intérieure du four et de protéger le plateau la grille et la fourche du tournebroche n utilisez pas de brosse dure ou équivalent lors du nettoyage N utilisez pas de produits toxiques ou abrasifs tels que de l alcool à brûler de la poudre abrasive ou du solvant Si le cordon d alimentation est endommagé il doit être remplacé par le fabricant le distrib...

Page 9: ...n an ongoing effort to satisfy your demands with regard to our products as best as possible our after sales service department is available to answer your questions and welcomes any suggestions you may have You can also log on to our website at www brandt com where you will find listings of all our products together with further useful information As part of our commitment towards constant improve...

Page 10: ... 11 2 INSTALLING YOUR APPLIANCE 12 A Countertop installation 12 B Electrical connection 12 C Description of your appliance 12 3 USING YOUR APPLIANCE 13 A Before using your oven 13 B Temperature control 13 C Cooking function selection 13 D Cooking time setting 13 E Use recommendations 14 4 CARING FOR AND CLEANING YOUR APPLIANCE 15 ...

Page 11: ... the unit is left unattended A malfunction while the plug is inserted into the mains could cause a fire When cooking fat spitting dishes such as roast chicken it is recommended to use 2 sheets of aluminium foil in order to reduce fat spitting Place one sheet on the tray and the other over the food The oil will drip in to the gap between the sheets of foil B TECHNICAL DATA C PROTECTING THE ENVIRONM...

Page 12: ...s use the heat could deform crack etc the item B Electrical connection The oven must be connected to a properly wired power outlet Insert the plug fully into the socket If it is not properly connected it could overheat Do not use an electric light outlet Never connect multiple plugs to the same power outlet C Description of your appliance Oven 1 Housing 2 Cavity 3 Rack support 4 Heating element 5 ...

Page 13: ...oking Temperature Control range up to 250 C B Cooking function selection Select the suitable cooking function for the dish you are cooking Upper heating Lower heating Upper lower heating Beware of hot dripping fat D Cooking time setting 1 Move the Timer arrow to the number which indicates the cooking time minutes depending on the dish you are cooking 2 Set the Timer by turning it clockwise You can...

Page 14: ...y Handle Baking Tray Roast chicken wings hamburgers gratin cakes most other oven cooked foods Note We recommend you use it as crumb tray Wire Rack Baked potatoes dry food Baking Tray and Wire Rack For food which will drip e g boiled fish etc Take care when removing pudding and hot liquids Rack Support There are 4 different positions for the tray which you can adjust according to the dish you are c...

Page 15: ...ack and the rotisserie fork Do not use toxic or abrasive cleaners such as gasoline polishing powder solvent For safety reasons if the power cable is damaged it must be replaced by the manufacturer or its servicing company or a qualified person Warranty and after sale service This product is covered by a 2 year warranty from your retailer For more details please refer to the warranty conditions sup...

Reviews: