Brandt BFL484YNW Instructions For Use Manual Download Page 36


a  time  when  the  supply  of  food  stocks 
are low and proceed as follows:
-Remove existing food and accessories 

baskets, unplug the appliance from the 
mains  power  and  leave  the  doors 
open. Ventilate the room thoroughly to 
accelerate the thawing process.

Caution!

  Don't  use  sharp  objects  to 

remove frost from the refrigerator. Only 
after  the  interior  is  completely  dry 
should  the  appliance  be  switched  back 
on  and  plugged  back  into  the  mains 
socket.

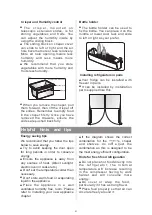
Take  care  to  keep  door  seals  clean. 
Sticky food and drinks can cause seals 
to  stick  to  the  cabinet  and  tear  when 
you  open  the  door.  Wash  seal  with  a 
mild  detergent  and  warm  water.  Rinse 
and dry it thoroughly after cleaning.

Caution! 

Only  after  the  door  seals  are 

completely dry should the appliance be 
powered on.

Door seal cleaning

Replacing the LED light

Warning:

  The  LED  light  must  not  be 

replaced by the user! If the LED light is 
damaged,  contact  the  customer 
helpline  for  assistance.  To  replace  the 
LED  light,  the  below  steps  can  be 
followed:
1. Unplug your appliance.
2.  Remove  light  cover  by  pushing  up 
and out.
3.  Hold  the  LED  cover  with  one  hand 
and  pull  it  with  the  other  hand  while 
pressing the connector latch.
4.  Replace  LED  light  and  snap  it 
correctly in place.

Troubleshooting

If  you  experience  a  problem  with  your  appliance  or  are  concerned  that  the 
appliance  is  not  functioning  correctly,  you  can  carry  out  some  easy  checks 
before  calling  for  service,  please  see  below.  You  can  carry  out  some  easy 
checks according to this section before calling for service.

Warning! 

Don't  try  to  repair  the  appliance  yourself.  If  the  problem  persists 

after  you  have  made  the  checks  mentioned  below,  contact  a  qualified 
electrician, authorized service engineer or the shop where you purchased the 
product.

XXXXXXXXXXXXXXXXXXXXXXXXX

33

Summary of Contents for BFL484YNW

Page 1: ...FR GUIDE D INSTALLATION ET D UTILISATION EN INSTRUCTION FOR USE R frig rateur Fridge...

Page 2: ......

Page 3: ...du dans un souci permanent de satisfaire le mieux possible vos exigences vis vis de nos produits notre service consommateurs est votre disposition et votre coute pour r pondre toutes vos questions ou...

Page 4: ...ment destin un usage domestique ainsi que pour des applications similaires telles que cuisines dans des magasins bureaux et autres environnements de travail fermes h tels h tels motels chambres d h te...

Page 5: ...de blessure en cas de chute N autorisez pas les enfants jouer avec l appareil en s accrochant ou se suspendant aux portes balconnets tag res ou bacs etc S curit en mati re d lectricit Pour viter tout...

Page 6: ...ion risque d incendie Ne faites pas fonctionner l appareil en absence du diffuseur de l ampoule d clairage Les composants lectriques doivent tre remplac s ou r par s par un lectricien qualifi ou un te...

Page 7: ...gn e tel qu illustr sur le sch ma 3 Fixez la poign e l aide des vis fournies dans la poche en plastique 1 2 Placez votre appareil dans un lieu sec afin d viter des conditions de forte humidit Ne l exp...

Page 8: ...reil lorsque vous effectuez cette op ration Outils n cessaires Couvercle sup rieur charni re sup rieure gauche Couvercle sup rieur pour porte sup rieure Couvercle pour le coin 1 2 3 3 D branchez le co...

Page 9: ...u c t droit avec les avec vis Retirez les pi ces et 6 Placez votre r frig rateur plat retirez la pi ce puis vissez les vis 7 D vissez la charni re inf rieure changez la de c t puis vissez et installez...

Page 10: ...la sur le coin droit de la porte puis montez la pi ce ces pi ces ont t d mont es l tape 2 1 2 14 Retirez le commutateur lames du bloc d adaptation pi ce de l tape 3 puis montez le sur l autre bloc uti...

Page 11: ...mpartiment ufs l int rieur 6 17 14 Balconnets interm diaires 7 15 Porte bouteille l int rieur 8 16 Poign e 9 18 17 Balconnets bouteilles 10 19 18 Porte du r frig rateur 19 Joint de la porte du r frig...

Page 12: ...cran de contr le comme dans la s quence suivante 8 1 Super Cool Le mode Super Cool permet de refroidir vos aliments rapidement et les garder frais plus longtemps Appuyez sur la touche Super Cool pour...

Page 13: ...uches sauf la touche Alarm Lorsque l appareil est d verrouill vous pouvez activer la fonction Child Lock en appuyant sur la touche Child Lock pendant 3 secondes pendant ce temps l ic ne Child Lock ser...

Page 14: ...nt ufs et un porte bouteille sont respectivement disponibles dans le balconnet sup rieur et inf rieur tag re du r frig rateur Les tag res du r frig rateur peuvent tre retir es pour les nettoyer Remarq...

Page 15: ...soulevez le bac afin de le retirer des coulisses Pensez vider le bac l gumes d abord Une fois les tiroirs retir s assurez vous que les coulisses sont totalement encastr es Conseils et astuces Conseil...

Page 16: ...ur Nettoyez r guli rement l ext rieur de votre appareil pour le maintenir en bon tat Essuyez l cran et l affichage num rique avec un chiffon doux et propre Pulv risez l eau sur le chiffon et non direc...

Page 17: ...nettoyage Attention Remettez en marche l appareil apr s le s chage complet des joints de la porte Remplacement de l ampoule LED Attention L ampoule LED ne doit pas tre remplac e par l utilisateur Si...

Page 18: ...rage du compresseur D autres bruits anormaux peuvent tre entendus pour les raisons num r es ci apr s V rifiez galement ces points L appareil n est pas niveau L arri re de l appareil touche le mur Cert...

Page 19: ...riaux d emballage Les mat riaux d emballages qui pr sentent le symbole du recyclage sont recyclables Jetez les emballages dans le conteneur pr vu cet effet dans un point de collecte des d chets afin...

Page 20: ...CEDEX Par t l phone du lundi au vendredi de 8h30 18h00 au INTERVENTIONS Les ventuelles interventions sur votre appareil doivent tre effectu es par un professionnel qualifi d positaire de la marque Lo...

Page 21: ......

Page 22: ...BRANDT refrigerator To ensure your requirements are fulfi lled at all times our Consumer Attention Service is also at your disposal to answer all your queries or take note of your suggestions you can...

Page 23: ...clients in hotels motels and other residential types of environment Bed and breakfast types of environment If you feel that the appliance is not operating correctly please check the Troubleshooting pa...

Page 24: ...with t h e a p p l i a n c e b y h a n g i n g o r standing over or on the doors racks shelves and drawers etc Safety about electricity To avoid the risks that are always present when using an electri...

Page 25: ...injuries If it is not functioning correctly consult a qualified registered electrician or replace it in accordance with the cleaning and care chapter Do not use electrical appliances such as ice crea...

Page 26: ...f direct sunlight rain or frost Stand the appliance away from heat sources such as stoves fires or heaters Leveling of appliance For sufficient leveling and air circulating in the lower rear section o...

Page 27: ...packaging or similar material to avoid damaging the backboard of the refrigerator To reverse the door the following steps are generally recommended 1 Stand the refrigerator upright Open the door to t...

Page 28: ...the follow figure shows button the buckle firstly and then close the cover from the inside until you hear the sound of popping Note 1 Remove the handle cover as the follow figure shows bend the upper...

Page 29: ...k to the plastic bag 15 connector and then install part Install part connect the wire 16 Open the door mount door racks and then close it Note Be sure character side of reed switch fits well with copi...

Page 30: ...eet 12 Covered dairy rack 13 Egg tray inside 14 Middle rack 15 Bottle holder inside 16 Handle 17 Bottle rack 18 Fridge door 19 Fridge door seal 1 Note Due to unceasing modification of our products you...

Page 31: ...panel starts working If no buttons have been pressed and the doors are closed the backlighting will turn off 3 Holiday longer period Press Super Cool button to activate this function The light will b...

Page 32: ...essing Power button for 5 seconds meanwhile the display panel will be turned off Important Do not store any food in the fridge during this time When the appliance is power off you can switch the appli...

Page 33: ...Note Please use gentle pressure on left or right side face to move the box along the shelf If required the flexible fresh box can be taken out with its hanger allowing you to adjust the shelf at diffe...

Page 34: ...nce Place the appliance in a well ventilated humidity free room Please refer to Installing your new appliance chapter If the diagram shows the correct combination for the drawers crisper and shelves d...

Page 35: ...e off and remove the plug from the mains socket Exterior cleaning To maintain good appearance of your appliance you should clean it regularly Wipe the digital panel and display panel with a clean soft...

Page 36: ...g the LED light Warning The LED light must not be replaced by the user If the LED light is damaged contact the customer helpline for assistance To replace the LED light the below steps can be followed...

Page 37: ...g sound similar to water boiling Popping noise during automatic defrosting Clicking noise before the compressor starts Other unusual noises are due to the reasons below and may need you to check and t...

Page 38: ...als with the recycle symbol are recyclable Dispose of the packaging into a suitable waste collection container to recycle it Before disposal of the appliance 1 Pull out the mains plug from the mains s...

Page 39: ...en you call please mention the complete reference for your machine model type serial number this information is provided on your guarantee certif cate and the information plate on your appliance ORIGI...

Page 40: ...BRANDT BFL484YNW BFL484YNX KEL_RS 47WL4S2...

Reviews: