background image

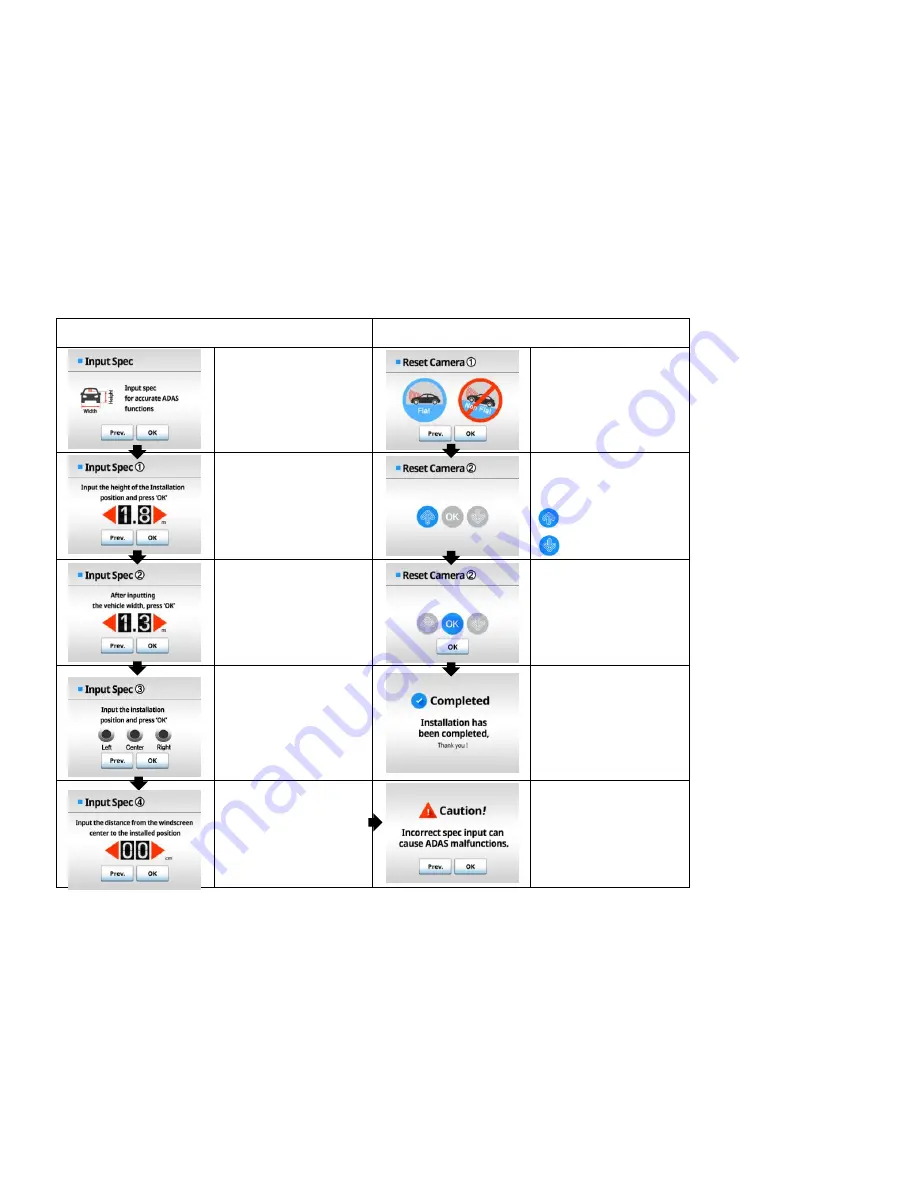
* Input Spec

* Camera setting 

To perform ADAS 

properly , input your 

vehicle specifications, 

Press OK to continue 

To calibrate camera 

angle correctly, make 

sure the vehicle is 

parked on the flat 

ground ,  

Press OK to continue 

Input the installed height 

from the ground by 

pressing the arrow 

button .  
Press OK after inputting 

the value  

Adjust the camera lens 

angle by following the 


arrow guide 

 : turn upward . 

 : turn downward 

Input the exterior width 

of vehicle by pressing 

the arrow button . 

Press OK after inputting 

the value  

OK button will be ON 

with the acoustic alarm 

when calibration is done 

correctly.  
Press OK to continue 

From the driver’s point


of view, select the 

installation position, 

Press OK to continue  

Setup has been 

completed 

Input the distance from 

the center of windshield 

to the installed position 

by pressing the arrow 

button. 


Press OK to continue  

If spec input is not 

properly done, it may 

affect ADAS 

performance.  

If inputted correctly, 

press OK to continue . 

[Camera Settings]


Summary of Contents for ADAS-1000

Page 1: ......

Page 2: ......

Page 3: ...Lane Departure Warning Via Vehicle s Turn Signal Connection Front Collision Warning Even At Low Speed Easy But Professional Installation Mode Full HD Crystal Clear Image Quality Overheating Prevention...

Page 4: ......

Page 5: ...Full HD Internal GPS Security LED Volume Adjustment Button Menu Button Touch LCD Manaul Recording Button REC Camera Angle Adjuster MIC DC power port 3 5 pi Micro SD card socket Power Supply Connection...

Page 6: ......

Page 7: ...i HUB at the finish connect the vehicle cable If the product and optional devices are connected when turned on vehicle power is applied to mini HUB it may cause internal product damages It is recommen...

Page 8: ...Press the OK button Check whether power is connected properly Switch to ACC On status and press OK Choose the desired connection method Vehicle Power wire Connection Press OK Simple Cigar Jack Connect...

Page 9: ...t arrow light turns on YES The vehicle signal is incompatible with product signal Change the signal by changing High Low LOW HIGH HIGH LOW NO If only 1 arrow is on check the cable connection again If...

Page 10: ...upward turn downward Input the exterior width of vehicle by pressing the arrow button Press OK after inputting the value OK button will be ON with the acoustic alarm when calibration is done correctl...

Page 11: ......

Page 12: ...s shown in the image The horizon guide line shows the lane lines are being detected When it generates LDW signal the lane lines will turn red Home Button Switches to the main menu Camera Button will c...

Page 13: ...n Red when generating a warning signal Collision Warning The red vehicle icon will blink twice FCDA The Green Vehicle icon will blink twice HMW Time to collision indicted at the center of screen Vehic...

Page 14: ...rn ADAS functions ON OFF and configure operations 2 DVR Change settings relevant to recording monitoring and resolution 3 Playback Play recorded videos 4 Configurations Change settings of system volum...

Page 15: ...20km h adjustable from 10 80 km h HMW The warning function is to keep a safe distance between vehicles Warning Sensitivity If the value of Warning Level gets bigger the warning will respond faster 3 L...

Page 16: ......

Page 17: ...instantly 1 Continuous Event Parking Continuous Select and check continuously recorded files Event Select and check the event files recorded during driving and parking Parking Select and check record...

Page 18: ...ice message be careful of Left Right lane will be generated FCDA The voice message Check ahead will be generated Even when voices are turned off warning alarms still be generated FCW only generates th...

Page 19: ...the image of the rear camera of the main body PIP It displays front and rear images simultaneously Rear PIP screens are supported only when the secondary camera is connected Screen Save sets up LCD d...

Page 20: ...d through the PC Manager 4 4 System Info User can check Version information of firmware and hardware When Reset Setup button is pressed the values stored in the system will be initialized and the syst...

Page 21: ...TIAN installation settings If values entered through Install mode are arbitrarily modified it may cause ADAS function errors 1 Vehicle Type Choose driver s vehicle type 2 Position Choose installation...

Page 22: ...hicle width Blinker Active If the display arrow light blinks continuously even when turn indicators are off change High Low settings in the Dimensions menu Measure the height from the ground the main...

Page 23: ...Head Tape Top Bottom Keyhole Open OPTIAN Cable Lock Position Cover Lock The Cover Lock is designed to prevent theft and unauthorized setting changes Key OPTIONAL DEVICES...

Page 24: ...ra to the rear window attach the camera with the holder on the left When attaching the external camera to the rear window avoid installing directly above heat wires After mounting the camera check thr...

Page 25: ...Learn more about cameras driver safety on our website...

Reviews: