Installation
LVAD3
Bradley
• 215-1851 Rev. A; ECN 17-08-002
4/17/2017
11
Adjust Temperature with Water Running
H
C
A
Loosen Cap Screw about 1/4" (4-6
turns) and lift up cover (do not
remove).
B
Using cover, turn cartridge gently until
desired water temperature is reached.
Do not turn past stops as this may
damage unit. Push cover down and
tighten screw.
WARNING This valve is NOT factory
preset. Upon installation,
the temperature of this
valve must be checked and
adjusted to ensure delivery
of a safe water temperature.
Water in excess of 110°F
(43°C) may cause scalding.
6
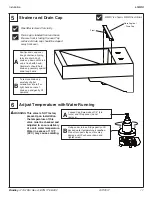
Strainer and Drain Cap
5
LVAD1 is shown. LVAD3 is similar.
Position drain cap over
trough strainer, aligning
tabs into drain. Push
drain cap down until drain
cap is flush with basin.
Grommets should hold
drain cap securely against
drain tough walls.
A
To remove drain cap,
carefully slip flat
screwdriver into left or
right hand corner of
drain cap and gently lift
upwards.
B
WashBar removed for clarity.
Front
Note Angle of
Drain Cap
Drain cap is labeled front and back.
Be sure front is facing the user. Top
surface of drain cap should be sloped
away from user.


