background image

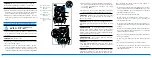
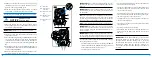
3. Pull the iSoFiX adjuster 

(7)

 to extract both arms 

(18)

. Move the locking arms from side to side until 

you hear the click indicating that they are fully 

locked (fig.11). 

*  The insertion guides facilitate the installation of 

the safety seat with the aid of the iSoFiX securing 

points and prevents damage to the upholstery. 

When not in use they should be removed and stored 

in a safe place. in vehicles with a reclining back the 

insertion guides should be removed before the seat 

is reclined. Problems that may arise are generally the 

result of accumulation of dirt or foreign bodies in the 

insertion guides and the clasps. To solve this type of 

problem simply clean the part in question.

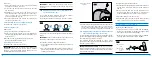
5. INSTALLING THE SEAT, GROUP 1

GROUP 1 Only 

9 to 18 Kg.

NOTICE

1. Make sure the 5-point harness of the safety seat has 

been correctly installed (see section 3).

2. Follow the steps described in section 3.1.
3. Follow the steps described in points 3.10.
4. Take the Top Tether and pass it over the safety seat.
5. Place the safety seat on the vehicle seat facing in the 

direction of travel.

6. Hold the safety seat with both hands and insert the 

two locking arms (19) firmly into the insertion guides 

(18)


 iSoFiX 

locking  

arms.

(7)

   iSoFiX 

Adjuster.

18

7

fig. 11

fig. 12

16

CLICK

OK

(32) until they fasten with a click on both sides. The 

red button will partially change to green on both 

sides (fig. 11).

7.  Shake the seat to check that it is correctly anchored 

to the vehicle’s iSoFiX points (fig. 13). 

IMPORTANT! The locking arms are only correctly fixed 

if both safety buttons are partially green. 

8.  Pull the iSoFiX adjuster and push the safety seat 

towards the back using a firm, constant pressure 

on both sides until it rests firmly against the vehicle 

seat. 

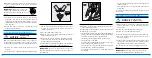
9.   Take the Top Tether and press the Top Tether adjuster 

(13)

 to stretch the strap (fig. 14).

fig. 13

fig. 14

fig. 15

(34)


Green tension indicator

fig. 16

34

44

45

Summary of Contents for BSFIX123

Page 1: ...BSFIX123 968B 01 PLUS 9 36 kg Apto para Suitable for Appropri MANUAL DE INSTRUCCIONES MANUAL DE INSTRU ES INSTRUCTIONS MANUAL...

Page 2: ...consulta no futuro Instrucciones de uso Sistema de retenci n infantil Grupo 1 2 3 De 9 a 36 kg de 9 meses a 12 a os aprox Instruction manual Child safety seat Group 1 2 3 From 9 to 36 kg from 9 moth...

Page 3: ...Por favor nunca utilice la silla de seguridad sin la funda y sin los protectores del arn s 10 La instalaci n del ni o con ropa de abrigo puede reducir la eficacia del sistema de retenci n 11 Proteja l...

Page 4: ...suele ser consecuencia de la acumulaci n de suciedad o cuerpos extra os Por mal funcionamiento se entiende Los cierres del broche salen s lo lentamente cuando se presiona el bot n rojo Los cierres de...

Page 5: ...irar el arn s de 5 puntos 1 Destense las cintas del arn s tirando de ellas de la parte pectoral de estas a la vez que presiona el bot n de ajuste del arn s 5 fig 2 2 Localice el conector de la cintas...

Page 6: ...loje las correas de los hombros de la silla de seguridad lo m ximo posible 2 Presione el bot n de ajuste del arn s a la vez que tira de la parte pectoral de las cintas del arn s para aflojarlas fig 2...

Page 7: ...a ayuda de los puntos de sujeci n ISOFIX y evitan el da o a la tapicer a del asiento Cuando no se utilicen deben retirarse y guardarse en un lugar seguro En veh culos con respaldo abatible es necesari...

Page 8: ...le sobre la cadera del ni o 7 Tire hacia abajo de los protectores para los hombros 3 para asegurarse de que est n bien colocados Para la seguridad del ni o antes de cada trayecto en coche compruebe qu...

Page 9: ...est n parcialmente verdes 8 Empuje la silla de seguridad hacia el respaldo ejerciendo una presi n firme y constante sobre ambos lados 8 Instalaci n del ni o en la silla Grupo 2 y 3 Solamente GRUPO 2 3...

Page 10: ...punto de anclaje 4 Tirando del regulador ISOFIX 7 vuelva a deslizar los brazos de bloqueo ISOFIX en la silla Grupo 2 y 3 ISOFIX y cintur n del veh culo 1 Desabroche la hebilla del cintur n del veh cul...

Page 11: ...de acidente 14 Verifique se a fivela est bem fechada porque em caso de emerg ncia a crian a pode ser libertada rapidamente 15 Os itens r gidos e as pe as de pl stico da cadeira de seguran a devem ser...

Page 12: ...e instala o para cada grupo GRUPO INSTALA O DA CADEIRA COLOCA O DA CRIAN A CAP TULO MANUAL 1 9 18 kg Isofix Top tether Arn s de 5 pontos 5 2 15 25 kg Isofix Cinto do ve culo 6 3 22 36 kg Isofix Cinto...

Page 13: ...rgente l quido para a loi a durante no m nimo uma hora Enxague a fivela e seque a 3 5 Retirar el arn s de 5 puntos 1 Liberte as cintas do arn s removendo as da parte peitoral do mesmo enquanto prime o...

Page 14: ...ias dos ombros s o ajustadas da seguinte forma 1 Solte as correias dos ombros da cadeira de seguran a o m ximo poss vel 2 Pressione o bot o de ajuste do arn s ao mesmo tempo que remove a parte peitora...

Page 15: ...estranhos 5 INSTALA O DA CADEIRA GRUPO 1 Apenas GRUPO 1 De 9 a 18 Kg AVISO 1 Certifique se de que o arn s de cinco pontos da cadeira de seguran a est instalado corretamente consulte a sec o 3 2 Siga o...

Page 16: ...ens o e ajuste adequados ao corpo da crian a fig 19 CUIDADO A parte do cinto abdominal 23 deve ser colocada o mais abaixo poss vel sobre a anca da crian a 7 Puxe os protetores de ombros para baixo 3 p...

Page 17: ...colo 23 deve ficar o mais abaixo poss vel sobre as ancas da crian a nos dois lados RECOMENDA O se o encosto ocultar a guia pode subir o apoio para a cabe a Depois poder ent o introduzir a correia dia...

Page 18: ...os bra os de bloqueio ISOFIX na cadeira Grupo 2 e 3 ISOFIX e cinto do ve culo 1 Desaperte a fivela do cinto do ve culo que fixa a cadeira de seguran a 2 Para soltarafixa o ISOFIX retire o reguladorIS...

Page 19: ...cts inside the car as these may injure the child in the event of an accident 14 Make sure that the buckle is correctly fastened so that the child can be quickly freed in case of emergency 15 The safet...

Page 20: ...CHILD INSTALLATION MANUAL CHAPTER 1 9 18 kg Isofix Top tether 5 point harness 5 2 15 25 kg Isofix Cintur n del veh culo 6 3 22 36 kg Isofix Cintur n del veh culo 6 3 GENERAL SEAT USE 3 1 How to use th...

Page 21: ...ss adjustment button 5 fig 2 2 Locate the harness strap connector 17 and unclip the harness straps freeing them from the connector then remove them by pulling them from the front of the seat fig 3 3 F...

Page 22: ...1 Loosen the shoulder straps of the safety seat as much as possible 2 Press the harness adjustment button while pulling the harness straps at the point where they cross the chest until they loosen fig...

Page 23: ...ion 3 2 Follow the steps described in section 3 1 3 Follow the steps described in points 3 10 4 Take the Top Tether and pass it over the safety seat 5 Place the safety seat on the vehicle seat facing...

Page 24: ...23 should be placed as low as possible on the child s hip 7 Pull down on the shoulder protectors 3 to ensure they are properly in place For the safety of the child the following checks should be made...

Page 25: ...ection of the belt easily You should then reset the headrest to the correct height as shown in point 3 11 TIP You can readjust the height of the vehicle headrest IMPORTANT The diagonal section of the...

Page 26: ...ring the safety seat 2 To free the ISOFIX anchoring pull the ISOFIX adjuster 7 while moving the seat backwards leaving the ISOFIX locking arms exposed The system unlock buttons will be visible 3 Press...

Page 27: ...Parque Empresarial Zuatzu Edificio Donosti 2 planta Oficina 3 20018 San Sebasti n Gipuzkoa Spain t 00 34 943 833 013 f 00 34 943 833 004...

Reviews: