background image

 17

2, Check and see if there are other bluetooth devices nearby interfering the signal and 

connection. 


Troubleshooting Guide 

If you are experiencing problems with your USB Turntable with Cassette Deck and Radio, 

check in the section below whether there are any quick and easy checks you can do that 

may help you solve the problem. If you cannot solve the problem by yourself, contact our 

after sales support line for advice. Do not attempt to open, repair or modify the equipment 

yourself.


Problems with sound


 Clockwise rotate the power/volume knob to increase the volume.   


 Make sure the unit’s power cord is connected to an appropriate electrical outlet.   


 Make sure the wall socket is switched on.   


 Make sure the function switch is set to your desired function: PHONO, USB/SD, 

TUNER, PHONO/AUX.   


 When playing records, make sure you’ve selected    correct speed (33, 45, 78 rpm).   


 When playing a cassette, make sure it is properly inserted.   

 When playing a CD ,make sure the CD is dealt face up . 


 When playing a CD via the AUX IN connection, make sure the cable is firmly connected, 

all controls on the CD player are properly set, the disc tray is closed and the disc is 

clean and undamaged.   


 When playing music from USB device (or SD/MMC card), make sure the memory device 

is properly inserted in USB port (SD/MMC card slot) and correct MODE is selected.   

Problems with radio reception


 Make sure you are in an area that can receive signals for your selected radio station.   


 If AM reception is weak, rotate or reposition the equipment to improve reception.   


 If FM reception is weak, try the following to improve reception:   


  Completely unravel the wire aerial at the back of the cabinet.   


  Slightly move the wire aerial for better reception.   


  If none of these measures improve stereo reception, try the same station on the FM 

Summary of Contents for TR-18CD

Page 1: ...1 CLASSICAL TURNTABLE WITH AM FM RADIO CD BT CASSETTE RECORDER USB SD SLOT MODEL TR 18CD Operating Instruction Manual ...

Page 2: ...ves or other apparatus including amplifiers that produce heat 8 Protect the power cord from being walked on or kinked in particular where the plug is fitted and at the point where it exits from the apparatus 9 Only use attachments accessories specified by the manufacturer 10 Unplug this apparatus during lightning storms or when unused for long periods of time 11 Refer all servicing to qualified se...

Page 3: ...ing the set be sure to first disconnect the power cord UNPACKING AND SET UP Carefully remove the unit from the display carton and remove all packing material from the unit Unwind the AC power cord and extend it to its full length Unwind the FM Antenna wire and extend it to its full length Place the unit on a stable level surface convenient to an AC outlet out of Direct sunlight and away from sourc...

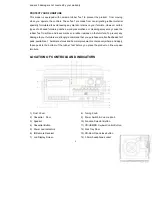
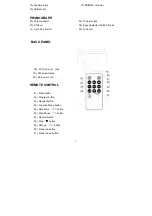
Page 4: ... or a rubber residue on the furniture To prevent any damage to your furniture we strongly recommend that you purchase small self adhesive felt pads available at hardware stores and home improvement centers everywhere and apply these pads to the bottom of the rubber feet before you place the product on fine wooden furniture LOCATION OF CONTROLS AND INDICATORS 1 Dust Cover 2 Cassetter Door 3 Speaker...

Page 5: ...ck 34 Speed selector 33 45 78 rpm 35 Tone arm BACK PANEL 18 RCA Line out jack 19 FM wire antenna 20 AC power cord REMOTE CONTROL 41 Mute button 42 Program button 43 Repeat button 44 Function Mode button 45 Skip down button 46 Play Pause button 47 Record button 48 Stop button 49 Skip up button 50 Folder up button 51 Folder down button ...

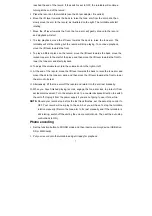
Page 6: ...ntenna If reception is weak slightly rotate or reposition the unit to improve AM reception 8 FM reception the receiver has a built in FM wire antenna hanging at the rear cabinet For best reception completely unravel and extend this wire 9 When you have finished listening to the radio turn the volume knob in a counterclockwise direction to switch the unit off Unplug it from the power supply if you ...

Page 7: ...level turn the volume knob to the right or left 11 At the end of the record move the lift lever towards the back to raise the tone arm and move it back to the tone arm park and then move the lift lever towards the front to lower the arm onto its rest 12 Alternatively lift the tone arm off the record and return it to the arm rest manually 13 When you have finished playing records engage the tone ar...

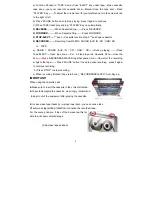
Page 8: ...ck of the record During encoding the USB or SD icon will be flashing on the display 7 To finish encoding press the stop button The display will show END and return to PHONO mode NOTE The recording speed is 1 1 Recording will take as long as playing the record The recording format is preset at MP3 bit rate 128 kbps Cassette Operation 1 Cassetter Button Indicators 2 Cassetter Button Control a RECORD...

Page 9: ...g playing Press Tape EJECT Open tape door Put a blank tape into Cassette Dock close the door Press RECORDER PLAYER together same time Now start the recording songs to the tape Press PAUSE button if need to pause recording press it again to continue recording b Press STOP to stop recording c When recording finished Tape is full end RECORDER PLAYER Auto Key up IMPORTANT When using the cassette deck ...

Page 10: ...op button The display will show END and return to TAPE AUX mode NOTE The recording format is preset at MP3 bit rate 128 kbps The recording speed is 1 1 Recording will take as long as playing the record CD Operation 1 Turn the volume knob clockwise to turn the equipment on 2 Press the CD Rom switch then the disk tray door opens 3 Place the CD face up inside making sure it is fully placed Then press...

Page 11: ... card The system is able to decode and playback all MP3 WMA files stored in the memory media connected to the USB port or SD MMC card slot 1 Turn the volume knob clockwise to turn the equipment on 2 Following the illustration below insert a USB device face up into the USB port making sure it is fully inserted Alternatively insert a memory card in the direction of the arrow as shown on the label ne...

Page 12: ...old this button to one All repatedly Important notes The system can detect and read files in MP3 WMA format only via the USB port or SD card slot You can connect an MP3 player to the system via the USB socket however some MP3 players may not be able to play via the USB socket This is due to variances in the MP3 encoding format it is not a malfunction of the system There are numerous USB and SD dev...

Page 13: ...vice and SD MMC card then select USB SD mode as described previously 2 Press the record REC button during playback of the track you want to copy ONE will be flashing on the display Press the record REC button again to confirm 3 The USB or SD icon will be flashing on the display while the system is copying the file 4 Once the file has been copied the unit will stop playback automatically END will b...

Page 14: ...om USB to SD or vice versa Deleting files from the USB device SD card The system is able to erase files stored on the USB drive or SD card You can delete a single file track a folder of files tracks or all files tracks on the storage medium Deleting a single file track 1 Insert the USB storage device or SD card then select USB SD mode as described previously 2 Press the delete DEL button during th...

Page 15: ...g the delete DEL button will completely delete all files tracks on the USB device or SD card Removing the USB device SD card First move the function selector to another mode tuner phono tape then turn the volume knob counterclockwise to turn off the power To remove a USB device pull it out of the USB port To remove a memory card press the memory card inwards and then release it The card will be re...

Page 16: ...fter a few seconds During encoding the USB or SD icon will be flashing on the display 5 To finish encoding press the stop button The display will show END and return to PHONO AUX mode NOTE The recording speed is 1 1 Recording will take as long as playing the CD or other auxiliary input The recording format is preset at MP3 bit rate 128 kbps Bluetooth Operation 1 Turn the volume knob clockwise to t...

Page 17: ...n playing records make sure you ve selected correct speed 33 45 78 rpm When playing a cassette make sure it is properly inserted When playing a CD make sure the CD is dealt face up When playing a CD via the AUX IN connection make sure the cable is firmly connected all controls on the CD player are properly set the disc tray is closed and the disc is clean and undamaged When playing music from USB ...

Page 18: ... the instructions may cause harmful interference to radio communications However there is no guarantee that interference will not occur in a particular installation If this equipment does cause harmful interference to radio or television reception which can be determined by turning the equipment off and on the user is encouraged to try to correct the interference by one or more of the following me...

Page 19: ...n compliance with FCC s RF Exposure guidelines This equipment should be installed and operated with minimum distance of 20cm the radiator your body This device and its antenna s must not be co located or operation in conjunction with any other antenna or transmitter ...

Reviews: