


7
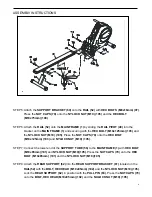
ASSEMBLY INSTRUCTIONS
NOTE:
Be careful not to damage the
PULSE SENSOR WIRES (73,74)
while doing assembly
STEP 8 to STEP 10.
STEP 9: Attach the
HANDRAIL (70)
onto the
SEAT CARRIAGE (64)
with
BUTTON HEAD BOLTS
(M8x12mm) (114)
.
STEP 10: Attach the
SEAT (68)
onto the
SEAT CARRIAGE (64)
with the
BOLT, HEX HEAD
(M6x1x15mm) (95)
. Attach the
BACK CUSHION (69)
onto the
SEAT CARRIAGE (64)
with
HEX
HEAD BOLTS (M6x1x30mm) (96)
.
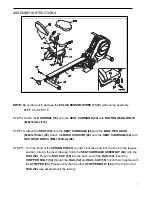
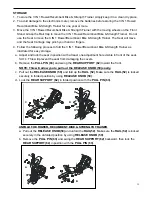
STEP 11: Turn the knob of the
SPRING PIN (67)
counter-clockwise and lock the knob in the release
position, refer to the inset drawing. Slide the
SEAT CARRIAGE ASSEMBLY (64)
onto the
RAIL (52)
. Press the
RAIL CAP (55)
into the back end of the
RAIL (52)
. Insert the
STOPPER BOLT (54)
through the
RAIL (52)
and
RAIL CAP (55)
to bolt them together with
the
STOPPER (53)
. Please verify that the other
STOPPER BOLT (54)
at the front end of
RAIL (52)
was assembled at the factory.
Summary of Contents for 3 IN 1 ROWER
Page 20: ...20...


