23
Multimedia LCD Projector
E
n
g
li
s
h
Installation
Setting Up the Projector
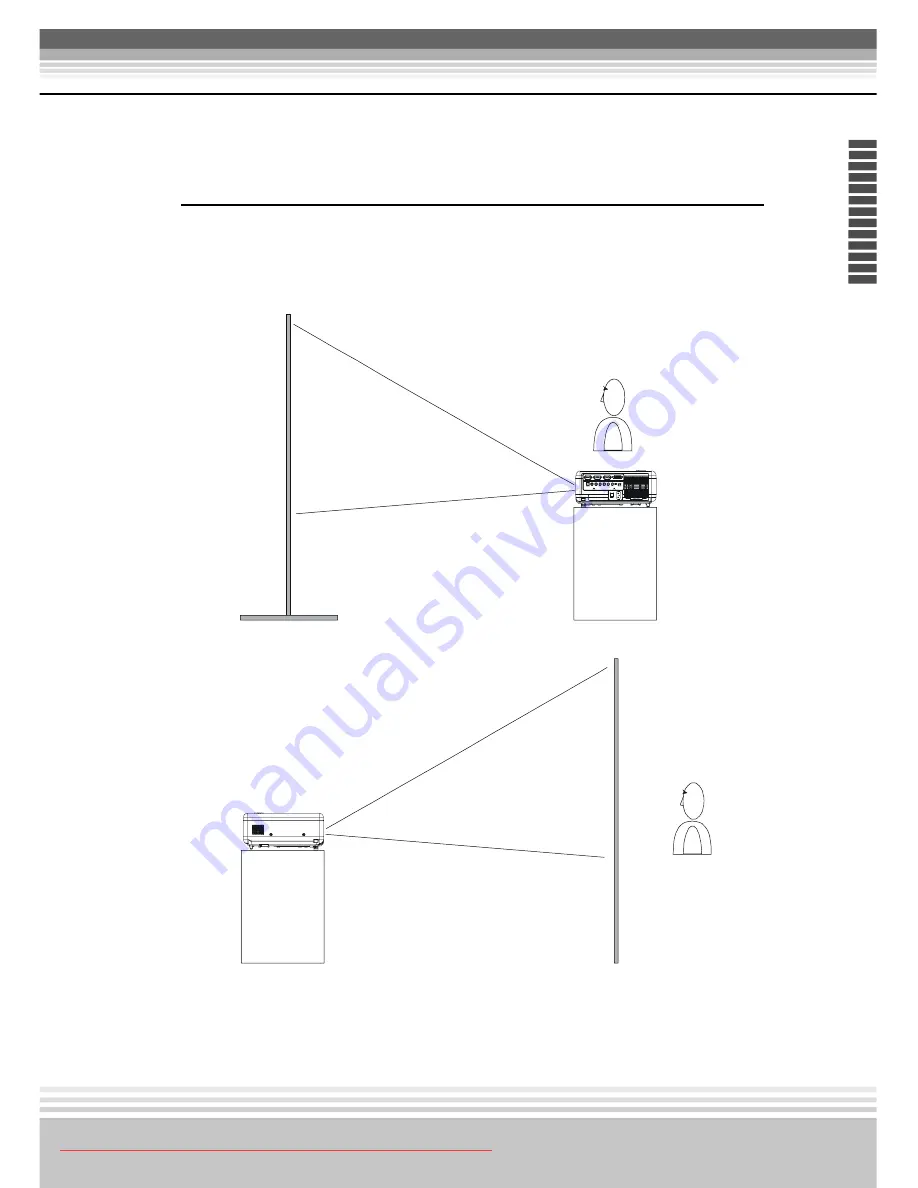
The projector supports the following four different projection methods
* Front projection
* Rear
Downloaded From projector-manual.com Boxlight Manuals
Page 1: ...for future reference Projector Feature 1 Business Home theater projector 2 Support P scan 3 2 pull down 3 Intelligent controlling fan system 4 Two way keystone function horizontal vertical 5 Auto cei...
Page 2: ...mes and Function of Each Part Main Unit Keypad Control Rear View IO Board Bottom View Remote Control Inserting the batteries Installation Setting Up the Projector Screen Size and Projection Distance A...
Page 3: ...rning on the Projector Adjusting the screen image Turning off the power Function of Menu OSD Keypad operating Computer mode Video Mode Cleaning the Projector Cleaning the Lens Cleaning the Air filter...
Page 4: ...possibly in personal injury or physical damage Typical Symbols This symbol indicates an additional warning including cautions An illustration is provided to clarify the contents for example the illus...
Page 5: ...not install this projector on an unstable surface such as a wobbly stand or incline because this could result in the projector falling and causing injury Do not open the cabinet Never open the cabinet...
Page 6: ...tainer containing liquid Do not place flower vases flowerpots cups cosmetics liquids such as water etc on top of this projector Do not use any power cable except those supplied with the projector The...
Page 7: ...the projector Care and maintenance For safety purposes disconnect the power plug from the power outlet before starting the care and maintenance of this projector Battery usage Replace the batteries w...
Page 8: ...ical shock Do not touch the power plug with wet hands this could result in electrical shock When disconnecting the power plug do not pull on the power cord This could damage the power cord and cause f...
Page 9: ...k into the lens while the projector is on Name card Location of product safety labels Safety labels are used on or within the projector to alert you to items or areas requiring your attention Download...
Page 10: ...ng the Package Contents Projector with Lens cover Remote Control included battery Power Cord S Video Audio Video Cable Computer cable Speaker Cable Filter Sponge User s Manual included CD Downloaded F...
Page 11: ...ntents 1 Remote control Type 2 with remote mouse and Laser point function 2 USB Mouse support type 2 remote control 3 DVI Cable 4 RGB DVI Adapter 5 YPbPr RGB Cable 6 Carring Bag 7 Filter Sponge Downlo...
Page 12: ...Focus ring 1 Zoom ring Outlet ventilation Part Names and Function Main Unit 1 Zoom Ring Use the Zoom Ring to adjust the size of the projected image Rotate the Zoom Ring until the image is the desired...
Page 13: ...eing drawn into projector Remove the Filter cover to clean the air filter 5 Front Rear adjustable foot Extend and retract to adjust the projection angle 6 Foot adjuster button Lock unlock the adjustab...
Page 14: ...eration mode Standby mode Cooling down mode 2 INPUT Computer source Selects between RGB input source Computer 1 Computer 2 RGB or Computer 2 YPbPr DVI AV S Video Component Video YcbCr 3 Blank Blanks t...
Page 15: ...sting the function of OSD menu item 7 Keystone Adjusts the vertical keystone with menu right menu left 8 Power indicator Lights on or flashes to indicate the operating status of the projector See Page...
Page 16: ...rm the video source 3 Monitor out connector Connect an external monitor to this connection view the computer 2 input C ontrol R S 232C M oni torO ut C om put er2 Y PbPr C om put er1 D V I Y C b C r V...
Page 17: ...from a video source 7 Audio out connector Connecting to an external speaker system 8 Audio in1 DVI Stereo mini jack for PC input 9 USB mouse connector Connects a USB mouse cable to a computer to cont...
Page 18: ...r cover Prevents dust and other foregin particles from being drawn into the projector 3 Remote control Replace the remote control at the button of the projector K ey sto ne S till IN P U T B lan k Fro...
Page 19: ...orizontal and vertical keystone function 6 Still Keep the current image on the screen 7 Blank Hide the current image Become black screen 8 Auto Refresh the current image 9 Menu down Menu up Menu left...
Page 20: ...expose the remote control to water or moisture this could result in malfunction When the remote control will not be used for an extened period remove the batteries Replace the batteries when remote co...
Page 21: ...the horizontal keystone function 9 Volume up down Sound louder or lower 10 Computer source Selects between RGB input source computer1 computer2 RGB computer2 Y Pb Pr DVI 11 Video source Select betwee...
Page 22: ...result in malfunction When the remote control will not be used for an extened period remove the batteries Replace the batteries when remote control operation becomes sluggish or unresponsive Do not p...
Page 23: ...ia LCD Projector Engli sh Installation Setting Up the Projector The projector supports the following four different projection methods Front projection Rear Downloaded From projector manual com Boxlig...
Page 24: ...h Rear ceiling projection Front ceiling projection A special method of installion is required in order to suspend the projector from the ceiling Please ask your dealer for details Downloaded From proj...
Page 25: ...fer to the table below to determine the image size at a given distance 1 XGA F 1 75 Image Size inch Distance M 30 1 17 1 40 40 1 55 1 86 50 1 93 2 32 60 2 32 2 77 80 3 08 3 69 100 3 84 4 60 200 7 66 9...
Page 26: ...rojector to fine tune the image position When the feet are adjusted it may cause the shape of the projected images to become distorted Use the keystone correction function to correct this distortion T...
Page 27: ...when moving the projector to prevent damage to the projector Caution The optional carry bag is intended to protect the projector from dust and scratches on the surface of the cabinet It is not designe...
Page 28: ...and connect the other end of the terminal where the monitor cable is disconnected from the computer 1 3 If needed connect the monitor cable of the computer monitor to the projector s Computer out 1 4...
Page 29: ...projector s computer 2 Y Pb Pr input port 1 2 Connect the other end of the project cable to the monitor out connection on the laptop 1 3 Tighten the screw on all connectors 2 Connect the audio cable i...
Page 30: ...rt 1 2 Disconnect the monitor cable from the computer and connect the other end of the terminal where the monitor cable is discon nected from the computer 1 3 Tighten the screw on all connectors 2 Con...
Page 31: ...use driver installed 1 Insert the end of the USB Cable B Type to the projector s USB port 2 Connect the end of the USB Cable A type to the computer s USB port 3 When the projector and computer are tur...
Page 32: ...and red RCA connect on the projector Connect the yellow RCA plug at one end of the video stereo audio cable to the yellow video jack Connect the other yellow RCA plug to the video out jack on the vid...
Page 33: ...eo or Y Cb Cr input connect the video stereo audio cable to the red and white R and L jack on the projector Insert the red RCA plug to the right channel and white RCA plug to the left channel Video B...
Page 34: ...e projector and all components connected to the projector 2 Remove the lens cover 3 Connect the power cord to the projector 4 Turn on the power switch 5 Press the button on the control panel or POWER...
Page 35: ...ress the VIDEO PC button on the control panel or the Computer Video buttons on the remote controller to select the appropriate source 8 Using the zoom ring to adjust the screen size 9 Using the focus...
Page 36: ...adjustor to adjust the image 2 Adjusting the image height Extend or retract the front adjustable foot to adjust the height of the image 3 Correcting Keystone Distortion Using the Keystone button on th...
Page 37: ...ond to any control panel or remote control buttons Caution Do not set the power switch to off or unplug the projector during the cool down sequence Not allowing the lamp to cool properly will greatly...
Page 38: ...ally adjusts the setting to match the current input 6 Up Down arrow button used to navigate through the OSD Menus 7 Right Left arrow button used to select and adjust OSD Menu functions and Volume 8 ES...
Page 39: ...trast 64 63 Adjusts the difference between light and dark areas of the image C olor Temp Adjusts the color temperature of the image 6500K 7300K 9300K User Sets color temperature to 6500K Sets color te...
Page 40: ...IO Volume 0 31 A djusts the volume Base 8 7 A djusts the base tone Treble 8 7 A djusts the treble tone M ute O n O ff M utes the volume on off _ _ _ Volume 12 base 12 treble 12 mute off on Downloaded...
Page 41: ...127 Move the image position vertically Phase 128 127 Set the synchronization polarity Frequency 1294 1394 Set the horizontal scanning frequency Keystone V 128 127 Corrects vertical keystone distortio...
Page 42: ...mputer 1 computer 2 RGB computer2 Y Pb Pr DVI video s video Y Pb Pr zoom pan execute still off on blank off on reset all execute language English select source execute Computer 2 Mode RGB resize 4 3 D...
Page 43: ...cute Enlarge or reduce the size of the image pan an image to view images that are larger than the display area Still O n off Freezes the current image on the screen Blank O n off Hides the image displ...
Page 44: ...ition PIP source AV S YPbPr Selects the PIP input source PIP brightness 64 63 Adjusts the brightness of the PIP image PIP contract 64 63 Adjusts the difference between light and dark areas of PIP imag...
Page 45: ...when the projector is mounted upside down Rear Excute Inverts the image horizontally used when projecting onto a rear projection screen Celing and Rear Excute Inverts the image horizontally and vertic...
Page 46: ...int Color Temp Adjusts the color temperature of the image 6500K 7300K 9300K User Sets color temperature to 6500K Sets color temperature 7300K Sets color temperature 9300K Enable the separate User colo...
Page 47: ...AUDIO Volume 0 31 Adjusts the volume Base 8 7 Adjusts the base tone Treble 8 7 Adjusts the treble tone Mute On Off Mutes the volume on off _ _ _ Volume 12 base 12 treble 12 mute off on Downloaded From...
Page 48: ...8 127 Move the image position vertically Phase 128 127 Set the synchronization polarity Frequency 1294 1394 Set the horizontal scanning frequency Keystone V 128 127 Corrects vertical keystone distorti...
Page 49: ...mputer 1 computer 2 RGB computer2 Y Pb Pr DVI video s video Y Pb Pr zoom pan execute still off on blank off on reset all execute language English select source execute Computer 2 Mode RGB resize 4 3 D...
Page 50: ...orarily enlarge a portion of the image and view portions of the image that are not visible in the display area S till O n off Freezes the current image on the screen Blank O n off Hides the image disp...
Page 51: ...when the projector is mounted upside down Rear Excute Inverts the image horizontally used when projecting onto a rear projection screen Celing and Rear Excute Inverts the image horizontally and vertic...
Page 52: ...soft cloth ensoure the case is complete dry before turning the projector back on Cleaning the lens Use a commercially available air blower or use a lens cleaning paper and lens cleaner approved for us...
Page 53: ...prevent dust from entering the projector Use a vacuum to remove the dust from the outside of the air filter Do not operate the projector with the air filter removed B Clean the air filter every 100 h...
Page 54: ...mp 1 Turn over the projector Loosen the screw and remove the lamp cover 2 Loosen 2 screw of the lamp and pull out the lamp 3 Replace the lamp with a new one and tighten the 2 screws back into position...
Page 55: ...off Correct the over temp condition immediately 1 Check that the ventilation slots are free from obstructions 2 If the condition persists contact your dealer 3 Check the cleanliness of the air filter...
Page 56: ...A 60 640X400 VGA text 720X400 VESA 720X350 VESA 60 72 75 85 640X480 SVGA 56 60 72 75 85 800X600 XGA 60 70 75 85 1024X768 SXGA 60 70 75 1280X1024 TV 480i NTSC 60 TV 575i PAL 50 SDTV 480p 60 HDTV 720p 6...
Page 57: ...ual F 1 75 2 10 f 26 7 32 0mm 30 260 1 25 8 8m 4 1 28 9 Typical 85 image center to corner 6400 K 6800K Horizontat 15 100kHz V syns 43 120Hz NTSC PAL SECAM HDTV 1080i 720P 480P SXGA XGA VGA MAC Compute...
Page 58: ...r to any authorized Boxlight service center provided and the Product must be accompanied by a written letter explaining the problem and which includes i proof of date of purchase ii the dealer s name...
Page 59: ...HER IN CONTRACT IN TORT UNDER ANY WARRANTY IN NEGLIGENCE OR OTHERWISE SHALL NOT EXCEED THE RETURN OF THE AMOUNT OF THE PURCHASE PRICE PAID BY PURCHASER AND UNDER NO CIRCUMSTANCES SHALL BOXLIGHT BE LIA...