background image

43

APPENDIX

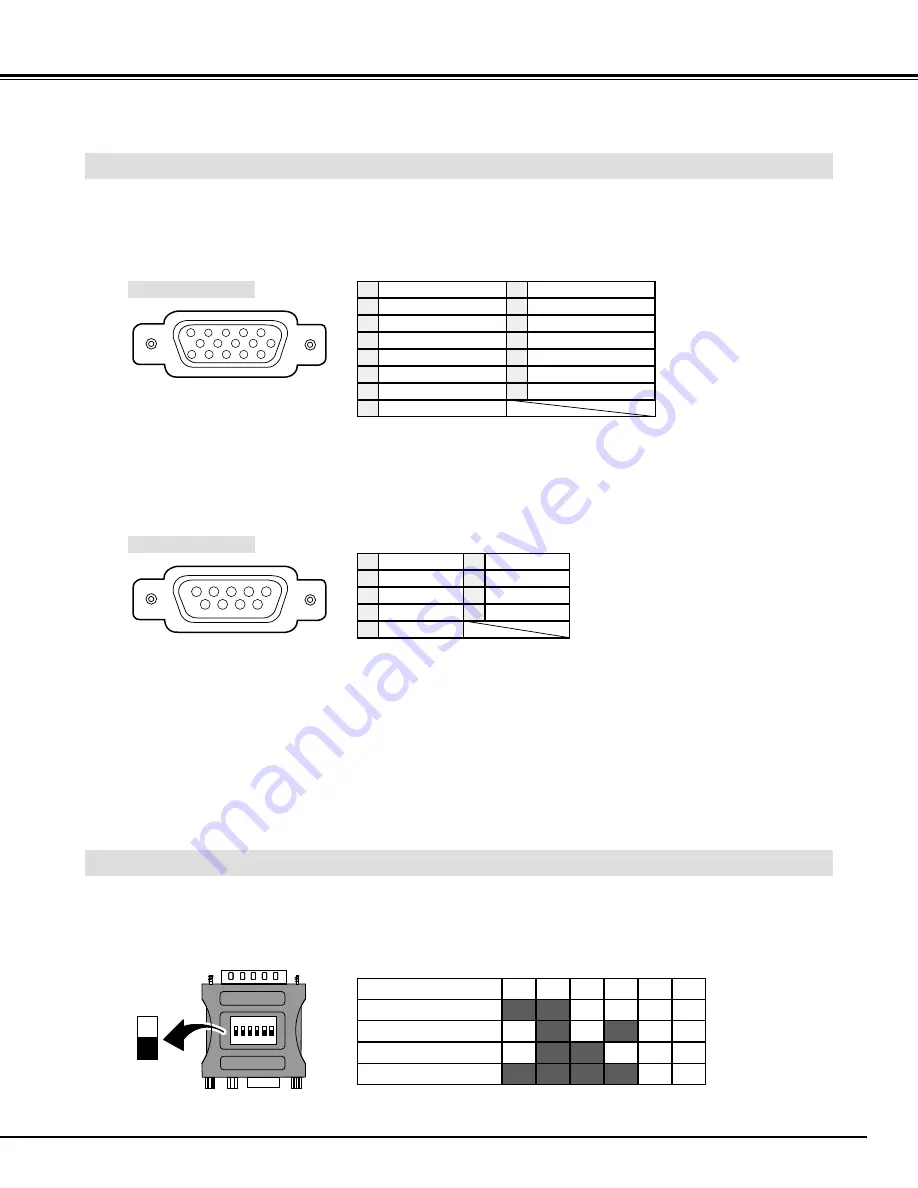
CONFIGURATIONS OF TERMINALS

RGB TERMINAL

Terminal : HDB15-PIN 
Connect the display output terminal of computer to this terminal with VGA Cable (not supplied).  When connecting the
Macintosh computer, the MAC Adapter (not supplied) is required.

5

1

2

3

4

10

9

6

7

8

15

14

13

11

12

Red Input

Ground (Horiz.sync.)

Green Input

Sense 2

Blue Input

Ground (Red)

Ground (Green)

Ground (Blue)

1

5

2

4

3

6

7

8

No Connect

Horiz. sync.

Ground (Vert.sync.)

Sense 1

Sense 0

Vert. sync.

Reserved

9

13

10

12

11

14

15

Pin Configuration

SERIAL TERMINAL

Terminal : HDB9-PIN 
Connect the serial port of computer to this terminal with Serial Cable (not supplied).

3

5

4

2

1

7

9

8

6

No Connect

Ground

R x D

No Connect

T x D

1

5

2

4

3

No Connect

RTS

No Connect

CTS

6

7

9

8

Pin Configuration

MAC ADAPTER (NOT SUPPLIED)

Set Slide Switches as shown in the table below depending on RESOLUTION MODE that you want to use before
you turn-on projector and computer.

ON

1

DIP

ON

OFF

2 3 4 5 6

13” MODE (640 x 480)

16” MODE (832 x 624)

19” MODE (1024 x 768)

21” MODE (1152 x 870)

ON

OFF

OFF

ON

ON

ON

ON

ON

OFF

OFF

ON

ON

OFF

ON

OFF

ON

OFF

OFF

OFF

OFF

OFF

OFF

OFF

OFF

1

2

3

4

5

6

Slide Switches (1 ~ 6)

Summary of Contents for Cinema 13HD

Page 1: ...DRAFT CINEMA 13HD HOME THEATER PROJECTOR USER S GUIDE...

Page 2: ...let If the problem still persists contact the sales dealer where you purchased the projector or the service center TO THE OWNER SAFETY PRECAUTIONS WARNING TO REDUCE THE RISK OF FIRE OR ELECTRIC SHOCK...

Page 3: ...abinet slots as they may touch dangerous voltage points or short out parts that could result in a fire or electric shock Never spill liquid of any kind on the projector This projector should be operat...

Page 4: ...e by one or more of the following measures Reorient or relocate the receiving antenna Increase the separation between the equipment and receiver Connect the equipment into an outlet on a circuit diffe...

Page 5: ...DJUSTMENT 29 PICTURE SCREEN ADJUSTMENT 30 SELECTING INPUT SOURCE 31 SELECTING VIDEO SYSTEM 32 PICTURE IMAGE ADJUSTMENT 33 IMAGE LEVEL SELECT 33 IMAGE LEVEL ADJUSTMENT 34 PICTURE SCREEN ADJUSTMENT 35 S...

Page 6: ...her settings Keystone Correction Positioning height of projector may result in distorted images being displayed in a trapezoid shape Keystone Correction solves this problem by digitally altering proje...

Page 7: ...his projector detects internal temperature and automatically controls operating power of Cooling Fans FRONT LAMP COVER ADJUSTABLE FEET AND FEET LOCK LATCHES This projector is equipped with Cooling Fan...

Page 8: ...efer to pages 11 13 for connection CAUTION For safety unplug the AC Power Cord when the appliance is not used CONNECTING AC POWER CORD Connect AC Power Cord supplied to projector The AC outlet must be...

Page 9: ...980 mm LENS SHIFT ADJUSTMENT Projection Lens can be moved up and down with Motor driven Lens Shift function This function makes it easy to provide the projected image where you want Refer to P 21 for...

Page 10: ...e Feet to prevent damage to Projection Lens and cabinet When this projector is not in use for an extended period put it into the case Dust Cover supplied with this projector ADJUSTABLE FEET Picture ti...

Page 11: ...projector has INPUT TERMINALS and OUTPUT TERMINALS on its side for connecting computers and video equipment Refer to the figure on pages 11 to 13 and connect properly Connect an external audio amplifi...

Page 12: ...this projector Video Cable RCA x 1 Video Cable RCA x 3 BNC x 1 BNC x 2 or BNC x 3 S VIDEO Cable Audio Cable RCA x 2 Speaker Cable Mini x 1 stereo NOTE When connecting projector AC Power Cords of both...

Page 13: ...HDB 15 pin Video Cable BNC x 5 MAC Adapter in the case of connecting Macintosh computer Audio Cables RCA x 2 or RCA x 1 Mini Plug mono Speaker Cable Mini Plug stereo Audio Cable RCA x 2 NOTE When conn...

Page 14: ...rned on And it flashes green in Power Management mode P37 This indicator is dim when projector is turned on And bright when projector is in stand by mode This indicator turns to yellow when the life o...

Page 15: ...lume P22 Used to reset to normal picture adjustments preset by the factory or to reset screen adjustment in True mode Digital Zoom mode or Keystone mode P21 28 30 33 Used to move Pointer or to adjust...

Page 16: ...image P22 AUTO PC ADJ BUTTON Use to operate Auto PC Adjustment function P24 VOLUME BUTTONS Used to adjust volume P22 D ZOOM BUTTONS Used to select Digital Zoom mode and resize image P30 KEYSTONE BUTT...

Page 17: ...Remote Control Connect Remote Control Unit to R C JACK with Remote Control Cable supplied Batteries installation is required when using as Wired Remote Control Unit INPUT 1 R C JACK Remote Control Ca...

Page 18: ...Refer to the following pages to operate each adjustment on ON SCREEN MENU 2 MOVING POINTER 3 SELECT ITEM Move the pointer see below or adjust the value of item by pressing POINT button s on Top Contro...

Page 19: ...TEM MENU Used to select system of selected video source Refer to P32 IMAGE ADJUST MENU Used to adjust picture image Contrast Brightness Color Tint White balance Sharpness Gamma Noise Reduction Progres...

Page 20: ...turned off Wait at least 5 minutes before turning on projector again When WARNING TEMP Indicator continues to flash follow procedures below 1 Turn MAIN ON OFF SWITCH to OFF and disconnect the AC Power...

Page 21: ...r 4 seconds Message disappears after 4 seconds Zoom Focus ZOOM ADJUSTMENT FOCUS ADJUSTMENT Message disappears after 4 seconds Lens shift LENS SHIFT ADJUSTMENT 1 Press LENS SHIFT button s on Top Contro...

Page 22: ...FUNCTION PICTURE FREEZE FUNCTION Message disappears after 4 seconds No show Press VOLUME button s on Top Control or on Remote Control Unit to adjust volume Volume dialog box appears on the screen for...

Page 23: ...nu Input 2 INPUT MENU INPUT Menu icon SELECTING COMPUTER SYSTEM This projector automatically tunes to most different types of computers based on VGA SVGA XGA or SXGA refer to COMPATIBLE COMPUTER SPECI...

Page 24: ...vided properly through this function manual adjustment is required Refer to page 25 26 Auto PC Adj PC ADJUST Menu icon 24 COMPUTER MODE SELECT COMPUTER SYSTEM MANUALLY SYSTEM Menu icon Displays system...

Page 25: ...he item that you want to adjust and then press SELECT button Adjustment dialog box will appear Press POINT LEFT RIGHT button to adjust the value Move the red frame icon to the item and press SELECT bu...

Page 26: ...l scale Adjustment of height of image Press POINT LEFT RIGHT button s for adjustments Vertical scale Press SELECT button at Display area icon and the Display area dialog box appears Reset Stored Close...

Page 27: ...768 XGA 13 1024 x 768 62 04 77 07 XGA 14 1024 x 768 61 00 75 70 XGA15 1024 x 768 35 522 86 96 Interlace 46 90 58 20 XGA 8 1024 x 768 47 00 58 30 XGA 9 1024 x 768 58 03 72 0 SXGA 1 1152 x 864 SXGA 2 12...

Page 28: ...reset on this projector Standard Picture level adjusted for the picture with fine tone Real User preset picture adjustment in IMAGE ADJUST Menu P29 IMAGE 1 4 IMAGE SELECT Menu icon IMAGE LEVEL SELECT...

Page 29: ...arker and POINT RIGHT button to adjust brighter From 0 to 63 Contrast Brightness Press either POINT LEFT button or POINT RIGHT button to obtain better balance of contrast From 0 to 15 Gamma 3 To store...

Page 30: ...de press any button except D ZOOM SELECT POINT NORMAL or AUTO PC ADJ button Provides image in its original size When the original image size is larger than screen size 1366 x 768 this projector enters...

Page 31: ...r Press POINT LEFT RIGHT button to move a red frame pointer to INPUT Menu icon Press POINT DOWN button to move a red arrow pointer to either Input 2 or Input 3 that you want to choose and then press S...

Page 32: ...SELECT button PAL SECAM NTSC NTSC4 43 PAL M PAL N Projector automatically detects incoming Video signal and adjusts itself to optimize its performance If projector cannot reproduce proper video image...

Page 33: ...t on this projector Standard Picture level adjusted for the picture with fine tone Cinema User preset picture adjustment in IMAGE ADJUST Menu P34 IMAGE 1 4 IMAGE SELECT Menu icon IMAGE LEVEL SELECT DI...

Page 34: ...E ADJUST Menu icon Press POINT LEFT RIGHT buttons to adjust value Press POINT LEFT button to lighten color and POINT RIGHT button to deeper color From 0 to 63 Press POINT LEFT button or POINT RIGHT bu...

Page 35: ...e the red frame to the function and press SELECT button SCREEN MENU SCREEN Menu icon Provides image to fit screen size 16 9 aspect ratio by expanding image width and height uniformly This function can...

Page 36: ...guage Language used in ON SCREEN MENU is selectable from among English German French Italian Spanish Portuguese Dutch Swedish and Japanese Display This function decides whether to display the On Scree...

Page 37: ...ter reset SETTING Remote control This projector has two different remote control codes the factory set normal code Code 1 and the secondary code Code 2 This switching function prevents the remote cont...

Page 38: ...n internal heat build up and adversely affect the life of projector Clean Air Filter following the steps below Clean Air Filters with brush or wash out the dust and particles Be sure to dry them out 3...

Page 39: ...placed When Lamp Replace Counter is reset LAMP REPLACE Indicator stops lighting Turn projector on press MENU button and ON SCREEN MENU will appear Press POINT LEFT RIGHT button s to move a red frame p...

Page 40: ...Y Indicator will light green again and projector may be turned on by pressing the power ON OFF button Check WARNING TEMP Indicator If this indicator flashes red projector cannot be turned on See TURNI...

Page 41: ...erating instructions contact the sales dealer where you purchased projector or the service center Give the model number and explain the difficulty We will advise you how to obtain service Remote Contr...

Page 42: ...ject to change without notice F 1 8 2 1 lens with f 48 4 mm 62 8 mm with motor zoom focus and shift 4 43 45 9 1 35 m 14 0 m 250 W Projection Lens Throw Distance Projection Lamp RCA Type Jacks R and L...

Page 43: ...d 9 13 10 12 11 14 15 Pin Configuration SERIAL TERMINAL Terminal HDB9 PIN Connect the serial port of computer to this terminal with Serial Cable not supplied 3 5 4 2 1 7 9 8 6 No Connect Ground R x D...

Page 44: ...duct WARRANTY LIMITATION AND EXCLUSION BOXLIGHT shall have no further obligation under the foregoing limited warranty if the Product has been damaged due to abuse misuse neglect accident unusual physi...

Reviews: