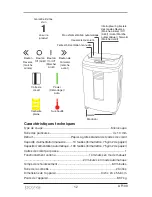
Boxis AutoShred User Manual Download Page 9

AF100

9

Troubleshooting

If you have a problem with your shredder, check the issues and resolutions 
below.  If you cannot solve the problem, contact our product support experts at 
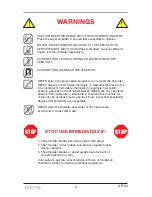
1-866-707-1854. Do not open the shredder head to attempt repair.   
It could expose you to electric shock and sharp blades. Doing this will  
void your warranty.

RESOLUTIONS

a. Make sure the shredder is plugged in.
b. Make sure the slide switch is in the Auto On position.
c. Make sure the unit has not overheated. See the OVERHEATING section.
d.  Make sure the bin is empty and properly inserted. The Yellow Bin Full LED 

will be illuminated if the bin is full.

1. Reverse the jammed paper by sliding to Manual Reverse.
2. Flip the safety cover up and remove jammed paper.
3. Close the safety cover.
4. Insert paper into the auto feed tray to resume normal operation.

If a paper jam is detected in the manual slot the shredder will stop running. 

Use the Manual Reverse position to dislodge the jammed paper.

a. Make sure the unit has not overheated.  See the OVERHEATING section.
b. Make sure the bin is not full.  See the BIN FULL section.

a.  Check that all staples are at the top of the page, furthest away from the 

shredder opening.

b.  Check that the paper is not folded or unsupported materials are in the auto 

feed tray.

c. Reduce the number of sheets in the tray.

ISSUE

Shredder will not 
turn on. 

Paper is jammed in 
the auto feed tray.

Paper is jammed in 
the manual entry.

Shredder suddenly 
stops while 
shredding. 

Shredder does not 
pull paper from the 
auto feed tray.

Summary of Contents for AutoShred

Page 1: ...Model AF100...

Page 2: ...ts Technical Specifications Features 3 Warnings 4 Installation Safety Instructions 5 Assembly 6 Operation 6 8 Maintenance 8 Troubleshooting 9 Warranty 10 Return Instructions Contact Info 10 PRODUCT SU...

Page 3: ...aper Credit Cards per pass 1 Continuous Operation 10 minutes manual 20 minutes auto feed Cool Down Time 60 minutes Bin Size 6 0 gallons 23 liters Unit Dimensions 13 58 x 9 45 x 21 89 inches 34 5 x 24...

Page 4: ...ntact with flammable chemicals for example nail polish acetone gasoline in the shredder basket NEVER use any petroleum based or flammable oils or lubricants in or around the machine as some oils can c...

Page 5: ...opening the shredder 6 This product should never be placed near a radiator or other heat source 7 Do not allow anything to rest on the power cord Do not place the power cord where people may walk on i...

Page 6: ...nts of paper particles found in the waste bin are normal due to product testing Setup 1 Place the machine on level ground and plug the power cord into any easily reached grounded electrical outlet 2 M...

Page 7: ...the auto feed tray Credit cards should be shred through the manual paper feed slot Do not insert additional paper into the auto feed tray when it is already in use Staples must be at the top of the p...

Page 8: ...lluminate This is normal If this happens you shredder will need approximately 60 minutes to cool Once the Overhead LED indicator is no longer illuminated you can continue shredding as normal OVERLOAD...

Page 9: ...iding to Manual Reverse 2 Flip the safety cover up and remove jammed paper 3 Close the safety cover 4 Insert paper into the auto feed tray to resume normal operation If a paper jam is detected in the...

Page 10: ...OF MERCHANTABILITY OR FITNESS FOR A PARTICULAR PURPOSE IS HEREBY LIMITED IN DURATION TO THE APPROPRIATE WARRANTY PERIOD SET FORTH ABOVE In no event shall the manufacturer be liable for any consequent...

Page 11: ...es techniques 12 Mises en garde 13 Directive d installation et consignes de s curit 14 Assemblage 15 Fonctionnement 15 17 Entretien 17 R solution de probl mes 18 Garantie 19 Instructions de retour et...

Page 12: ...utes en mode automatique Temps de refroidissement 60 minutes Taille de la corbeille 23 litres Dimensions de l appareil 34 5 x 24 x 55 6 cm Poids de l appareil 9 37 kg 1 an sur le produit Garantie limi...

Page 13: ...tact avec des substances inflammables par exemple vernis ongles ac tone essence dans le bac de la d chiqueteuse Ne JAMAIS utiliser de lubrifiants ou d huiles inflammables ou base de p trole dans ou au...

Page 14: ...irer la corbeille d chets Il est conseill de d brancher le cordon d alimentation avant d ouvrir la d chiqueteuse 6 Cet appareil ne doit jamais tre plac pr s d un radiateur ou de toute autre source de...

Page 15: ...l de trouver des r sidus de papier dans la corbeille Installation 1 Placez l appareil sur une surface plane et branchez le cordon d alimentation lectrique dans une prise de courant contact de mise la...

Page 16: ...ente d alimentation manuelle N ins rez pas d autres feuilles dans le bac d alimentation automatique pendant que la d chiqueteuse est en marche Les agrafes doivent se trouver en haut de la feuille le p...

Page 17: ...uit votre d chiqueteuse mettra environ 60 minutes se refroidir Lorsque le voyant DEL Overheat s teindra vous pourrez recommencer utiliser votre d chiqueteuse SURCHARGE Si une trop grande quantit de pa...

Page 18: ...interrupteur en position Manual Reverse 2 Soulevez le couvercle de s ret et retirez le papier coinc 3 Refermez le couvercle de s ret 4 Ins rez du papier dans le bac d alimentation automatique pour re...

Page 19: ...LA DUR E MENTIONN E CI DESSUS Le fabricant ne peut en aucun cas tre tenu responsable des dommages accessoires ou indirects attribuables cet appareil Cette garantie vous accorde des droits l gaux sp ci...

Page 20: ......

Reviews: