background image

21

Machine Shuts Off or Belt Stops During Workout

NO

Issue resolved

BEGIN HERE

Did Console stay 

on or turn off?

Is the issue still 

present?

If display reads 

+SAFETY KEY,

remove and reinsert the 

safety key

Display On

Display Off

Follow troubleshooting 

steps 

BeltsWontStayMoving.pdf

Issue resolved

NO

YES

Did House or 

Machine breaker 

trip?

HOUSE

MACHINE

Try another outlet. 

Machine will not work with 

some older GFI/AFI, or in 

houses with improperly 

grounded circuits. Consult 

an electrician if issue 

persists.

Reset breaker by pushing 

it in. Breaker is located by 

main power switch on 

front of machine.

Does the Circuit 

Breaker keep 

tripping?

Replace Circuit Breaker

YES

Summary of Contents for Treadmill 22

Page 1: ...ing Labels and Serial Number 3 1 Specifications 4 1 Grounding Instructions 5 1 Emergency Stop Procedure 6 1 Moving and Storing the Machine 7 1 Unfolding the Machine 9 1 Leveling the Machine 10 1 Treadmill Belt break in period 10 1 Connectivity 11 1 Maintenance 13 1 Cleaning 13 1 Adjusting the Belt Tension 14 1 Aligning the Walking Belt 14 1 Lubricating the Walking Belt 15 1 Maintenance Parts 16 1 ...

Page 2: ...s unplug the power cord from the wall outlet and wait 5 minutes before cleaning maintaining or repairing this machine Place the power cord in a secure location Read and understand the Part Replacement Procedure before working on the machine Failure to obey the instructions and safety warnings could cause injury to the service technician or bystanders Keep bystanders children and pets away from the...

Page 3: ...guards in place Lock out power before servicing WARNING HAZARDOUS VOLTAGE Contact may cause electrical shock or burn Turn off and lock out power before servicing REVISIONS ECO REVISION REV DESCRIPTION APPROVED DATE A DRAWING RELEASE B CHANGED SIZE 8 17 09 12745 12247 DLOVELY DLOVELY 120mm 30 5mm ts can crush and s in place ower before REVISIONS ECO REVISION REV DESCRIPTION APPROVED DATE TITLE 2 5 ...

Page 4: ...contact Customer Service if purchased in US Canada or your local distributor if purchased outside US Canada 177 7 cm 70 100 5 cm 39 6 215 8 cm 85 177 7 cm 70 112 9 cm 44 5 Power Requirements 120V 220V Operational Voltage 110 127V AC 60Hz 220V 240V AC 50Hz Operating Current 15 A 8 A Heart Rate Armband 1 Lithium Polymer battery not replaceable Maximum User Weight 181 kg 400 lbs Total Surface Area fo...

Page 5: ...nly until a properly grounded outlet can be installed by a qualified electrician The tab for the grounding screw must be connected to a permanent ground such as a properly grounded outlet box cover Whenever the adapter is used it must be held in place by a metal screw EarthingInstructions for a 220 240V AC system This product must be electrically earthed If a malfunction occurs correct earthing de...

Page 6: ...while the machine is in operation it will stop quickly which could cause the loss of balance and possible injury For safe storage of the machine and to prevent unsupervised operation of the machine always remove the Safety Key and disconnect the power cord from the wall outlet and the AC input Place the power cord in a secure location The Console will display Safety Key Disconnected To do a workou...

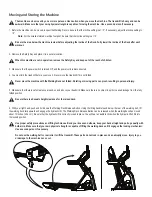
Page 7: ...ck not folded Rotating or moving parts can pinch resulting in personal injury 5 Make sure that there is safe clearance around on and above your treadmill Make sure there is no object to spill or cause blockage from the fully folded position Be sure there is adequate height clearance for the raised deck 6 With your right hand push and hold down the Walking Deck Release Button Using the lifting hand...

Page 8: ...his machine Do not move the machine with bare feet or only wearing socks Do not use the Console or lifted Walking Deck to pivot or move the tread mill Injury to you or damage to the machine can occur Keep clear of the movement path of the lifted Walking Deck 9 Grasping the Side Handrail and the front of the Upright safely roll the treadmill to the desired location The treadmill is heavy and can be...

Page 9: ...earance taking into consideration the height of the user and the maximum incline of the deck 2 Make sure there is no object on or around the treadmill to spill or cause blockage from the fully unfolded position 3 Slightly push the walking deck toward the console With your right hand push and hold down the Walking Deck Release Button and pull the walk ing deck away from the console Once the end of ...

Page 10: ...eadmill comes equipped with a durable high quality walking belt designed to provide many hours of reliable service The walking belt on a treadmill that has not been operated for a length of time either in factory packaging or after assembly can exhibit a thumping noise when started This is due to the belt taking on the curve of the front and rear rollers This is a common occurrence and does not in...

Page 11: ...le will display the Just for You screen The screen will prompt you to do your Fitness Assessment workout to get a custom workout You can go to the Learn tab for more information about your options Using the Bowflex JRNY App on your Portable Device Optional Though you can access your completed workout information from your console with your JRNY membership you can also access this information remot...

Page 12: ...ive cover if provided from the Heart Rate Sensor before use Bluetooth Audio in or out Your machine is able to play audio across a Bluetooth connection from your smart device through the treadmill speakers The machine can also stream audio from the console to your Bluetooth device such as Bluetooth headphones Note Bluetooth audio can only be streamed in one direction in or out at a time ...

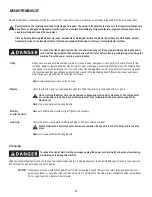
Page 13: ...alified service technician is used to flip the Walking Deck After each workout use a damp cloth to wipe your machine and Console free of moisture Note Avoid excessive moisture on the Console Weekly Check that the front and rear rollers operate smoothly Wipe the machine to remove dust dirt or grime Do not remove the Motor Cover as dangerous voltages and moving parts are present The components are s...

Page 14: ... and may need realign ment NOTICE Too much tension on the belt causes unnecessary friction and wears the belt motor and electronics Aligning the Walking Belt The walking belt should be centered on your treadmill at all times Running style and a non level surface can cause the belt to move off center Minor adjustments to the 2 bolts at the rear of the treadmill are neces sary when the belt is off c...

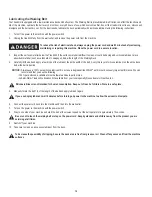
Page 15: ...layer of silicone lubricant on the entire deck below the belt is desired NOTICE Always use a 100 pure silicone lubricant Do not use a degreaser like WD 40 as this could seriously impact performance We can recommend that you use the following 100 pure silicone available at most hardware and auto parts stores Lube N Walk Treadmill Lubrication Kit available from your local specialty fitness dealer or...

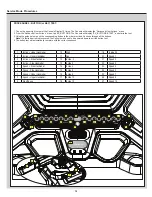
Page 16: ...ght Side Handlebar Left Right Upright Left Upright Left Base Shroud Right Base Shroud Base Assembly Power Cord Safety Key Upright Brace Left Console Mast Console Base Assembly Upper Handlebar Right Upper Handlebar Left Upright Brace Right Outer Junction Cover Right Outer Junction Cover Left Inner Junction Cover Left ...

Page 17: ...r Drive Belt Drive Motor A C Inlet Motor Control Board Side Foot Platform Fuse Power Switch Transport Wheel Deck Cushioner Incline Adjuster Leveler Walking Belt Motor Cover Deck Lift Shock Assembly Rear Roller Deck Release Button Rear Roller Cover Transport Handle Base Support ...

Page 18: ...u 2 From the Advanced User Actions menu tap WIFI SETUP 3 From the WIFI SETUP screen tap on CLEAR PREFERENCES 4 The Console will display a RESTART message Unplug the power to the machine The machine will reset when turned on PROCEDURE 4 CALIBRATE MCB 1 Tap on the upper right corner of the Console Display 10 times The Console will display the Advanced User Actions menu 2 From the Advanced User Actio...

Page 19: ... be powered down to exit the button test 4 The button test will automatically complete with the correct sequence CONFIRM SPEED CONFIRM INCLINE STOP PAUSE 20 14 11 8 5 3 2 6 1 Incline Upper Handlebar 10 Start 19 Incline 20 2 Incline Upper Handlebar 11 Fan 20 Speed 1 3 Incline Side Handlebar 12 Incline 5 21 Speed 2 4 Incline Side Handlebar 13 Incline 0 22 Speed 3 5 Speed Side Handlebar 14 Incline 3 ...

Page 20: ...S NO Check and tighten the hardware that secures the Deck the Deck Cushions and Base Frame Weldment Replace Deck if it persists Start a manual workout and advance the speed to 2 0 mph Is the noise present Is the noise a thump bump that happens once per revolution Replace Rear Roller YES UNDERNEATH NO Move around the machine and listen for location of noise Does noise come from Rear Roller Is noise...

Page 21: ...ow troubleshooting steps BeltsWontStayMoving pdf Issue resolved NO YES Did House or Machine breaker trip HOUSE MACHINE Try another outlet Machine will not work with some older GFI AFI or in houses with improperly grounded circuits Consult an electrician if issue persists Reset breaker by pushing it in Breaker is located by main power switch on front of machine Does the Circuit Breaker keep trippin...

Page 22: ...as the Motor moves slowly Replace Incline Motor Refer to Replace the Incline Motor procedure in the Service Manual and reseat all cable connec tions BEGIN HERE Is the issue still present YES Did the communications test pass Reset machine power and follow Service Mode Procedure 4 to calibrate the MCB YES Follow Service Mode Procedure 5 to test the incline buttons Replace I O cables Did the incline ...

Page 23: ... Owner s Manual instructions to correct the setting before beginning these steps SAFETY KEY is displayed Reinsert Safety Key and retest Machine working NO NO Contact Customer Care if inside US Canada or your local distributor if outside US Canada Follow Service Mode Procedure 2 to check firmware version and error codes Replace Safety Key Issue resolved YES Is Safety Key damaged ...

Page 24: ...date NO Is the issue still present YES Issue resolved Follow Service Mode Procedure 2 to check firmware version and error codes Contact Customer Care if inside US Canada or your local distributor if outside US Canada If Console will not light up follow Unit will not power on Troubleshooting Procedure If the units of measure are incorrect follow the Owner s Manual instructions to correct the settin...

Page 25: ... the troubleshooting Is the issue still present YES NO Replace I O Cables Issue resolved Issue resolved Is the issue still present NO YES Contact Customer Care if inside US Canada or your local distributor if outside US Canada If the Console powers up and the Start button beeps or causes the Display to change then the Console is NOT defective the Start button does not make a beep follow Service Mo...

Page 26: ...ff machine and wait 5 minutes Remove Motor and MCB Cover Verify Speed Sensor is properly aligned and check Sensor and wire for damage Disconnect machine power for 1 minute Follow Service Mode Procedure 3 to reset Console then Service Mode Procedure 4 to calibrate the MCB If the Console powers up and the Start button beeps or causes the Display to change then the Console is NOT defective Perform Se...

Page 27: ...if outside US Canada Issue resolved Run the Belt at low speed and attempt to stop the Belt with your foot Does Belt slip NO Align the Walking Belt Can Belt be aligned Adjust the Walking Belt tension Shut off machine and wait 5 minutes Remove Motor Cover Issue resolved Is the Drive Belt tight Is the issue still present Refer to Replace the Drive Belt procedure in the service manual to adjust the Dr...

Page 28: ...28 ELECTRICAL WIRING ...

Page 29: ...NK RED ACL ACN COM UP DOWN WHITE L G N FERRITE CHOKE EARTH GROUND FRAME 4 2 3 1 EARTH GROUND FRAME TACHOMETER MAGNET AND REED SWITCH SENSOR WHITE RED Incline Sensing TO CONSOLE WALK BELT FRONT PULLEY AND SHAFT EARTH GROUND FRAME EARTH GROUND FRAME GROUND TO FRAME TO CONSOLE ...

Page 30: ...es in the upper right corner of the Console Display The Console will display the Advanced User Actions menu 2 Tap on the Demo mode app option Note This is where Demo mode is activated and de activated 3 Tap on the Activate Demo mode option 4 Inspect the Console to be sure that Demo mode is active and running on the Console Display 5 Adjust the volume with the volume controls on the back of the Con...

Page 31: ...ement Procedure Skill Level Level I Low very little mechanical knowledge or exposure Level II Intermediate some experience with mechanical procedures Level III Advanced knowledgeable about mechanical procedures ...

Page 32: ...efore cleaning maintaining or repairing this machine Place the power cord in a secure location Read and understand the Part Replacement Procedure before working on the machine Failure to obey the instructions and safety warnings could cause injury to the service technician or bystanders Keep bystanders children and pets away from the product being serviced at all times Make sure that the repair is...

Page 33: ... Walk ing Belt Adjustment Bolts 3 Using a 6mm hex wrench on the side the belt should move away from rotate the Adjustment Bolt a 1 4 turn clock wise 4 Allow the Walking Belt to adjust to the new tension 5 Repeat steps 3 and 4 until the Walking Belt is centered 6 Final Inspection Inspect your machine to ensure that all hardware is tight and components are properly assembled Do not use until the mac...

Page 34: ...the wall outlet and wait 5 minutes before cleaning maintaining or repairing this machine Place the power cord in a secure location Read and understand the Part Replacement Procedure before working on the machine Failure to obey the instructions and safety warnings could cause injury to the service technician or bystanders Keep bystanders children and pets away from the product being serviced at al...

Page 35: ...s machine Place the power cord in a secure location 2 Using a 2 Phillips screwdriver remove the 5 screws indicated by ar rows that secure the Motor Cover and remove it of the machine see image to the right 3 Gently release the front snaps indicated by ovals that secure the Motor Cover and pivot it back toward the walking belt until it releases Remove from the machine Note Your machine may not matc...

Page 36: ... and the Incline Motor Potentiometer see below image from the Motor Control Board after noting their locations Note Be sure to note where all cables attach for re assembly Incline Motor Cables Incline Motor Potentiometer Cable Motor Control Board MCB ...

Page 37: ... HEAT SINK RED ACL ACN COM UP DOWN WHITE L G N FERRITE CHOKE EARTH GROUND FRAME 4 2 3 1 WHITE RED Incline Sensing TO CONSOLE EARTH GROUND FRAME EARTH GROUND FRAME GROUND TO FRAME TO CONSOLE To Motor To Speed Sensor MCB ...

Page 38: ...clearance for the machine Some components of the equipment can be heavy or awkward Enlist the service of a second person when you do maintenance steps involving these components Do not try to do heavy or awkward steps on your own 8 Tilt the machine onto the side with the safe clearance Do not grasp the Console or the Walking Belt to tilt the machine onto the side The Console could be damaged and t...

Page 39: ...e Display 10 times The Console will display the Advanced User Actions menu 15 From the Advanced User Actions menu tap CALIBRATE in the upper right corner of the Console Display The Console will shift to Calibrate mode 16 From the Calibrate menu tap CALIBRATE_MCB Be sure the area around the Treadmill is clear of all bystanders children and pets Be sure there is nothing on or under the Walking Belt ...

Page 40: ...om the wall outlet and wait 5 minutes before cleaning maintaining or repairing this machine Place the power cord in a secure location Read and understand the Part Replacement Procedure before working on the machine Failure to obey the instructions and safety warnings could cause injury to the service technician or bystanders Keep bystanders children and pets away from the product being serviced at...

Page 41: ... of the equipment always unplug the power cord from the wall outlet and wait 5 minutes before cleaning maintaining or repair ing this machine Place the power cord in a secure location 2 Remove the Right Base Shroud from the machine 3 Disconnect the Middle and Lower Input Output I O Cables Note Your machine may not match the images provided exactly Right Base Shroud ...

Page 42: ...Using a 2 Phillips screwdriver remove the 5 indicated screws that secure the Motor Cover Note To assist with re assembly of the Motor Cover the two front screws are short Motor Cover Motor Control Board MCB ...

Page 43: ...new Lower I O Cable into the Frame Assembly following route of the old Cable Note Do not crimp the Cables 7 Connect the new Lower I O Cable to the Motor Control Board in the proper location Note Do not crimp the Cable 8 Connect the new Lower and Upper Input Output I O Cables and push the Connection close to the Right Upright Lower Input Output I O Connector Lower Input Output I O Cable ...

Page 44: ... HEAT SINK RED ACL ACN COM UP DOWN WHITE L G N FERRITE CHOKE EARTH GROUND FRAME 4 2 3 1 WHITE RED Incline Sensing TO CONSOLE EARTH GROUND FRAME EARTH GROUND FRAME GROUND TO FRAME TO CONSOLE To Motor To Speed Sensor MCB ...

Page 45: ...Belt or near the Treadmill 14 The Console will display CALIBRATE_MCB USER CONFIRM Tap it and the calibration procedure starts Note The calibration procedure will begin by automatically moving the Walking Belt and adjusting the incline of the Walking Deck Be sure not to touch or allow anyone else to touch the machine while calibration is occurring 15 When calibration is complete the Console will di...

Page 46: ...ord from the wall outlet and wait 5 minutes before cleaning maintaining or repairing this machine Place the power cord in a secure location Read and understand the Part Replacement Procedure before working on the machine Failure to obey the instructions and safety warnings could cause injury to the service technician or bystanders Keep bystanders children and pets away from the product being servi...

Page 47: ...let and wait 5 minutes before cleaning maintaining or repair ing this machine Place the power cord in a secure location 2 Remove the Right Base Shroud from the machine 3 Disconnect the Middle and Lower Input Output I O Cables 4 Using a 2 Phillips screwdriver remove the 4 indicated screws by ar rows from Lower Junction Covers 5 Gently release the snaps indicated by ovals two on each side that secur...

Page 48: ... area 7 Using a 2 Phillips screwdriver remove the hardware indicated by an arrow that attaches the Right Outer Junction Cover Remove the Right Outer Junction Cover and place outside of the work area 8 Using some cable or string attach the upper connectors of the new Middle I O Cable to the lower connectors of the old Middle I O Cable Right Inner Junction Cover Right Outer Junction Cover ...

Page 49: ...49 9 Disconnect the Middle I O Cables from the Console Base Note To assist with selecting the correct cables they are the two that come from the Right Upright ...

Page 50: ...and feed the cables through the Right Upright 11 Remove the cable or string from the cables and properly dispose of the old Middle I O Cable 12 Connect the cables from the new Middle I O Cable 13 Re install all remaining parts that were removed in reverse order 14 Final Inspection Inspect your machine to ensure that all hardware is tight and components are properly assembled Do not use until the m...

Page 51: ...t and wait 5 minutes before cleaning maintaining or repairing this machine Place the power cord in a secure location Read and understand the Part Replacement Procedure before working on the machine Failure to obey the instructions and safety warnings could cause injury to the service technician or bystanders Keep bystanders children and pets away from the product being serviced at all times Make s...

Page 52: ...pair ing this machine Place the power cord in a secure location 2 Using a 2 Phillips screwdriver remove the 5 indicated screws that secure the Motor Cover Note To assist with re assembly of the Motor Cover the two front screws are short 3 Remove the connectors from the Motor Control Board after noting their locations Note Be sure to note where all cables attach for re assembly Note Your machine ma...

Page 53: ...screws indicated by ovals that attach the Motor Control Board MCB to the Frame 5 Remove the old Motor Control Board and install the new Motor Control Board Connect all the cables to the MCB in their proper locations Be sure not to crimp any cables MCB ...

Page 54: ... by flipping the power switch to ON 8 From the Power Up screen tap on the upper right corner of the Console Display 10 times The Console will display the Advanced User Actions menu 9 From the Advanced User Actions menu tap CALIBRATE in the upper right corner of the Console Display The Console will shift to Calibrate mode ...

Page 55: ... HEAT SINK RED ACL ACN COM UP DOWN WHITE L G N FERRITE CHOKE EARTH GROUND FRAME 4 2 3 1 WHITE RED Incline Sensing TO CONSOLE EARTH GROUND FRAME EARTH GROUND FRAME GROUND TO FRAME TO CONSOLE To Motor To Speed Sensor MCB ...

Page 56: ... the incline of the Walking Deck Be sure not to touch or allow anyone else to touch the machine while calibration is occurring 12 When calibration is complete the Console will display CALIBRATE MCB PASS 13 Tap EXIT in the upper right corner of the Display to exit the Calibrate Mode 14 Flip the power switch to OFF Calibration is now complete for the machine 15 Final Inspection Inspect your machine ...

Page 57: ...g this machine Place the power cord in a secure location Read and understand the Part Replacement Procedure before working on the machine Failure to obey the instructions and safety warnings could cause injury to the service technician or bystanders Keep bystanders children and pets away from the product being serviced at all times Make sure that the repair is done in an appropriate work space awa...

Page 58: ...d wait 5 minutes before cleaning maintaining or repair ing this machine Place the power cord in a secure location 2 Using a 2 Phillips screwdriver remove the 5 screws indicated by ar rows that secure the Motor Cover and remove it Note To assist with re assembly of the Motor Cover the two front screws are short Note Your machine may not match the images provided exactly Motor Cover Motor Cover Moto...

Page 59: ...with both arms Make sure that your own physical strength is capable of lifting the walking deck until it engages the locking mechanism Use a second person if necessary Do not use the walking belt or rear roller to lift the treadmill These parts do not lock in place and can abruptly move Injury to you or damage to the machine can occur 6 Make sure that the locking mechanism is engaged Carefully pul...

Page 60: ...e walking deck and move to the side of the machine Keep clear of the movement path of the walking deck 11 The hydraulic lift is set up to drop gradually Hold onto the walking deck until approximately 2 3 of the movement down Make sure that you use proper lifting technique bend your knees and keep your back straight Be aware that the walking deck can possibly drop quickly in the last part of the mo...

Page 61: ...r Left Motor Cover Shroud still attached to it from the Frame 16 Using a 5mm hex wrench from the outside and a 10mm wrench on the inside of the frame remove the hardware indicated by ovals below that secures the Speed Sensor Assembly Drive Pulley Zip Tie Motor Cover Shroud Outside Lower Left Motor Cover Shroud Outside Lower Left Motor Cover Shroud Inside Lower Left Speed Sensor Speed Sensor Speed ...

Page 62: ...ensor Magnet is beside the Speed Sensor With the Speed Sensor Magnet centered on the Speed Sensor fully tighten the hardware that attaches the Speed Sensor Be sure that the Magnet is centered after tightening 21 Cut the remaining Zip Ties that secure the Speed Sensor Cable 3 shown here 22 Remove the Speed Sensor Con nector from the Motor Control Board 23 Route the new Speed Sensor Cable along the ...

Page 63: ... HEAT SINK RED ACL ACN COM UP DOWN WHITE L G N FERRITE CHOKE EARTH GROUND FRAME 4 2 3 1 WHITE RED Incline Sensing TO CONSOLE EARTH GROUND FRAME EARTH GROUND FRAME GROUND TO FRAME TO CONSOLE To Motor To Speed Sensor MCB ...

Page 64: ...roud is attached to the Outside Lower Left Motor Cover Shroud 27 Place the Outside Top Left Motor Cover Shroud on top of the Outside Lower Left Motor Cover Shroud 28 Gently pivot the Inside Upper Left Motor Cover Shroud onto the Outside Top Left Motor Cover Shroud and loosely attach them together with the indicated self tapping screw 29 Using a 2 Phillips screwdriver loosely attach the Outside Upp...

Page 65: ...ge the hydraulic lift Be sure that the hydraulic lift is correctly locked in place You will hear an audible click when the hydraulic lift shifts into the locked position Use proper safety precautions and lifting techniques Bend your knees and elbows keep your back straight and pull up equally with both arms Make sure that your own physical strength is capable of lifting the walking deck until it e...

Page 66: ...from the fully unfolded position 38 Slightly push the walking deck forward toward the console and then push the Walking Deck Release Button until the locking tube releases and you can pull the walking deck away from the console Hold up the rear of the walking deck and move to the side of the machine Keep clear of the movement path of the walking deck 39 The hydraulic lift is set up to drop gradual...

Page 67: ...vot Cover to the Frame 43 Re install all remaining parts that were removed in reverse order 44 Final Inspection Inspect your machine to ensure that all hardware is tight and components are properly assembled Do not use until the machine has been fully assembled and inspected for correct performance in accordance with the Owner s Manual ...

Page 68: ...outlet and wait 5 minutes before cleaning maintaining or repairing this machine Place the power cord in a secure location Read and understand the Part Replacement Procedure before working on the machine Failure to obey the instructions and safety warnings could cause injury to the service technician or bystanders Keep bystanders children and pets away from the product being serviced at all times M...

Page 69: ...htly loose Note Be sure to record the number of turns of the Adjustment Bolt it takes to loosen it This will assist with reassembly 4 Make sure that there is safe clearance around on and above the treadmill Make sure there is no object to spill or cause blockage from the fully folded position Be sure there is adequate height clearance for the raised deck 5 Using the Deck Handle found below the rea...

Page 70: ...the walking deck and make sure that it does not move When you do this keep clear of movement path in case the treadmill lock is not engaged Do not lean against the treadmill when it is folded Do not put items on it that could cause it to become unstable or fall 7 Using a 2 Phillips screwdriver remove the 4 screws indicated by ar rows from the Deck Handle and place it aside 8 Using a 2 Phillips scr...

Page 71: ...the Right Inside Deck Shroud Remove it from the machine 10 Using a 2 Phillips screwdriver remove the 10 screws indicated by arrows that secure the Right Front and Right Rear Deck Suspensions to the Walking Deck Deck Shroud Right Inside Deck Suspension Right Rear Deck Suspension Right Front ...

Page 72: ...t Side Rail to the Walking Deck Note The Deck Release Shroud may need to be maneuvered to gain access to the rear screw 12 Using a 2 Phillips screwdriver remove the 5 screws indicated by arrows from the Outside Deck Shroud 13 Repeat the previous 4 Steps on the left side of the machine Walking Deck ...

Page 73: ... the side of the machine Keep clear of the movement path of the walking deck 17 The hydraulic lift is set up to drop gradually Hold onto the walking deck until approximately 2 3 of the movement down Make sure that you use proper lifting technique bend your knees and keep your back straight Be aware that the walking deck can possibly drop quickly in the last part of the movement 18 Using a 6mm hex ...

Page 74: ...icone available at most hardware and auto parts stores Lube N Walk Treadmill Lubrication Kit available from your local specialty fitness dealer or Nautilus Inc Silicone lubricant is not intended for human consumption Keep out of reach of children Store in a safe place 25 Manually rotate the belt 1 2 of the length of the belt and apply lubricant again If you used spray lubricant wait 5 minutes befo...

Page 75: ...reverse order 32 Final Inspection Inspect your machine to ensure that all hardware is tight and components are properly assembled Do not use until the machine has been fully assembled and inspected for correct performance in accordance with the Owner s Manual ...

Reviews: