background image

13

DEUTSCH

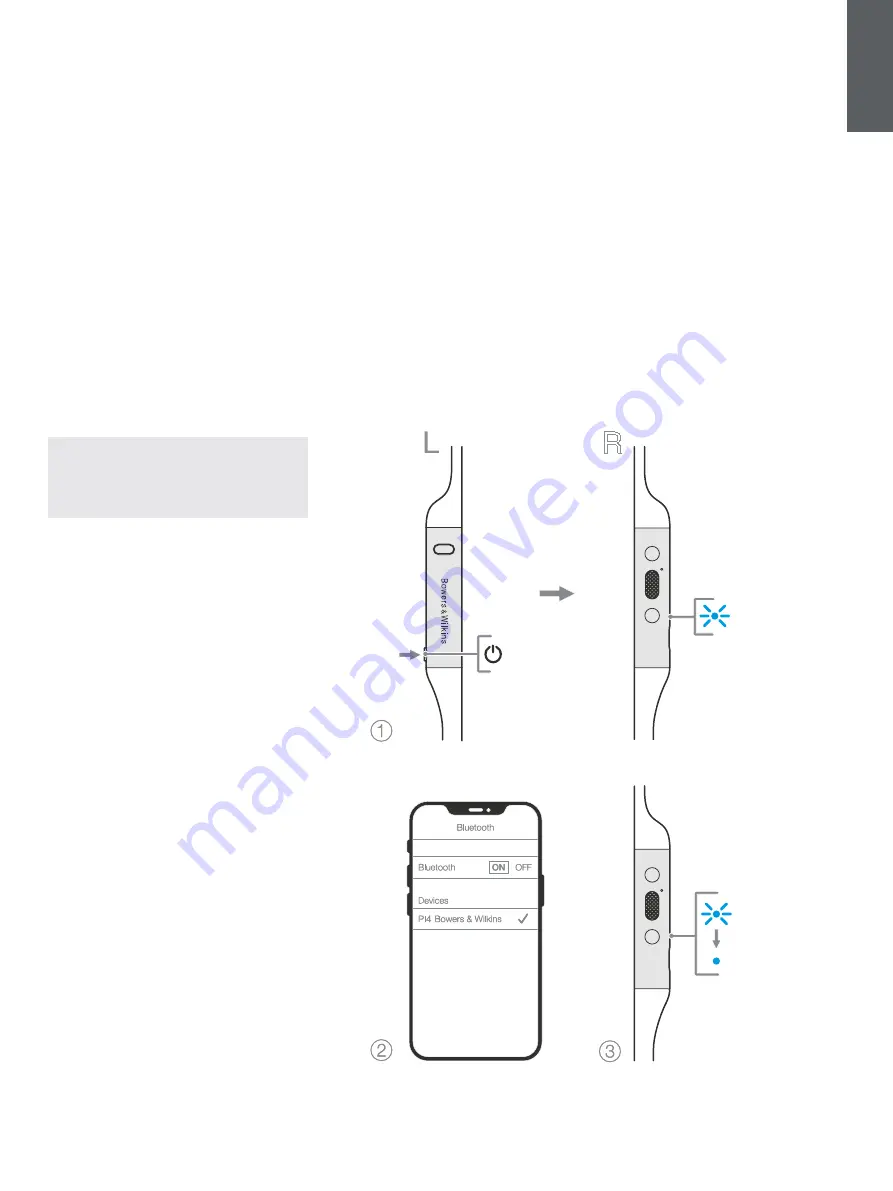
6. Bluetooth-Verbindung

6.1 Koppeln

Der PI4 dient zur kabellosen Audiowiedergabe 

von Bluetooth-Audiogeräten wie Smartphones, 

Tablets oder PCs. Dazu müssen Kopfhörer und 

Gerät (Quelle) zunächst gekoppelt werden (siehe 

Abbildung 6).

  1.   Wenn Sie Ihren Kopfhörer zum ersten Mal 

einschalten, wird der Bluetooth-Pairing-Modus 

aktiviert und die Anzeige blinkt blau. Wenn der 

Pairing-Modus nicht aktiviert ist, halten Sie 

die Power-Taste 5 Sekunden lang gedrückt. 

Lassen Sie los, wenn die Anzeige blau blinkt 

und ein akustisches Signal ertönt.

  2.   Stellen Sie sicher, dass die Bluetooth-Funktion 

auf dem Audiogerät aktiviert ist. Der PI4 wird in 

der Geräteliste angezeigt. Wählen Sie ihn zum 

Koppeln aus.

  3.   Die Anzeige blinkt blau, während die Kopplung 

läuft. Wenn die Kopplung erfolgreich ist, 

wechselt die Anzeige auf durchgehend blau 

und es Sie hören ein akustisches Signal.

Ihr Kopfhörer kann sich bis zu acht gepaarte 

Bluetooth-Geräte merken. Wiederholen Sie die 

obigen Schritte, um weitere Geräte zu koppeln.

Hinweis: Ihr Kopfhörer verlässt den Bluetooth-

Kopplungsmodus automatisch, wenn fünf 

Minuten lang keine Kopplung mit einem 

Gerät stattgefunden hat. Wenn die Kopplung 

fehlschlägt, blinkt die Anzeige schnell blau. Bitte 

versuchen Sie die Kopplung erneut.

6.2 Mehrere Bluetooth-Verbindungen

Der PI4 kann mit zwei Geräten gleichzeitig 

verbunden werden. Allerdings ist die 

Audiowiedergabe oder das Entgegennehmen von 

Anrufen nur jeweils von einem Gerät möglich.

So wechseln Sie zwischen zwei Geräten:

  1.   Halten Sie die Audiowiedergabe auf dem 

ersten Gerät an oder verwenden Sie die PI4-

Multifunktionstaste.

  2.   Wenn Sie nun Sie Audio vom zweiten Gerät 

wiedergeben, schaltet der Kopfhörer um.

Beim Streamen von Audio wird die Wiedergabe 

automatisch unterbrochen, wenn ein Anruf auf dem 

zweiten Gerät eingeht. Der Anruf wird automatisch 

an Ihren Kopfhörer weitergeleitet. Durch Beenden 

des Anrufs wird die Wiedergabe vom ersten Gerät an 

automatisch fortgesetzt.

6.3 Verbindung zu einem Gerät trennen

Sie können den PI4 schnell von einem Gerät 

trennen, indem Sie die Power-Taste zweimal kurz 

hintereinander drücken. Ein Signalton zeigt eine 

erfolgreiche Trennung an.

Alternativ können Sie die Verbindung mit der Bowers 

& Wilkins Headphones App verwalten.

6.4 Kopfhörer mit der App einrichten

Die Bowers & Wilkins Headphones App bietet eine 

erweiterte Einrichtung. Die App ermöglicht zudem 

weitere Anpassungen wie Sprachansage, Standby-

Zeit, Verbindungsmanagement und Software-

Updates für die Kopfhörer. Diese App steht für iOS- 

und Android-Geräte kostenlos zum Download bereit.

So fügen Sie Ihre Kopfhörer hinzu:

  1.   Laden Sie die Bowers & Wilkins Headphones 

App auf Ihrem Mobilgerät herunter und 

installieren Sie sie.

  2.   Starten Sie dazu die App und befolgen Sie 

die Anweisungen zu Benachrichtigungen und 

Berechtigungen der App.

  3.   Tippen Sie im Hauptbildschirm der App einfach 

auf + und befolgen Sie die Anweisungen in der 

App.

Abbildung 6
Bluetooth-Kopplung

R

6.5 Software-Updates für die Kopfhörer

Bowers & Wilkins stellt gelegentlich Software-

Updates zur Verfügung, mit denen Sie die Leistung 

Ihrer Kopfhörer optimieren oder neue Funktionen 

hinzufügen können. 

Die Bowers & Wilkins Headphones App 

benachrichtigt Sie, wenn ein Software-Update 

verfügbar ist. Tippen Sie auf die Benachrichtigung 

und folgen Sie den Anweisungen in der App.  

2s

Summary of Contents for PI4

Page 1: ...PI4 Wireless Headphones...

Page 2: ...tures include our latest innovations in Adaptive Noise Cancellation Ambient Pass Through and Magnetic Clip Sensor technologies Our latest generation noise cancellation feature was designed from the gr...

Page 3: ...ependent on source device Increase Volume Press the Volume button Lower Volume Press the Volume button The following buttons on the right control unit are used for phone call functionality Function Ac...

Page 4: ...the left control unit also controls this feature see Diagram 2 for button location Function Action Enable ambient pass through Press and hold the Noise Cancellation button for 2 seconds Disable ambien...

Page 5: ...nes will wait before switching to Auto Standby please see Standby Timer under Settings in the App 5 Wearing Your Headphones Wearing your headphones correctly will help ensure you get the best possible...

Page 6: ...audio from the second device and the headphone will switch over When streaming audio receiving a call on the second device will automatically pause playback and the call will be routed automatically...

Page 7: ...agram 7 It is recommended the headphones are first powered off 1 With the headphones not worn take the neckband and form a single loop 2 Bundle the loop and control units together in one hand With the...

Page 8: ...Hz to 30kHz Distortion THD 0 3 1kHz 10mW Battery Type Rechargeable Lithium Polymer Battery Life Charging 10 hrs Bluetooth with ANC 3hrs with 15min charge Inputs Bluetooth USB C audio In Box Accessorie...

Page 9: ...I4 ber USB aufgeladen wird Zu den Real World Listening Funktionen des PI4 geh ren unsere j ngsten Innovationen in den Bereichen Ger uschunterdr ckung Adaptive Noise Cancellation Umgebungsfilter Ambien...

Page 10: ...erh hen Taste Lautst rke dr cken Lautst rke verrringern Taste Lautst rke dr cken Die folgenden Tasten an der rechten Bedieneinheit werden f r die Anruffunktion verwendet Funktion Bedienung Anruf anneh...

Page 11: ...2 Sekunden lang gedr ckt halten Umgebungsfilter deaktivieren Halten Sie bei aktiviertem Umgebungsfilter die Ge r uschunterdr ckungstaste gedr ckt oder dr cken Sie sie einmal f r 2 Sekunden Der Kopfh...

Page 12: ...er vor dem automatischen Standby warten soll Weitere Informationen finden Sie in der App unter Einstellungen und Standby Timer 5 Einsatz Ihres Kopfh rers Das korrekte Tragen der Kopfh rer tr gt dazu b...

Page 13: ...er verwenden Sie die PI4 Multifunktionstaste 2 Wenn Sie nun Sie Audio vom zweiten Ger t wiedergeben schaltet der Kopfh rer um Beim Streamen von Audio wird die Wiedergabe automatisch unterbrochen wenn...

Page 14: ...ehe Abbildung 7 Es wird empfohlen den Kopfh rer zuerst auszuschalten 1 Nehmen Sie den Nackenb gel in die Hand und formen Sie eine einzelne Schleife 2 B ndeln Sie die Schleife und die Bedienelemente in...

Page 15: ...0 kHz Verzerrung 0 3 1 kHz 10 mW Akku Wiederaufladbarer Lithium Polymer Akku Akkulaufzeit und Aufladen 10 Std Bluetooth mit ANC 3 Std nach 15 Min Aufladung Eing nge Bluetooth USB C Audio Lieferumfang...

Page 16: ...is recentes inova es nas tecnologias de cancelamento adaptativo de ru do pass through de ambiente e dete o de utiliza o melhorada A nossa funcionalidade de cancelamento de ru do de ltima gera o foi co...

Page 17: ...a o bot o de aumentar o volume Diminuir o volume Prima o bot o de diminuir o volume Os bot es seguintes que se encontram na unidade de controlo do lado direito s o utilizados para a funcionalidade de...

Page 18: ...o do bot o Fun o A o Ativar o pass through de ambiente Prima o bot o de cancelamento de ru do e mantenha o premido durante 2 segundos Desativar o pass through de ambiente Com o pass through de ambient...

Page 19: ...dores esperam antes de passarem para standby autom tico Consulte Standby Timer Temporizador de standby em Settings Defini es na aplica o 5 Utilizar os auscultadores Usar os auscultadores corretamente...

Page 20: ...I4 2 Reproduza o udio a partir do segundo dispositivo e os auscultadores fazem a transi o Durante a transmiss o de udio se receber uma chamada no segundo dispositivo a reprodu o suspensa automaticamen...

Page 21: ...bolsa de armazenamento inclu da Consulte a Imagem 7 Recomenda se que primeiro se desligue os auscultadores 1 Sem os auscultadores estarem colocados fa a um la o nico com o suporte para o pesco o 2 Agr...

Page 22: ...carregamento 10 horas com Bluetooth com ANC 3 horas com carregamento de 15 min Entradas Bluetooth udio USB C Acess rios inclu dos na caixa Cabo USB A para USB C de 20 cm bolsa de armazenamento capas...

Page 23: ...ttiva del rumore passaggio delle informazioni ambientali e sensori magnetici per pausa standby automatico L ultima generazione della funzione di cancellazione adattiva del rumore stata riprogettata da...

Page 24: ...olume Premere il tasto Volume Abbassare il volume Premere il tasto Volume Gli stessi tasti durante le conversazioni telefoniche eseguono invece le seguenti funzioni Funzione Comando Rispondere o chiud...

Page 25: ...ne del tasto Funzione Comando Attivazione passaggio informazioni Premere e mantenere premuto per 2 secondi il tasto di cancellazione rumore Disattivazione passaggio informazioni Con il passaggio infor...

Page 26: ...lkins Headphones anche la funzione di standby automatico risulter disabilitata Con l applicazione possibile personalizzare quanto tempo deve trascorrere prima di passare allo standby automatico selezi...

Page 27: ...ssibile riprodurre l audio o ricevere chiamate da un solo dispositivo alla volta Per passare da un dispositivo all altro 1 Mettere in pausa l audio sul primo dispositivo o utilizzare il tasto multifun...

Page 28: ...lizzate conservare le cuffie nella custodia in dotazione ripiegandole come illustrato in Figura 7 Prima di riporle si raccomanda di spegnerle 1 Formare un anello con la parte che normalmente si indoss...

Page 29: ...z 30 kHz Distorsione THD 0 3 1 kHz 10 mW Batteria Ricaricabile ai polimeri di litio Durata della batteria 10 ore streaming Bluetooth 3 ore con 15 min di ricarica Ingressi Bluetooth USB C audio Accesso...

Page 30: ...r onze nieuwste innovaties op het gebied van Adaptive Noise Cancellation adaptieve ruisonderdrukking Ambient Pass Through en Magnetic Clip Sensing technologie Onze nieuwste generatie ruisonderdrukking...

Page 31: ...et bronapparaat Volume verhogen Druk op de knop Volume Volume verlagen Druk op de knop Volume De volgende knoppen op de rechter bedieningseenheid zijn bedoeld voor telefoongesprekken Functie Handeling...

Page 32: ...onden ingedrukt Ambient Pass Through uitschakelen Als Ambient Pass Through is ingeschakeld druk de Noise Cancellation knop dan 2 seconden lang in de hoofdtelefoon kiest dan de vorige ruisonderdrukking...

Page 33: ...Als de sensoren voor het magnetische kliksysteem met de app worden uitgeschakeld wordt deze functie ook uitgeschakeld Met de app kunt u instellen hoe lang de hoofdtelefoon moet wachten voordat hij aut...

Page 34: ...o aan het streamen bent een telefoongesprek binnenkomt op het tweede apparaat wordt het afspelen van de audio automatisch gepauzeerd en wordt het gesprek automatisch naar uw hoofdtelefoon doorgeleid A...

Page 35: ...vrije hand aaneen en lus ze over de gebundelde nekband 3 U kunt de hoes openknijpen Schuif de hoofdtelefoon erin Controleer vervolgens of de hoes goed dicht is en geen enkel onderdeel van de hoofdtel...

Page 36: ...e lithium polymeer accu Accuduur en laden 10 uur Bluetooth met ANC 2 uur met 15 min laden Ingangen Bluetooth USB C audio Bijgesloten accessoires USB A naar USB C kabel van 20 cm opberghoes oordopadapt...

Page 37: ...Bowers Wilkins PI4 PI4 PI4 tablet Bluetooth PI4 USB Real World Listening PI4 Adaptative Noise Cancellation Ambient Pass Through Wear Sensing Ambient Pass Through PI4 Bowers Wilkins Headphones iOS Andr...

Page 38: ...38 1 PI4 PI4 USB C 2 PI4 2 1 1 2 LED 2 LED 2 2 2 2 1 2 3 LED 3 1 3 2 30 30 10 10 2 L R L 5 2 2...

Page 39: ...39 3 3 1 PI4 2 3 2 PI4 2 2 2 Bowers Wilkins Headphones 3 3 PI4 PI4 Bluetooth PI4 1 2 3 Bowers Wilkins Headphones 4...

Page 40: ...40 PI4 3 1 USB A USB A 2 USB C USB C 3 4 1 PI4 PI4 Bluetooth PI4 Bluetooth Standby Timer 5 5 PI4 PI4 1 PI4 2 3 4 USB C 5 R...

Page 41: ...uetooth 5 2 Bluetooth PI4 3 Bluetooth 5 Bluetooth 6 2 Bluetooth PI4 1 PI4 2 6 3 PI4 Connections Bowers Wilkins Headphones 6 4 Bowers Wilkins Headphones iOS Android 1 Bowers Wilkins Headphones 2 3 6 Bl...

Page 42: ...42 7 7 1 PI4 10 LED 7 2 PI4 10 LED Bowers Wilkins Headphones Reset 8 8 1 PI4 PI4 7 1 2 3 8 2 PI4 PI4 9 PI4 www bowerswilkins com support 7...

Page 43: ...HSP v1 2 BLE GATT Generic Attribute Profile 2 x 14 2 mm 2 ANC 2 CVC1 Clear Voice Communication v1 10 Hz 30 kHz THD 0 3 1 kHz 10 mW 10 Bluetooth ANC 3 15 Bluetooth USB C USB A USB C 20 cm 40 Restricti...

Page 44: ...44 www bowerswilkins com Bowers Wilkins PI4 Bowers Wilkins Bowers Wilkins PI4 PI4 PI4 PI4 Bowers Wilkins PI4 iOS Android Bowers Wilkins Bowers Wilkins Headphone PI4 10...

Page 45: ...45 1 PI4 PI4 USB C 2 PI4 2 1 LED OFF LED 2 2 2 1 2 3 1 1 2 2 2 2 2 2 1 3 2 3 LED 3 3 LED 2 LED 30 30 10 10 2 L R L...

Page 46: ...46 3 3 1 PI4 2 High Low Auto Off 3 2 PI4 5 2 2 2 Bowers Wilkins 3 3 PI4 1 2 3 ON OFF Bowers Wilkins Headphone 4...

Page 47: ...47 4 PI4 3 1 USB A USB A 2 USB C USB C LED LED 3 4 1 PI4 OFF ON OFF 5 PI4 1 2 3 4 USB C 5 R...

Page 48: ...48 6 6 1 PI4 1 LED 2 PI4 3 LED 8 5 LED 6 2 PI4 2 2 1 PI4 2 2 2 6 3 PI4 Bowers Wilkins 6 4 Bowers Wilkins iOS Android 1 Bowers Wilkins 2 3 6 R 6 5 Bowers Wilkins Bowers Wilkins 2s...

Page 49: ...49 7 7 1 LED 10 LED PI4 7 2 PI4 10 LED LED Bowers Wilkins 8 8 1 PI4 PI4 1 2 3 8 2 PI4 9 PI4 www bowerswilkins com support...

Page 50: ...D AptX Classic AAC SBC Bluetooth A2DP v1 3 1 AVRCP v1 6 1 HFP v1 7 1 HSP v1 2 BLE GATT Generic Attribute Profile 2 x 14mm 2 x 2x CVC1 v1 10Hz to 30kHz 0 3 1kHz 10mW 10 Bluetooth 3 15 Bluetooth USB C 2...

Reviews: