background image

5.


Previous Page – Press 


+


Alt 


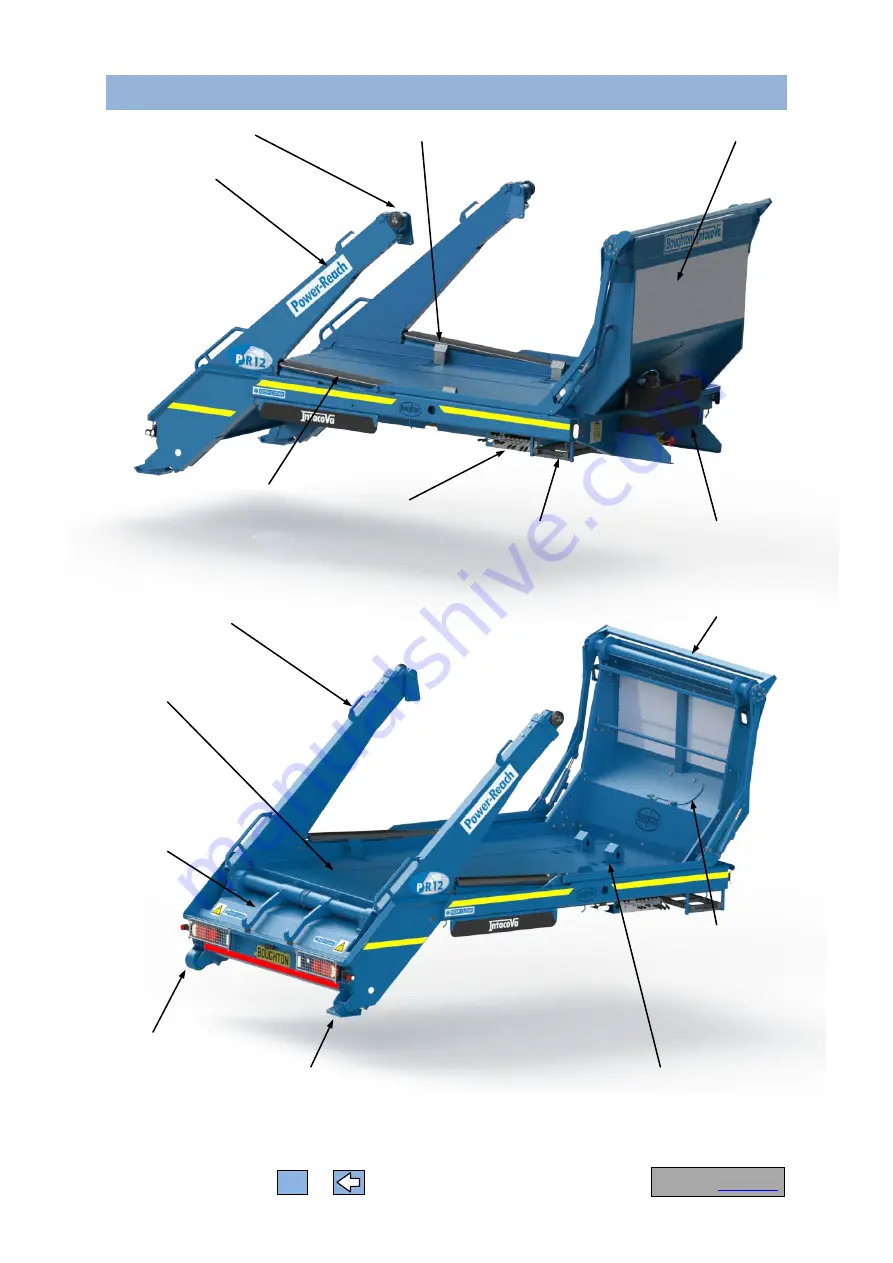
2. Skiploader General Arrangement 


* All skiploaders will have flat feet (Pad) rear stabilisers fitted unless the chassis is fitted with front axle 

parking brakes, in which case, roller stabilisers can be fitted 

Return to 

Contents


Access Cover 


Main Control 

Valve Block 

Hydraulic Fluid Tank 

Intacova Sheeting System 

(Optional) 

Telescopic Lifting Arm 

Main Lifting Arm 

Stabiliser – Option Roller* 

Access Ladder (Both Sides) 

Lift Chain Stowage 

Tiphooks 

Adjustable Skip Stops - Front 

Adjustable Skip Stops - Lateral 

Main Lift Arm Hydraulic 
Cylinder 

Cab Guard 

Load Bed 

Stabiliser – Option Pad* 

Summary of Contents for Power-Reach PR12

Page 1: ...Engineering Limited Document S1005 ML 029 Issue 01 May 2016 Operation Maintenance Manual Power Reach Skiploader Incorporating Optional Sheeting System ...

Page 2: ...page arrows in the toolbar To quickly return to the contents page left click on Return to Contents located at the bottom of each page Links contained in this document are identified by blue underlined text These links take the user directly to the section described by the link text To return from a linked page to the previous page press the ALT key and the Left Arrow key together on the computer k...

Page 3: ...ng System 23 10 3 Retracting Intacova Sheeting System 24 10 4 Unloading a Skip 25 10 5 Tipping a Skip 27 11 Maintenance 30 Safety 30 Schedule 31 Daily Checks by the Vehicle Operator Driver 31 Maintenance Schedule Workshop 31 Maintenance Procedure 1 Check and Fill Hydraulic Tank 32 Maintenance Procedure 2 Filter Check Change 33 Maintenance Procedure 3 Chain Inspection 34 Maintenance Procedure 4 Gre...

Page 4: ... equipment should be made aware of the location of the manual and should be instructed to read through and familiarise themselves with its contents prior to operating the equipment The following symbols have been used in this publication to bring certain items relating to safety to the attention of the user of the equipment Please take note of these symbols and take action to avoid unsafe operatio...

Page 5: ...in this standard WARNING Failure to observe the limitations of the equipment and using non approved skips may result in serious injury and or damage to the equipment This equipment must never be used To carry persons or animals To raise the vehicle to change a tyre or carry out any other maintenance To lift or pull any item other than approved skips The maximum permitted payload for which this equ...

Page 6: ...rol block Loaded skips should be sheeted to ensure that the contents remain within the skip during operation on the highway Boughton Engineering Limited has designed and manufactured this equipment to meet all relevant safety regulations The equipment design has taken into account ease of operation and maintenance conforms to the requirements of the EU Machineries Directive 2006 42 EC and is CE ma...

Page 7: ...ining the equipment in a safe operational condition WARNING Correct maintenance of this equipment is essential for safe operation Always maintain the equipment to the schedule prescribed in the maintenance manual NEVER operate the equipment if there is a known fault Take the vehicle out of service and affect a repair before returning into service ALWAYS use approved spares and recommended fluids a...

Page 8: ...e roller stabilisers can be fitted Return to Contents Access Cover Main Control Valve Block Hydraulic Fluid Tank Intacova Sheeting System Optional Telescopic Lifting Arm Main Lifting Arm Stabiliser Option Roller Access Ladder Both Sides Lift Chain Stowage Tiphooks Adjustable Skip Stops Front Adjustable Skip Stops Lateral Main Lift Arm Hydraulic Cylinder Cab Guard Load Bed Stabiliser Option Pad ...

Page 9: ...n lift arms 2026 mm J Distance between tip hook centres 610 mm K Overall width 2460 mm L Overall height from top of chassis to top of cab guard 1718 mm M Chassis bed height 313 mm N Top of chassis to stabiliser raised 555 mm P Top of chassis to stabiliser lowered 961 mm Q Maximum lift from below ground 2568 mm R Load arm angle of rotation 142 S Cab guard overhang 390 mm Weight of Skiploader includ...

Page 10: ...t be installed on all vehicles IntaCova Dimensions A Height from top of chassis 2002 mm B Maximum width 2456 mm C Main arm maximum radius 3120 mm D Secondary arm radius 1376 mm Cycle Times To sheet at 1500rpm 22 seconds To unsheet at 1500rpm 28 seconds Container Sheeting Range 4yd 3 06m 16yd 12 23m Containers should comply with C H E M standards Return to Contents ...

Page 11: ...ead man principle and return to the neutral position if released To activate any of the controls the user must apply pressure to lever A at all times Levers H and I operate the Intacova sheeting system These levers will not be present if the Intacova system is not fitted to your vehicle Standard Control Functions Levers B D E F G Levers A B C D E F G H I Lever Up Lever Down Lever B Main Arms Lever...

Page 12: ...raise and lower the tip hooks When tipping the tip hooks must be in the raised position For all other operations the tip hooks must be lowered Optional Control Functions Levers H I Levers H I are only present on the control panel if the optional Intacova sheeting system is fitted to the vehicle Lever Up Lever Down Lever H Sheeter Main Arms Lever I Sheeter Secondary Arms Operate Levers Together To ...

Page 13: ...ol Main Controls 1 Start Button 2 Emergency Stop Button 3 Hold to Run Button 4 Push Button Keypad 5 Sheeting System Toggle Main Arms 6 Sheeting System Toggle Secondary Arms 7 Indicator LED 8 Indicator LED Item 4 Push Button Keypad Functions Right Button Functions Main Arms Load Telescopic Arm Retract Both Telescopic Arm Right OS Extend Telescopic Arm Right OS Retract Stabiliser Right NS Retract St...

Page 14: ...by the push buttons are detailed below Items 5 6 Toggle Switch Functions Where Fitted Main Arms Telescopic Arm Left Telescopic Arm Right Stabiliser Left Stabiliser Right Offload Telescopic Arm Extend Extend Extend Extend Extend Retract Retract Retract Retract Retract Load Sheeting System Main Arms Sheeting System Secondary Arms Retract Extend Retract Extend Return to Contents ...

Page 15: ...cal giving two stop positions for each socket depending on which way around the stop is inserted into the socket For the front stops there are effectively 6 positions For the side stops there are effectively 6 positions Side skip stop positions should be chosen so that the guides are the tightest practical fit to the width of the skip Front stop positions should be chosen to ensure that if a skip ...

Page 16: ...ith the telescopic arms fully retracted and the main arms in the fully down position The height quoted on the vehicle height notice located in the vehicle cab relates to the equipment when at the minimum travel height Operating the vehicle outside the overall height limit specified on the vehicle height notice may result in prosecution A single warning light is located either within the cab dashbo...

Page 17: ...the item s indicated by the display warning light When all the lights are extinguished on the body warning light module the driver should check to see that the in cab warning light is also extinguished A further visual check of the equipment must be made by the driver before the vehicle is driven on the highway Always ensure that the vehicle is not driven on the highway until all of the warning la...

Page 18: ... be illuminated indicating that the auto revs signal is active and all of the proximity sensors are detecting equipment is out of the minimum travel height position In addition check the in cab warning light If operating correctly this light must also be illuminated If any light fails to illuminate the vehicle should be taken for repair by a qualified technician Return to Contents ...

Page 19: ...general visual inspect of the skiploader equipment should be undertaken Walk around the vehicle looking for any signs of damage to components Look for patches of fluid under the vehicle If fresh fluid is detected inspect the vehicle in the area above the patch to see if there are any leaks If damage or leaks are detected take the vehicle for repair by a qualified technician 2 Before loading or unl...

Page 20: ...e that the chains are not knotted or twisted WARNING Lift chains are critical safety components DO NOT attempt to modify the lift chains by changing their length DO NOT attempt repair of chains by cutting or welding If a chain is damaged or worn beyond usable limits it must be replaced Serious injury and or damage to the vehicle may result from using damaged or worn lift chains Refer to Maintenanc...

Page 21: ...ipment must remain clearly visible to the operator when the system is active and during any load unload and tipping sequences 8 4 When operating the system the operator must remain outside of the clearance zone shown in figure below Return to Contents ...

Page 22: ... 6 Remote Operation Hand Held Controller Overview for equivalent functions Remote Operation Hand Held Controller Start Sequence Not Applicable To All Vehicles For vehicles fitted with the optional remote operation hand held controller the following start sequence must be followed To switch on and operate remote controller 1 Ensure that the in cab dash board mounted switch is moved to the REMOTE po...

Page 23: ... operate the equipment Note The button second position fully depressed is a safety feature to prevent accidental operation If the Hold to Run button is in the fully depressed position the keypad and toggle switches are disabled The Hold to Run button must be held at its first position throughout any operation of the skiploader equipment 8 The keypad and toggle switches are now active Press the key...

Page 24: ...nd its location to ensure that it is suitable for lifting 1 Reverse skiploader vehicle to a position in front of the skip Position the rear of the vehicle as close to the skip as possible 2 Apply hand brake 3 Engage PTO 4 Check that the tip hooks are in the down position If the tip hooks are up use the tip hook Lever in to lower Levers 5 Extend stabiliser legs The legs should be extended so that t...

Page 25: ...learance Levers Stop the loading cycle just prior to the skip resting on the load bed and check that the skip stops have been correctly positioned WARNING Do not attempt to reposition the skip stops with the skip supported on chains over the platform Remove the skip from over the load bed reposition the guides then reload the skip Failure to observe this warning will result in a potential crushing...

Page 26: ...eting System The Intacova sheeting system when fitted must always be deployed when carrying a loaded open top skip to prevent potential loss of load during transit 1 With the skip in position on the vehicle load bed activate the Intacova main arms bringing the sheeting system over the skip Levers 2 Operate the main arms until the sheeting roller has rotated beyond the rear of the skip 3 Activate t...

Page 27: ...vate the Intacova main arms to bring the sheeting system over the skip towards the load bed cab guard A continual check must be made to ensure that no collision takes place between the Intacova and any other part of the vehicle structure during this operation Levers 5 The Intacova sheeting system is fully retracted when the main arm spigot is engaged in the socket on the side rave of the load bed ...

Page 28: ...ply handbrake 3 Engage PTO 4 Extend stabiliser legs The legs should be extended so that the load is just removed from the rear suspension Levers Note The stabilisers should be used to level the rear of the vehicle The rear wheels should remain in contact with the ground to retain the effectiveness of the handbrake 5 Check that the tip hooks are in the down position If the tip hooks are up use the ...

Page 29: ...n the chain hooks provided on the main lift arms 10 Rotate main arms until they are in the fully down position Levers 11 Retract telescopic arms around until they are in the fully down position Levers 12 Retract the stabilisers Levers A check should be made to ensure that the vehicle skiploader system is correctly set up prior to driving on the highway Check the in cab warning light s If lights ar...

Page 30: ...n damage to the equipment and or serious injury or death The skiploader system can be used to tip a loaded skip provided the skip is equipped with tipping bars designed for the purpose Prior to starting operation read through the General Safety Checks Prior to Operating section 9 and assess the skip and the intended tipping location to ensure that they are suitable Any sheeting must be removed fro...

Page 31: ...achieved Once the skip tipping bar is correctly located against the leading edges of the tip hook the telescopic arms must not be operated throughout the remainder of the tipping sequence WARNING If the skip tipping bars are engaged directly into the throat of the tip hooks or the telescopic arm controls are operated when the skip tip bars are engaged in the throat of the tip hooks the tip hooks a...

Page 32: ...the fully down position and that the telescopic arm is fully retracted Levers 13 Retract the stabilisers Levers 14 Lower the tip hooks Levers A check should be made to ensure that the vehicle skiploader system is correctly set up prior to driving on the highway Check the in cab warning light s If lights are illuminated check 1 Main arms 2 Telescopic arms 3 Stabilisers Refer to section 8 Disengage ...

Page 33: ...ng work When working on the equipment always ensure that it is disabled to prevent accidental operation of moving parts Remove the vehicle ignition key unless a test on the equipment is to be run Ensure that the area around and under the vehicle is clear before activating and operating the equipment Work should be carried out with rams in the closed position wherever possible ALWAYS ensure that hy...

Page 34: ...blocked filter for rectification Maintenance procedure 2 Check operation of the in cab warning lights Operation See section 8 for warning light checks Report for investigation and repair if warning lights fail test or warning lights do not extinguish Check condition of lift chains Visual Immediately report any damage or wear Replace chains before commencing operation Maintenance procedure 3 Check ...

Page 35: ...ass situated on the tank offside Prior to checking the fluid levels ensure that all hydraulic cylinders are in the full closed position The fluid level must be between the maximum and minimum indicator lines If the level of fluid is near to or below the min line then the fluid must be topped up Note Topping up of the hydraulic fluid should be carried out by a qualified technician in the workshop 1...

Page 36: ...Changing the hydraulic fluid filter should be carried out by a qualified technician in the workshop 1 Ensure PTO is disengaged 2 Access the top of the hydraulic tank through the hatch at the base of the Cab Guard fig 2 1 3 Turn the filter cap anticlockwise to remove and gain access to the filter fig 2 2 Note The filter cap is sprung against the filter and will be pushed away from the housing when ...

Page 37: ... inspected to ascertain if they are serviceable Check that the chain does not exhibit the following characteristics 1 Chain stretch the links of the chain elongate causing the overall chain length to increase 2 Deformation through bending or twisting of the links 3 Chain wear the links wear at the bearing surfaces weakening the chain and causing the overall chain length to increase 4 Cracks in the...

Page 38: ...chion Extend the stabiliser leg to expose the inner surfaces The grease should be applied liberally to the box section surfaces and wear strips then spread using a brush After application retract the stabiliser legs and clean away any excess grease Apply Grease to All Surfaces Main Hydraulic Cylinder Pivot Front Intacova Optional Main Arm Lower Main Hydraulic Cylinder Pivot Rear Main Arm Pivot Bea...

Page 39: ...n lubricated bolts and zinc plated bolts into un plated holes and nuts Quoted P torque values are for zinc plated bolts into zinc plated nuts For cap screws use grade 10 9 torque values Nominal Bolt Size Grade 8 8 U Torque Nm Grade 8 8 P Torque Nm Grade 10 9 Torque Nm Course Fine Course Fine Course Fine M6 10 9 12 7 15 M8 25 8 27 7 31 33 2 36 3 38 9 M10 51 2 54 61 4 64 8 72 76 M12 89 3 97 6 107 2 ...

Page 40: ...p cock is located underneath the hydraulic fluid tank see fig 7 1 3 Disconnect the suction line at the hydraulic pump located on the back of the PTO see fig 7 2 4 Position the detached end of the suction line in the container into which the old fluid will be drained 5 Remove the hydraulic tank filler cap see fig 7 3 6 Open the stop cock on the hydraulic fluid suction line The hydraulic fluid will ...

Page 41: ...fig below Charge batteries before first use Follow all instructions in the battery battery charger manual to ensure safe use and to prolong the life of the battery When storing the remote control unit remove the batteries and store them in a cool dry place DO NOT store batteries at low charge levels Remote Controller Storage The remote controller should be stored when not in use in a location wher...

Page 42: ...ion or assistance in operating the PR12 Skiploader and Intacova Sheeting System contact Boughton Engineering Ltd Balliol Business Park Wobaston Road Wolverhampton WV5 9EU Tel 44 0 1902 623430 Fax 44 0 1902 787265 Email enquiries boughtonengineering com Return to Contents ...

Reviews: