background image

32

1.

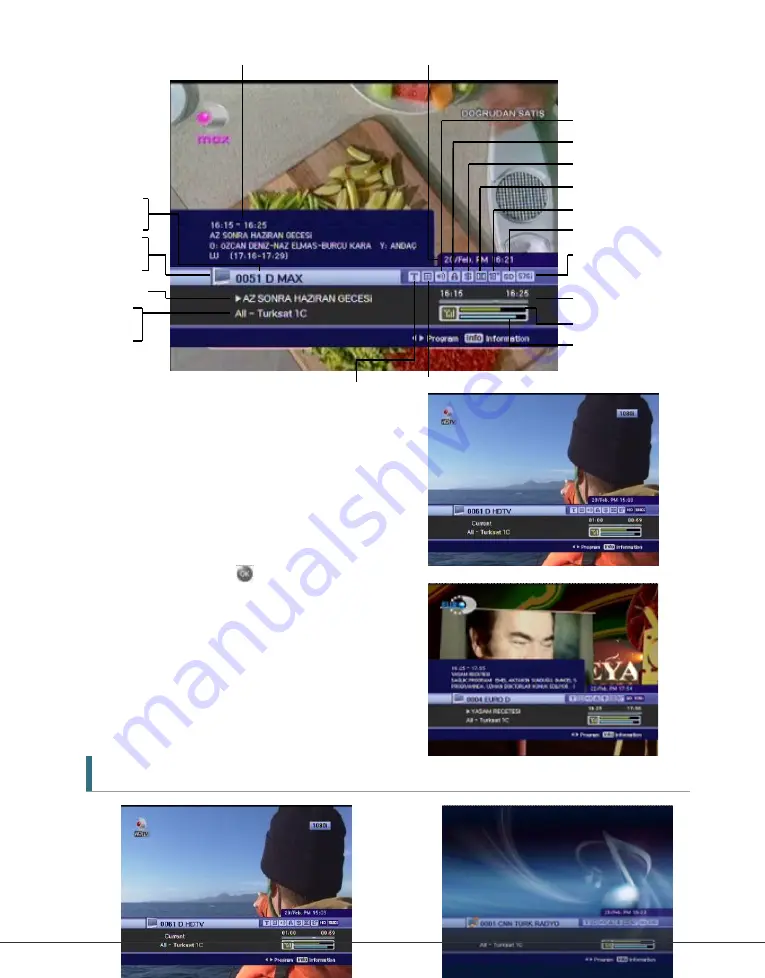
 Whenever you press the INFO button, the banner information
window appears for a few seconds.

1.

 If you press the INFO button again on the banner, the detail
EPG window appears.

2.

If you press the     button, information and EPG window will
disappear.

3.

Press the P+- button and then you can
change the channel.

4.

If ' ' exists on the Banner, press the /
button and then you can watch the next
EPG.

6.2 TV & Radio changing

While watching TV or listening to Radio, you can select TV or Radio using the TV/Rad button.

Audio Language
Lock
Scramble
Dolby
Parentel Control
Density (HD/SD)
Stream Resolution

Event Progress Bar
Signal Strength Bar
Signal Quality Bar

Channel Number

and Name

TV Type

(TV and Radio)

Current Event Name

Satellite or Group

Name

Subtitle    Teletex

Summary of Contents for BT-100 HD

Page 1: ...BT 100 HD HD High Definition Common Interface Embedded Satellite Receiver User Manual ...

Page 2: ......

Page 3: ...ront Panel 8 2 2 Rear Panel 8 2 3 Remote Control Unit 9 3 Connections 11 3 1 Connecting to TV 11 3 2 Connecting to Dish 15 4 Menu Overview 17 4 1 Menu Instruction 17 4 2 Menu Help 17 4 3 Menu Structure 18 5 Menu Operation 19 5 1 First Installation 19 5 2 Installation 21 5 3 System Setting 26 5 4 Channel 28 5 5 Advanced 30 5 6 Status 31 ...

Page 4: ... TV or Radio Channel Lists 33 6 4 Option 37 6 5 A V 38 6 6 Fav 39 6 7 A Z 39 6 8 EPG 40 Additional Information 42 1 1 Programming the Remote Control to Operate Other Devices 42 1 2 Key Table 44 1 3 Brand List 46 A 1 Troubleshooting 56 A 2 Technical Specifications 57 A 3 Glossary of Terms 59 ...

Page 5: ... following marks that indicate hazardous situations Caution Indicates a situation which if not avoided could damage the equipment or apparatus Warnings Indicates a hazardous situation which if not avoided could result in serious injury Note Indicates additional information to the user to make the user aware of possible problems and information of any importance to help the user to understand to us...

Page 6: ...nd blocking ventilation passage Passage blocking can cause fire Avoid scrubbing the surface with Benzene or Volatile gasoline Color can be damaged Leave the power and the antenna off for the ling absence or during thunder storm Avoid dropping and damaging Remote Control Unit If there is smoke or burning smell turn off un plug the set immediately Contact your local repair center for advice Avoid pl...

Page 7: ...id dissembling and assembling Do not open the set Do not snatch the cable to plug out Do not move the set while power cord is plugged in Keep the distance from Magnetic items and Audio Speaker Place the set with the good ventilation and away from the direct sunlight and humidity Avoid the temperature of over 30C and below 5C ...

Page 8: ...Function 256 Color Graphic User Interface Multi language menu 4 digit 7 segment LED Display Variable Aspect Ratio 4 3 16 9 with Pan Vector or Letter Box EPG Electronic Program Guide for On screen Channel Information Teletext and Subtitle Supported VBI OSD Installation by Easy Setup Guide Capacity for Storing Multi Channel FTA 2500 Channels 500 Transponders Favorite Channel and Parental Lock Functi...

Page 9: ...7 1 2 Accessories Component video cable HDMI cable Operating instruction this Manual Remote Control AAA dry cell batteries x 2 ...

Page 10: ...n Exit from the current menu or cancels the current progressing operation if applicable 4 CH Up Down Buttons Changes channels in viewing mode and moves the cursor up down in menu mode 5 Volume Up Down Buttons Increases decreases the volume levels in viewing mode and changes settings in menu mode 7 Display 4 digit 7 segment 4 digit display of channel information The red LED is the STAND BY indicato...

Page 11: ...t of the DISH IN signal 7 Electric Inlet Lead 90 240V AC Auto selectable 50 60Hz Make sure to check the power specification 8 Power Cord AC Power Switch 2 3 Remote Control Unit All receiver features can be controlled with the remote controller Button Description 1 POWER Turns the unit On and Off TV STB Switches between TV and STB TV VCR DVD STB Mode indicator Indicates operational mode of remote c...

Page 12: ...he volume level in viewing mode CH Changes channels in viewing mode P Selects other menu pages with sub pages 6 Select the option such as Audio Language Teletext Language and Subtitle Language Select video mode 4 3 4 3 Letter Box 16 9 and audio mode Left Right Stereo Joint Select the group of satellite or favorite Selects the new features such as Zooming Multi picture 7 OPT Select the option such ...

Page 13: ...ion 1080i 720p480p 480i using YPbPr port 1 Connect STB s YPbPr OUT and audio L R OUT to YPbPr IN and audio L R IN of TV 2 Set STB s video output mode to 1080i or 720p or 480p using FUNC key of remote controller Please check TV s user manual for detail connecting method of the YPbPr input port ...

Page 14: ...and White connector to Audio R and Audio L and Yellow to Video port respectively 2 Connect the TV SCART of TV to lower SCART connector with fully featured SCART cable 3 Connect the VCR SCART of VCR to upper SCART connector with fully featured SCART cable 4 Go to section 3 2 Connecting to Dish then connect your dish ...

Page 15: ...I input port 1 Connect STB s HDMI OUT to HDMI IN of monitor or TV 2 Set STB s video output mode to 1080i or 720p or 480p using FUNC key of remote controller For the best access to HD programming at the highest available resolution use this connection method ...

Page 16: ...14 Connecting to A V receiver Dolby digital amplifier 1 Connect STB s optical digital audio out to A V receiver 2 Go to TV Output menu and set Dolby Digital DD to enable ...

Page 17: ...15 3 2 Connecting to Dish Dish Connect the Satellite antenna cable to DISH IN Fixed Dishes Using a DiSEqC switch Connect the output of DiSEqC 1 0 to DISH IN of the receiver ...

Page 18: ...16 Motorized Dish Using DiSEqC 1 2 Connect the output of DiSEqC 1 2 to DISH IN of the receiver ...

Page 19: ...have selected the sub menu you want press the button When you want to return to the previous menu press the button When you want to return to the live screen press the Menu button 4 2 Menu Help In the menu short information is displayed at the bottom of the screen Using button Using P P button Using button Using button Using Opt A V Fav button Using button Numerical button or Button ...

Page 20: ...age Time Setting Setting current time Parental Control Change the password and select the censorship classification OSD Display Setting OSD display time and transparency Channel Sorting Choose the channel sort type such as by Transponder Network CAS Reservation Reserving channels you want to record at your desired time Delete Delete the channels such as Favorite TV Radio CAS etc Advanced Reset Fac...

Page 21: ...ow you to set your receiver using simple procedure 1 Select the desired language using the button 2 Press the button to confirm and go to the next step 1 Select the desired satellite using the button 2 Press the button to confirm and go to the next step 1 Select LNB Type using the button 2 Press the button to confirm and go to the next step ...

Page 22: ...done press the button to start scanning If you want to know more detail description about each procedure please refer to the following installation part in 5 2 Previous Step button If you want to go to the previous step press the Opt button and then you can reset options Cancel and Exit button If you want to skip First installation press the Exit button ...

Page 23: ...er etc if you want to check the detail view use the button 1 Press the button the right screen shows the pre selected 32 satellite lists 2 Select the desired satellite and press the button Then change the satellite column will be by the desired Satellite name If you can t find the desired satellite select any satellite and press the button 1 Press the button to watch the satellite in the pre progr...

Page 24: ... Type value If you have selected User Single or User Dual enter LNB frequency value directly and press the button If you select LNB Type value as 9750 10600 9750 10750 or User Dual 22KHz value is fixed to auto mode in other case you can select a value depending on usage of 22KHz tone switch box 1 Select Switch Type if used 2 If you use a DiSEqC 1 0 switch select DiSEqC on the Switch Type 3 Select ...

Page 25: ... Limit Press the button to fix East limit Enable Limit Press the button to change the limit Set West Limit Set East Limit can be available with Disable Limit status 1 Select Switch Type 2 If you use a USALS motor select from the Switch Type using the button 3 Change position of your USALS motor through the Option Go to Position Press the button to move the motor to the position calculated by the l...

Page 26: ...Scan and press the button 1 The left window shows TV channels and the right window shows Radio channels during the scanning process White channel names are new channels downloaded to your receiver Black channel names are already existing channels 1 If you press the button when scanning for channels pop up window appears 2 When you complete scanning for channels a similar pop up menu appears 3 If y...

Page 27: ...sponders using the network index table PID Search Search using Auto PID Manual Dec Manual Hex 1 When you select Manual Dec option a pop up menu appears 2 Enter the value of Video PID Audio PID and PCR PID with numeric keys 3 Press the button to scan PIDs or press the button to make the pop up menu disappeared 1 When you select the Manual Hex option a pop up menu appears 2 Enter the value of Video ...

Page 28: ...een format of your TV 4 3 4 3 Letter Box 16 9 Dolby Digital DD Set the Channel to display the audio and video signal on your TV 5 3 2 Language 1 Select the language options using the button 2 Press the button to change the selected language Display Change the language used in the OSD and Menus Audio 1 2 Change the language that you listen to audio in Subtitle 1 2 Change the language that you watch...

Page 29: ...on following message requiring new password will be displayed 2 Change the password into new one by numeric button 3 To ensure your change you are supposed to input a password once more 1 Select your desired rating level using the button 2 Press the button to save and exit Rating mode allows you to block channel according to the age level you have set View All All channels can be watched 7 Channel...

Page 30: ... 30 60 120 Minutes OSD Mixweight Select the OSD transparent type Low Middle High 5 4 Channel 5 4 1 Sorting 1 Select Sorting Type using the button 2 If you press the button current changing state will be Saved and exit Transponder Channels are sorted into transponder order Network Channels are sorted into service provider order CAS Channels are sorted into Scramble channels and Free channels order ...

Page 31: ... press the button to save and exit If it is duplicated with the time zone that was already registered at a reservation list the alarm message appears which it is not able to register In this case you must register a reservation for other time zone Just one time action After action was done event will be deleted on the list Action execution in weekday Action execution in weekend Action execution we...

Page 32: ... Option such as TV Radio and etc 1 Select the Mode and Option you want to delete channels using the button 2 Press the button to delete and exit 5 5 Advanced 5 5 1 Reset Factory Default 1 If you want to change the set into the default values press the button The following confirmation window will appear 2 If you select Yes the system will be reset to the primitive state like new receiver ...

Page 33: ...ad 1 Connect the receiver with other receiver or PC through RS 232 cable 2 For the target receiver turn the AC Power off then turn on again 3 You can watch the transfer status of software 5 6 Status 5 6 1 System Information 1 You can watch the system information such as Model ID Hardware version Software version and Loader version 6 Viewing General Information 6 1 Banner Information Detailed Event...

Page 34: ... then you can change the channel 4 If exists on the Banner press the button and then you can watch the next EPG 6 2 TV Radio changing While watching TV or listening to Radio you can select TV or Radio using the TV Rad button Audio Language Lock Scramble Dolby Parentel Control Density HD SD Stream Resolution Event Progress Bar Signal Strength Bar Signal Quality Bar Channel Number and Name TV Type T...

Page 35: ...lay the channel list You can watch several icons at the bottom of the channel list Each icon has a special and convenient function for user If you want to change the mode press the Opt button to go to the desired icon View Delete Move Rename Lock Group Sorting TV Type TV or Radio Group or Satellite Name Group Status Channel Parameters Provider Name ...

Page 36: ...e press the TV Rad button When you want to watch the next or previous channel page press the P button 1 Press the INFO button to watch the information for a selected channel 2 Press the EXIT button to hide the information 1 If you know the correct channel number to watch press the number using the numeric button 1 If you want to go Alphabetic move you must change the channel list to the sorted sta...

Page 37: ...de 1 Select the Move Icon using the Opt button 2 Select the channel which will be located in other position 3 Press the button and then a sign which indicates move will be marked on the right side of the channel name 4 Set the new position using the button 5 If you want to complete moving channel press the button Then move sign will disappear on the right side of the channel name 6 Press the EXIT ...

Page 38: ...racters Caps Change between caps and lower case letter Done To save the change Cancel Exit rename mode 6 3 5 Lock Mode 1 Select Lock Icon using the Opt button 2 Select the channel to be locked and press the button 3 Set the password Locking mark will appear on the left side of the Channel name To cancel it just press the button 4 Press the EXIT button to save and exit 6 3 6 Group Mode You can make...

Page 39: ... showed on the channel list 6 Press the button to set the group with selected group using the button 7 Press the EXIT button to save and exit 6 4 Option While watching TV or listening to Radio press the Opt button You can watch small pop up window You can select a option Audio Language Teletext Language Subtitle Language If you want to change the option mode press the button 6 4 1 Audio Language 1...

Page 40: ...contents in the language if it is available 6 5 A V While watching TV or listening to Radio press the A V button You can watch small pop up window You can select a option Audio Mode Video Mode If you want to change the option mode press the button 6 5 1 Audio Mode 1 Select the Audio Mode using the button 2 Press the button to set the output direction for speakers STEREO LEFT RIGHT JOINT 3 Press th...

Page 41: ... Satellite using the button 2 Press the button to select a Satellite 3 Press the button then you can watch the channel list of selected Satellite 6 6 2 Favorite 1 Select the Favorite using the button 2 Press the button to select a group 3 Press the button then you can watch the channel list of selected group 6 7 A Z While watching TV or listening to Radio press the A Z button You can watch sorted ...

Page 42: ...shooting There may be various reasons behind receiver problems Check the receiver according to the procedures described below If you can t solve your problem even after following the troubleshooting procedures please contact the dealer Do not open the receiver cover It may cause a dangerous situation Symptom Cause Remedy The front panel doesn t display any message The power cord is not plugged in ...

Page 43: ...operate The batteries of the remote controller are not inserted or exhausted Check whether the batteries are inserted correctly in your remote controller Check and replace the batteries of the remote controller Poor picture quality Less channels in scanning Signal loss cable Change the antenna power in Antenna menu A 2 Technical Specifications 1 Tuner Demodulator Parameter Specifications Input Fre...

Page 44: ...3818 Transport Stream Specification Input Rate Max 15Mbit s Video MPEG 2 MP ML Audio MPEG 1 2 Audio Layer 1 2 Aspect Ratio 4 3 16 9 Video Resolution 720x480p PAL 720x480i NTSC 1080i Audio Mode Stereo Dual channel Joint stereo Mono Audio Sampling Frequency 32 44 1 48kHz ...

Page 45: ...9 24 Female S VHS Y C RCA Stereo CVBS Component Y Pb Pr SPDIF Fiber Optic connection Digital Audio Output Serial Port RS232C D sub male type 4 Power Supply Parameter Specifications Input Voltage 90 260VAC SMPS Power Consumption Max 27W Weight Appr 1 5KG Operating Temperature 0 C 40 C Storage Temperature 40 C 65 C ...

Page 46: ...ceiver Parental control A feature that allows parents to lock programs that they consider unsuitable for their children A locked channel or program can only be unlocked with the password PIN code Personal Identification Number A four digit code that is used for locking unlocking channels and programs as in the parental control feature Polarization Polarization allows several programmes to be fitte...

Page 47: ...led satellite TV programme Some satellite TV programmes are transmitted in scrambled form A smartcard and possibly a CA module is needed to view such programmes Symbol rate Size of the digital package transmissi ...

Page 48: ......

Reviews: