9
22
22
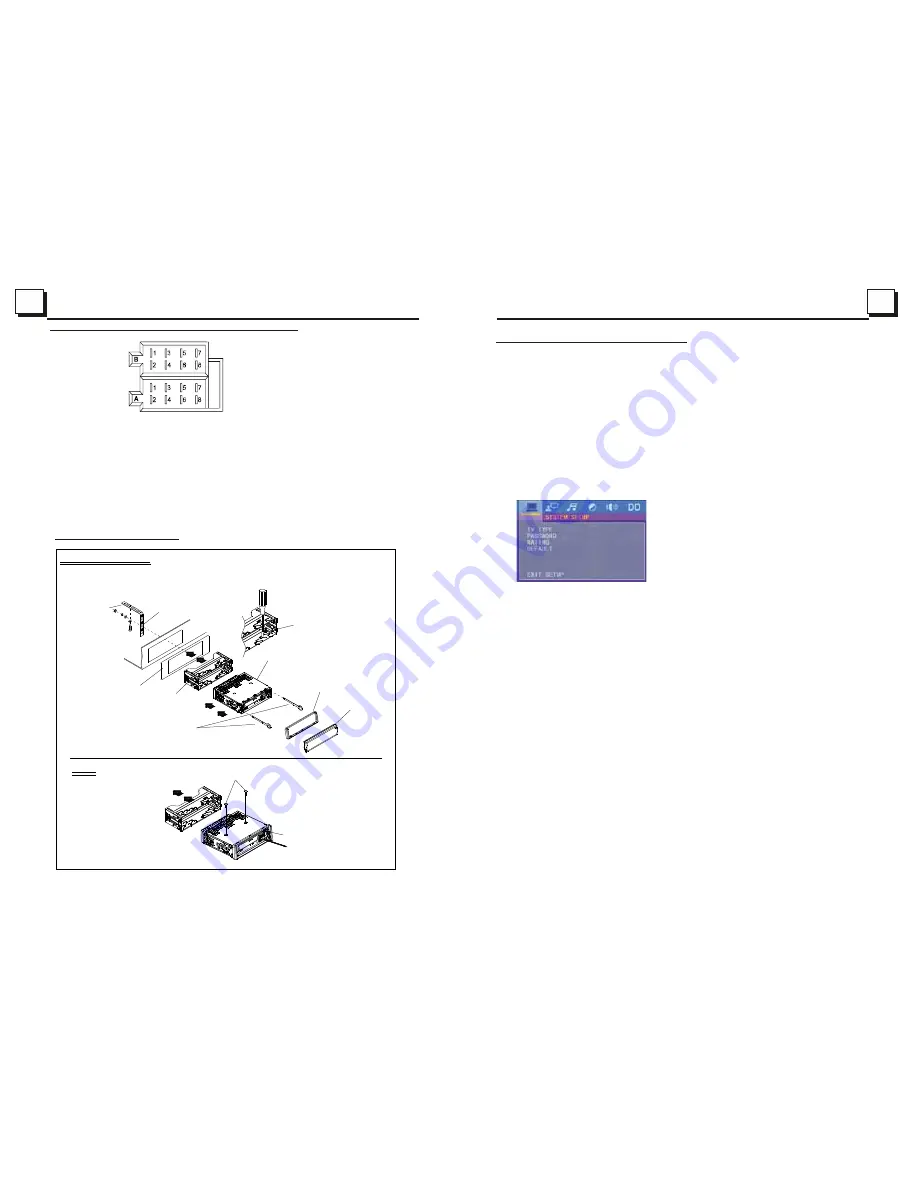
1.8 UNIT INSTALLATION
INSTALLATION INSTRUCTIONS
TO BOOST UP THE CAPABILITY OF
ANTI-JAMMING, PLEASE FIX THE
METAL STRAP ON THE METAL
CONNECTED TO THE CHASSIS OF
THE CAR.
METAL STRAP
DASH BOARD
SLIDING METAL HOUSING
TO DRAW THE CHASSIS OUT OF THE
SLIDING METAL HOUSING, INSERT
THE LEFT AND RIGHT KEY PLATES
INTO THE TWO SIDES OF CHASSIS.
FRONT PANEL
PLASTIC TRIM OUT
UNIT CHASSIS
SELECT THE PROPER TABS
OF THE SLIDING METAL
HOUSING TO FIX THE
SLIDING METAL HOUSING.
NOTE
REMOVE THE DECK TRANSPORT
SCREWS BEFORE INSTALLING IT.
THE UNIT INSTALLATION IS ANTI-THEFT ONE. THE UNIT CHASSIS WEARS A SLIDING METAL HOUSING. FIRSTLY CONNECT THE
POWER LINES, SPEAKER LINES AND AUTO ANTENNA ACCORDING TO MANUAL REQUIREMENT, THEN INSTALL THE SLIDING METAL
HOUSING IN A CAR ACCORDING TO THE DIAGRAM.
REMOVE THE SLIDING METAL HOUSING
EJECT BUTTON
RESET BUTTON
The Description of the Fixed ISO Female Connector
CONNECTOR A
1.
2.
3.
4. 12V(yellow)
5. Auto Antenna(blue)
6.
7. 12V (To Ignition Key)(red)
8. GROUND(black)
CONNECTOR B
1. Rear Right Speaker (+)
2. Rear Right Speaker (-)
3. Front Right Speaker (+)
4. Front Right Speaker (-)
5. Front Left Speaker (+)
6. Front Left Speaker (-)
7. Rear Left Speaker (+)
8. Rear Left Speaker (-)
FUSE
10
A
4.24 DVD System Menu Setup Operation
1. Press the SETUP button on the remote controller to access the DVD System
Menu on the monitor.
2. There are 6 setup pages in all for the System Menu. Press the > or < button
to select an desired setup page.
3. Press the ^ or v button to select an setup item in the selected setup page.
4. Press the > button to enter the setup item. Then press the v or ^ button to select
a desired mode of the setup item, finally press the OK button to confirm it.
* Press the < button to return to the upper level.
* Press the SETUP button again or use the direction buttons to highlight the
item of the EXIT SETUP and then press the OK button to exit the System Menu.
For the DVD System Menu, there are 6 setup pages in all. They display as follows:
4.24.1 SYSTEM SETUP
TV TYPE
The setup item is for matching TV screen size.
4:3 PS: Choose the item when connecting a TV set with 4:3 screen. When playing
the pictures with 16:9 size, the left and right parts of the video will be cut out,
and display in full screen.
4:3 LB: Choose the item when connecting a TV set with 4:3 screen. When playing
the pictures with 16:9 size, the top and bottom parts of the TV screen will be
turned into a black square respectively.
16:9: Choose the item when connecting a TV set with 16:9 wide screen.
PASSWORD
This setup item is for locking or unlocking the rating level of the Parental Control.
The defaulted state is locked. The defaulted password is 0000.
You can set a new password that you like: Select the PASSWORD item and then
press the > button to enter it, then input the original password 0000, and then
press the OK button to unlock it. Press the > button to enter it again, then input
a new password that you like and then press the OK button to make it effective.
Before the other persons see the Manual, you should get the password in mind
and cut out the part of PASSWORD in the Manual.
RATING
The item is for setting a new rating level of the Parental Control.
1. Select the PASSWORD item and then press the > button to enter it, then input
the password mentioned above, and then press the OK button to unlock the
setting of the rating level of the Parental Control.
Summary of Contents for BV7336
Page 1: ......


