background image

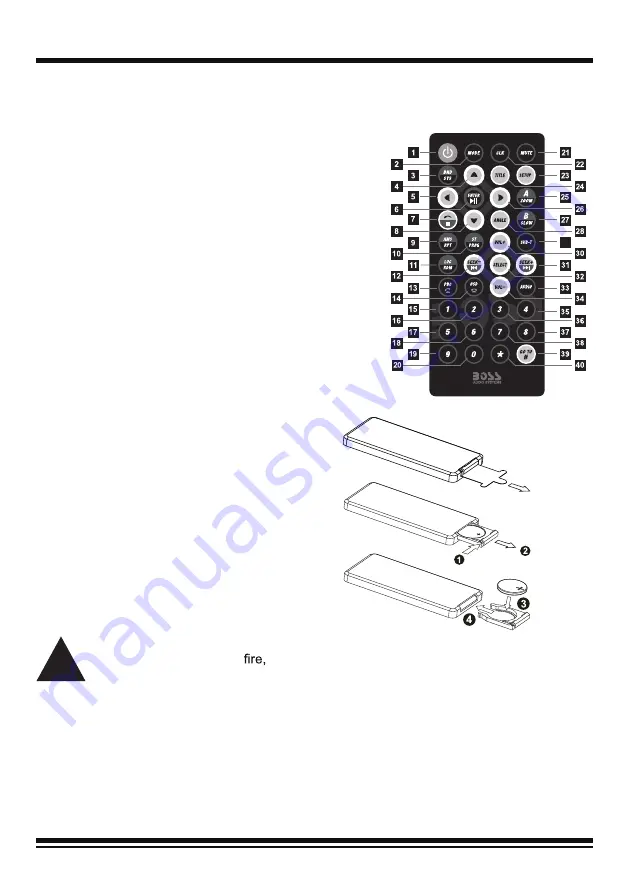
Remove Insulating Sheet

The remote control comes with an insulating sheet 

attached to the underside of the remote control, as 

illustrated on the right. The remote control will not 


work until the insulating sheet is removed.

Replace Lithium Battery Cell

1.  When the lithium cell battery becomes weak, 


replace it as illustrated on the right.

2.  Press and hold the movable block in the 

direction indicated by arrow 1. At the same 

time, pull the cell holder out of the remote 

control in the direction indicated by arrow 2.

3.  Replace the old cell with a new one, making 

sure the (+) polarity is facing upward.

4.  Re-insert the cell holder into the remote  

control.

- Cell leakage may cause damage to the remote control.
- Do not throw cells into 

 as this may cause an explosion.

- Keep battery cells out of reach of children.

Remote Control Operation

Position the emitting window of the remote control  

toward the sensor window of the unit.

•  The operation angle for front panel remote control  

reception is about 30 degrees.

•  The distance between the emitting window of the remote control and the sensor 

window of the unit should remain less than 5 meters.


!

13

REMOTE CONTROL (CONT.)

Button Names and Locations


30/34. VOL+(Volume Increase), VOL-(Volume Decrease)

   Press 

VOL+

 or 

VOL- 

button to increase or decrease volume level. 


32. SELECT(Audio/Function Settings) button

   Press this button to choose aud and function items or confirm
   the your settings. 

 33. AUDIO(Audio Language) button

   In DVD playback, press this button repeatedly to switch the
   language of audio if the DVD disc is recorded with multi-
   languages. In VCD playback, press this button repeatedly to
   switch L/R or stereo audio track.

Note: When using the remote control for the first time, you

must pull out the portective plastic tab from the battery

compartment found on the back of the remote control.

29

Summary of Contents for BV6658B

Page 1: ......

Page 2: ...Change Bands BND 6 Manual Tuning 6 Auto Seek Tuning 6 Auto Store Recall Preset Staion AMS 6 Store Recall Preset Station 1 6 6 Local DX Reception 6 Stereo Mono Reception 6 DVD CD MP3 USB Operation 7 9 Insert and Eject Disc USB 7 Play Pause Playback 7 Stop Playback 7 Selecting Next Previous Chapter Title Track 7 Fast Forward Backward 7 Introduce Scan 7 Repeat Playback 8 Random Playback 8 Track Searc...

Page 3: ...nt free cloth Do not use solvents or thinners such a petrol benzene or cleaners After removing a disc from the disc slot place the disc in a sleeve or case to keep it clean and prevent scratches Do not stick paper or tape on the disc surface If there is glue or adhesive on the disc surface remove it before using the disc Lithium Battery Cell Warnings Cell leakage may cause damage to the remote con...

Page 4: ...hassis as illustrated to separate the chassis from the housing BRACKET KEY BRACKET KEY PLASTIC TRIM OUT Mount Radio Refer to the Installation Diagram to install the unit 1 Bend the tabs on the mounting sleeve where necessary to ensure than the front part of the main unit will remain into the vehicle dash opening 2 Insert radio into the mounting sleeve 3 Use a metal strap to secure the rear part of...

Page 5: ... WASHER PLAIN WASHER TAPPING SCREW HEX NUT DASH BOARD METAL MOUNTING STRAP CONSOLE MOUNTING SLEEVE ACC Red GND Black ANT Blue Power B Yellow Green Purple Rear Right Speaker Front Right Speaker Rear Left Speaker Front Left Speaker Purple Black Green Black White White Black Gray Gray Black 15 1 Yellow Video Output Socket 1 2 White AUX Left CH Input 3 Red AUX Right CH Input 4 Yellow Video Output Sock...

Page 6: ... button RDM random Preset station 4 button 10 previous 10 tracks previous folder Zone A Front Speaker button 1 2 3 4 5 6 7 8 9 10 next 10 tracks next folder Zone B Rear Speaker button 10 CLK clock setting MUTE button end call button 11 tune seek down previous track fast reverse button 12 tune seek up next track fast forward button 13 Hands free Microphone 16 IR remote sensor 17 Display 18 USB Port...

Page 7: ...tes will 5 6 Finally press and hold the CLK button to confirm the time adjustments Change the Source SRC Press the SRC button to switch between RADIO BT DISC USB and AUX IN modes 2 Zone function ZONE A ZONE B This function enables audio to be separated from Front and Rear speaker outputs Press the ZONE A ZONE B button to turn on or off the front rear audio outputs ZONE A ON ZONE B ON ZONE A B ON Z...

Page 8: ...riefly press the AMS button on the remote control to scan each preset station in each band Store Recall Preset Stations 1 6 Local DX In urban areas most stations are strong enough and LOCAL ON mode should be selected Switch to LOCAL OFF mode to search for stations with weaker signals Press the LOC button on the remote control to choose local or distant reception mode Stereo Mono FM station is rece...

Page 9: ...e first 10 seconds of each track press again to stop the introduction scan and play the current track Selecting Next Previous Chapter Title Track To play the next chapter Title track press the or button To play the previous track press the or button Fast Forward Backward To fast forward press and hold the the speed of fast forward changes as follow X02 X04 X08 X20 Normal Playback or SEEK button Wi...

Page 10: ... Rotate the VOL knob to select the number of your favorite track or file with high speed You can also press the numerical keys on the remote control to select a specific track by its serial number c Finally press the SEL button to confirm and play the selected track GO TO During DVD VCD playback press the GOTO button on the remote control to search the desired track time to play the Disc The OSD w...

Page 11: ...mote control to turn on the PBC mode the PBC menu of VCD disc will be displayed on the connected monitor User can select the chapter by using the cursor keys and numeric keypad finally press the ENTER button to play the track Note This PBC function is suitable for the SVCD and VCD2 0 disc OSD On Screen Display In DVD VCD playback press this button repeatedly to show information such as Title numbe...

Page 12: ...the 0 9 and button on the remote control to input the telephone number the entered number will be shown on the LCD b If a number has been incorrectly input press the button to delete it c Press the button to make outgoing call Redial Last Dialed Number Press and hold the button on the control panel to redial the last dialed phone number Answer a Call When the mobile phone is called the incoming te...

Page 13: ...In DVD VCD MP4 MP3 mode press this button to enter different repeatedly playing modes RPT CHP chapter RPT TIT title RPT ONE RPT FLR folder RPT ALL 10 ST Stereo mono PROG Program In FM reception mode press this button to choose STEREO or MONO audio effect In DVD VCD mode press this button to enter the program play mode then user can set the sequence of playback 11 LOC LOC DX RDM Random button In FM...

Page 14: ...ain to resume volume level 22 CLK Clock Settings button Press this button to show clock time Press and hold this button to enter clock setting mode 23 Setup button In DVD VCD playback press this button to enter the setup page 24 Title button In DVD playback press this button to enter title menu 25 A ZONE A ZOOM zoom in out button Press the A button to turn on or off the front audio outputs ZONE A ...

Page 15: ...ontrol Operation Position the emitting window of the remote control toward the sensor window of the unit The operation angle for front panel remote control reception is about 30 degrees The distance between the emitting window of the remote control and the sensor window of the unit should remain less than 5 meters 13 REMOTE CONTROL CONT Button Names and Locations 30 34 VOL Volume Increase VOL Volu...

Page 16: ... a new password and confirm 5 RATING Parental Setup For DVD discs which support the USA rating system by using this function children will be barred from watching content that may not be suitable for their age You have to input the password when you want to change the rating setting Rating 1 KID SAFE Select it if the programs are safe to all kids view Rating 2 G Select it to indicate that it allow...

Page 17: ...ontrast Hue Saturation and Sharpness using the cursor keys and ENTER button on the remote control 1 BRIGHTNESS 0 2 4 6 8 10 12 2 CONTRAST 0 2 4 6 8 10 12 3 HUE 6 4 2 0 2 4 6 4 SATURATION 0 2 4 6 8 10 12 5 SHARPNESS 0 2 4 6 8 E SPEAKERS SETUP DOWNMIX 4 2 0 2 4 b KEY 12 10 8 6 4 2 0 BRIGHTNESS CONTRAST HUE SATURATION SHARPNESS DOWNMIX LT RT STEREO VSS ...

Page 18: ...ensitivity 30 dBu I F Frequency 10 7 MHz AM USA Europe 530 KHz 1710 KHz 522 1620 KHz Usable Sensitivity 20 dBu I F Frequency 450 KHz DVD PLAYER Usable Audio Formats DVD R RW CD R RW JPEG MP3 WMA Pre amp Output Front and Rear Frequency Response 20 Hz 20 KHz S N Ratio 60dB BT BT Profile supports Range of frequency A2DP AVRCP HFP 2 4GHz spectrum USB Port Type 2 0 USB Charging 5V 1A ...

Page 19: ...efore using player No sound Volume turned down Adjust volume to desired level Wiring not properly connected Check and repair wiring connection Operation keys not working Front panel not properly into place Reinstall the front panel Car interior is too hot Allow vehicle to cool before using player Sound skips Installation angle is more than 30 degrees Adjust installation angle to less than 30 degre...

Page 20: ......

Reviews: