background image

Settings in the service menu

51

Greenstar 8000 Style – 6720883855 (2019/01)

7.2.3

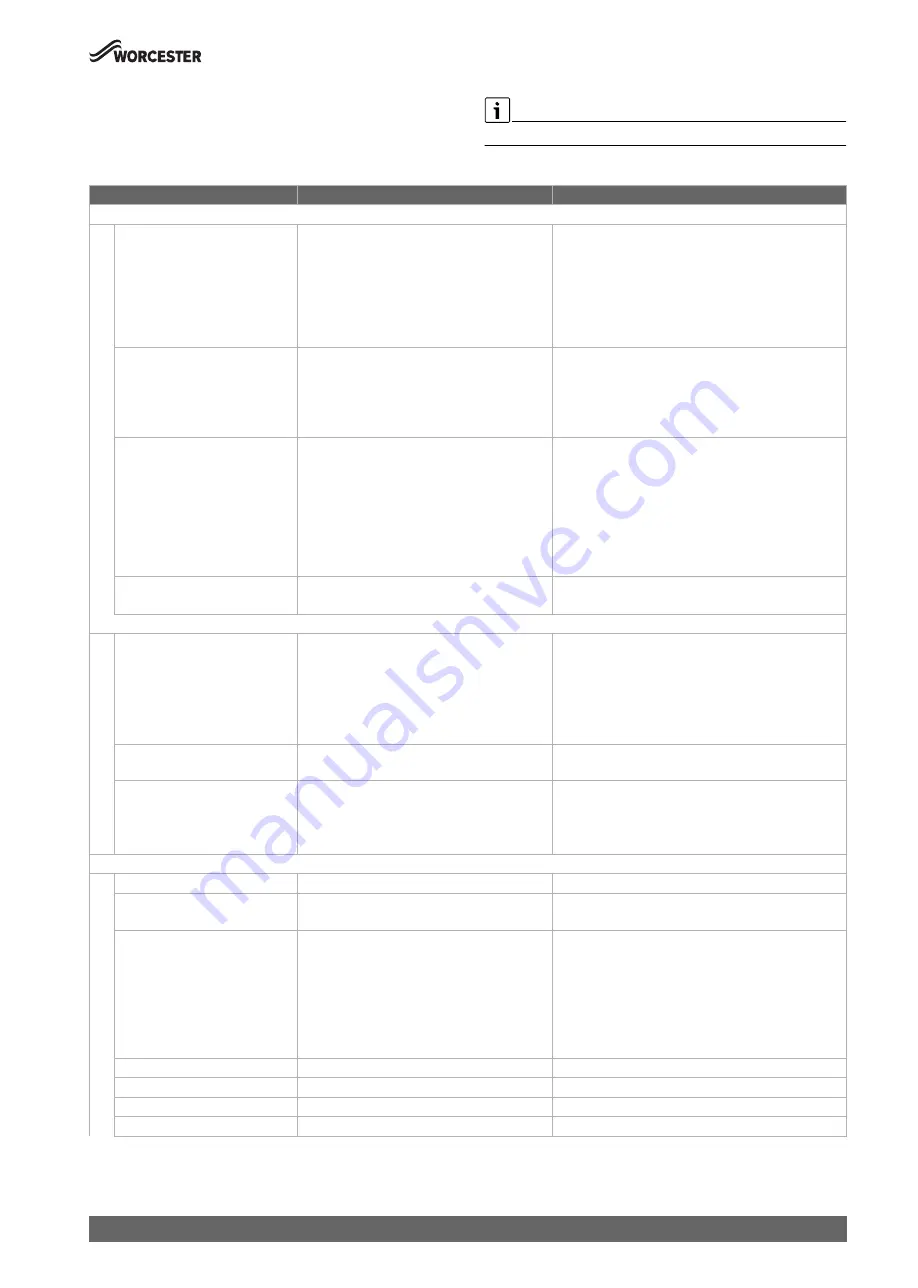
Settings menu

The menu is adapted to your system automatically. Some menu items are 
only available if the system has been set up accordingly. The menu items 
are only displayed in systems in which the corresponding system 
components are installed, e.g. Key Timer.

The factory settings are 

highlighted

 in the following table.

Menu item

Settings/adjustment range

Comment/restriction

Hydraulics

Low-loss header

• Low loss header not installed in the system
• Low loss header installed, temperature sensor 

connected to the wall mounted boiler

• Low loss header installed, temperature sensor 

connected to the heating circuit module

• Low loss header installed, but no temperature 

sensor is connected

Position of the low loss header temperature sensor

DHW configuration

• Not installed
• 3-way valve installed
• System?: Cyl. prim. pump inst. after low loss 

hdr.

• System?: Cyl. primary pump installed

HC1 configuration

• No heating circuit 1 (HK1) on the appliance 

(HK1 not available or not connected via the 
heating circuit module)

• No own pump (flow rate for HK1 is realised by 

the heating pump)

• Own HC1 pump downstream the low loss 

header

• Dedicated pump installed

Pump config.

• None
• Heating pump

Heating

Max. heat output

Maximum released thermal output [%].

On natural gas applainces: 
▶ Measure the gas rate.
▶ Compare the measurement with the setting tables 

(

 Chapter  12.6, page 72). 

▶ Correct deviations. 

Standby time

• 3…

10

…60 minutes

The time interval determines the minimum delay between 
starting and restarting the burner.

Clock inh. T. off

Clock inh. T. on

• 2  …

 6 

… 15 Kelvin

• -15...

 -6

...-2 Kelvin

Temperature standby period. 

The difference between the current flow temperature and 
the set flow temperature until the burner is switched on or 
off.

Hot water

Max. DHW output

• 10...

100

 %

Maximum power on hot water 

DHW circ. pump

Off

• On

Activation of hot water circulation pump

Cycle circ. pump

1 x 3 minutes/h

• 2 x 3 minutes/h
• 3 x 3 minutes/h
• 4 x 3 minutes/h
• 5 x 3 minutes/h
• 6 x 3 minutes/h
• Permanent

Number and duration of starts of hot water circulation 
pump per hour

TD-Temperature

• 60...

70

…80  °C

Max. TD duration

10

…30 minutes

Max. duration of legionella protection cycle in minutes

Start TD

Start now?

Start legionella protection cycle

Stop TD

Cancel now?

Stop legionella protection cycle

Summary of Contents for Worcester GR8700iW 30 S NG

Page 1: ...6720883855 2019 01 UK IE Installation and Maintenance Instructions Gas fired condensing system boiler Greenstar 8000 Style GR8700iW 30 S GR8700iW 35 S GR8700iW 30 SB GR8700iW 35 SB ...

Page 2: ...ret adaptor installation 35 5 5 Electrical connection 36 5 5 1 Installer connections 36 5 5 2 Cable preparations 38 5 5 3 External controls domestic installations 38 6 Commissioning 39 6 1 Pre Commissioning checks 39 6 2 Water treatment 39 6 2 1 Filling the appliance and adding Inhibitor 39 6 2 2 Adjusting the operating pressure of the heating system 40 6 3 Starting the appliance 40 6 3 1 Control ...

Page 3: ...raining the appliance 64 9 2 Overheat thermostat removal 65 9 3 Pressure sensor removal 65 9 4 Pressure relief valve removal 65 9 5 Replacing the gas valve 65 9 6 Checking replacing the motor of the 3 way valve 66 9 7 Replacing the optional 3 way valve 66 9 8 Following inspection maintenance 66 10 Fault finding and diagnosis 67 10 1 Operating and fault displays 67 10 1 1 General information 67 10 ...

Page 4: ...sibility of the designer installer of the flue to ensure this flue gas system operates correctly and in a safe manner H If you smell gas A gas leak could potentially cause an explosion If you smell gas observe the following rules Prevent flames or sparks Do not smoke use a lighter or strike matches Do not operate any electrical switches or unplug any equipment Do not use the telephone or ring door...

Page 5: ... manage and promote the scheme Visit centralheating co uk for more information H Health and safety The appliance contains no asbestos and no substances have been used in the construction process that contravene the COSHH Regulations Control of Substances Hazardous to Health Regulations 1988 H Combustion and corrosive materials Do not store or use any combustible materials paper thinners paintsetc ...

Page 6: ...ctice for domestic and hot water supply BS6891 Installation of low pressure gas pipe work up to 28mm R1 BS5546 Installation of gas hot water supplies for domestic purposes EN12828 Central heating for domestic premises BS5440 1 Flues and ventilation for gas appliances of rated heating not exceeding 70kW net Flues BS5440 2 Flues and ventilation for gas appliances of rated heating not exceeding 70kW ...

Page 7: ...ance types Table 2 Type overview The name of the appliance consists of the following parts GR8700iW Type name 30 or 35 Heat output in kW S System appliance B Black font panel NG Gas type Natural Gas LPG Gas type Liquid Petroleum Gas 3 6 Product identification Data plate The data plate includes the product performance information approval data and serial number The data plate location can be found ...

Page 8: ... height 780 Z Appliance depth 365 W Flue centre from appliance left side 220 D Flue centre from rear of appliance 87 0010023464 001 1 2 3 4 5 6 7 Function From left case edge Diameter of pipe 1 Condensate Outlet 58mm 22mm Rubber push fit connection 2 CH Flow 90mm 22mm Compression fitting 3 Cylinder Return 1 155mm 15mm Compression fitting 4 Gas inlet 220mm 22mm Compression fitting 5 Cylinder Flow 1...

Page 9: ...oved 1 KEY accessory housing slot wireless Gateway 2 Condensate trap 3 Data plate 1 4 Pressure sensor 5 Pressure gauge 6 Venturi sealed 7 Schrader Valve 8 Fan 9 Expansion vessel 10 Heating flow 11 Air gas manifold with non return valve 12 Ignition transformer 0010023657 001 13 1 12 10 9 7 8 6 22 11 4 15 16 17 18 19 20 21 24 25 27 28 5 29 14 2 23 3 26 ...

Page 10: ...ate 2 24 Diverter valve accessory 25 Heating pump 26 Drain point 27 Pressure relief valve heating circuit 28 Central heating return 29 Control unit 3 9 Product data for energy consumption The product data on energy consumption can be found in the operating instructions for the user 3 10 Standard accessories Theappliancehastheoptiontofitanintegraldivertervalvekit whichhas multiple controls options ...

Page 11: ... are left open If the circulating pump speed is fixed and system circulation can be significantly adjusted or stopped by TRV s or zone valves a system bypass should be installed to give at least a 3 metre circuit when activated However any appliance fitted with a modulating pump may not require a system bypass Drain cocks are required at all the lowest points on the system Air vents are required a...

Page 12: ... cylinder Sealed primary system Cylinder and 2 x central heating zones Typical S Plan Plus example The cylinder return must be the last connection on the common return pipe to prevent reverse circulation Fig 7 Cylinder and 2 x heating zones 1 Appliance 2 Zone valves 3 Hot water cylinder Sealed primary system 3 way valve cylinder and central heating zone Typical Y Plan example The cylinder return m...

Page 13: ...rmanent live to the appliance preventing any heat being produced from the appliance Fig 10 Example layout Internal diverter valve kit with unvented cylinder and cylinder safety valve 1 Appliance with internal diverter valve kit 2 Cylinder safety valve unvented cylinder 3 Unvented hot water cylinder 4 1 4 System fill Filling primary sealed systems NOTICE Filling the primary sealed system The system...

Page 14: ...s When using this table to estimate the gas flow rate in pipe work of a knownlength theeffectivelengthwillbeincreasedby0 5mforeach 90 elbowandteefittedandby0 3mforeach90 bend Thismethod is only a estimate for more complex design please refer to BS6891 2015 and training given in ACS Liquid Petroleum Gas LPG Discharge rates for copper tube with 2 5mbar differential pressure between the ends for LPG ...

Page 15: ...f flues in voids Thehomeownercangainclearandsafeaccesstothecontrols check top up or reset the appliance Roof space installations must fully conform to BS 5410 part 1 roof space installations Products in roof spaces must have permanent fixed lighting a permanentfixedretractableladderandafixedfloorareasufficientto allow access for normal use and servicing around the product and between and the acces...

Page 16: ...heWorcester BoschGroupfluekitfor complete installation instructions Flue kit part numbers Table 8 Flue kit assembly part numbers 4 4 1 Flue length The maximum flue length will depend on the following factors 60 100mm flue system Vertical horizontal flue type Appliance output Plume management length 80 125mm flue system Vertical horizontal flue type Appliance output Horizontal maximum flue lengths ...

Page 17: ...ength L adaptor bend included in length calculation 60 100 330 1 050mm 80 125 N A Extended horizontal flue Fig 18 Horizontal flue option Flue length L adaptor bend included in length calculation Maximum flue length as stated in Horizontal maximum flue lengths Horizontal flue with additional 90 elbow Fig 19 Horizontal flue option Flue length L adaptor bend included in length calculation Maximum flu...

Page 18: ... as stated in Horizontal maximum flue lengths minus 2 x 90 bends equivalent straight flue length as stated in Table 11 Effective length of bends Vertical balanced flue assembly Fig 24 Vertical flue option Flue length L Maximum flue length as stated in Vertical maximum flue lengths Vertical balanced flue with 90 elbow offset Fig 25 Vertical flue option Flue length L Maximumfluelengthasstatedin Vert...

Page 19: ...e a minimum10 fallback stoptabsintheelbowpreventlessthan10 to the appliance for proper disposal of condensate Any further horizontal runs after an elbow can be 3 WARNING Minimum plume management length The minimum distance of 500mm must be maintained between air inlet and exhaust Do not terminate the plume management inside the terminal exclusion zone shaded area shown in figure 28 Fig 28 Terminal...

Page 20: ...ure 6 The flue must not penetrate the roof in the shaded area The terminal must be at least 1500mm from the opening or vent whensitedbelowthewindowor600mmwhensitedtoeitherside or above 7 400mm measured diagonally from a pitched roof or 500mm in regions with heavy snow fall 300mm measured vertically from the air intake to the closest intersection with the roof 8 1 200mm separation between a vertica...

Page 21: ...dowor600mmwhensitedtoeitherside or above 7 600mm diagonally to an opening door air vent or opening window 8 1 200mm separation between a vertical flue measured horizontally and a horizontal flue terminal Not required if the horizontal flue is 1 200mm above 9 Forthepurposeofdeterminingsuitableflueterminalpositionsfor gas appliances the boundary can be considered to extend to the centre line of any ...

Page 22: ...annot be lower than 1 000mm from the top of a light well due to the build up of combustion products Dimensionsfromaflueterminaltoafannedairinlettobedetermined by the ventilation equipment manufacturer A flue terminal guard shall be fitted whenever a terminal or air inlet is fitted less than 2 000mm above ground above a balcony or above a flat roof to which people have access 4 4 5 Plume re direct ...

Page 23: ...isance BS 5440 Part 1 recommends that care is taken when siting terminal in relation to surfaces or boundary lines 8 300mm distance from a boundary line to the air intake as long as the exhaust terminal faces away from the boundary line The exhaust terminal must have a minimum 300mm clearance to a surfacebelowandtheremustbeatleast600mmclearancewhen measured horizontally in a straight line from the...

Page 24: ... minimize the risk of freezing wherever possible the condensate drain should be installed internally 2 Allcondensatepipeworkmust fall fromtheappliancebyaminimum of 3 52mm per metre to ensure adequate condensate flow 3 The pipe work route must allow air to be supplied back to the appliance for correct operation 4 Connection to a rainwater down pipe must include an air break Also The condensate pipe...

Page 25: ... pump Figure 34 Where direct connection to a gravity discharge pipe work is not physicallypossible orwhereverylonginternalrunswouldberequiredto reach a suitable discharge point condensate should be removed using a proprietary condensate pump of a specification recommended by the condensate pump manufacturer The pump outlet should discharge to a suitable gravity discharge outlet The condensate then...

Page 26: ...ly followed As well as trace heating other methods of protecting pipe work that is run externally should be considered to prevent freezing in prolonged periods Insulation materials can be used these should be of class O grade with an outer coating that is weather proof bird animal proof and have a UV resistant finish A minimum of 19mm thick insulation is recommended for 32mm external pipes The use...

Page 27: ...0mmfromthe bottom of the tube The holes must face away from the house The tube must be surrounded by at least 100mm of limestone chippings to a depth of 400mm An air break must be installed in the external pipe work as shown to avoid an airlock during ground flooding adverse weather conditions which could prevent the condensate from discharging Minimum hole size for the condensate soak away must b...

Page 28: ...he Building Regulations to flush and inhibit the primary water system in accordance with BS 7593 TheBuildingServicesComplianceGuiderecommendsthataprimary water cleanser is fitted to the system WorcesterBoschrecommendfittingafilterthatwillhelpremoveboth magnetite and non magnetic debris Worcester offers two filters that helps remove both magnetite and non magnetic debris 22mm version part number 7 ...

Page 29: ...en 1 and 1 5 bar via a WRAS approved filling loop Vent any air from the appliance and system New appliance Once the new appliance has been installed follow the guidance in Filling the appliance and adding inhibitor section 5 Installation NOTICE Risk of damage to appliance or accessories All the previous pre installation sections must be read and requirements met before starting the appliance or fl...

Page 30: ...uld share the lifting of the appliance up to the loft hatch tilt and slid on its back into the loft space Ensurethattheroofspacehaspermanentfixedlighting apermanent fixed retractable ladder and a fixed floor area from the hatch to the appliance installation point This will allow access for installation normal use and servicing Before installing the appliance ensure that the system has been cleaned...

Page 31: ...x the wall mounting template 3 to the wall in the desired position Drill the holes 4 through the template for the primary fixing points as indicated on the template Additional fixing points for the appliance will be indicated on the wall mounting template Flue outlet position The appliance wall mounting template has the flue centre lines for the following flue systems 60 100mm 80 125mm Flue turret...

Page 32: ...if available to the wall Checkwhetherthescrewsandwallplugssuppliedwiththeappliance can be used Remove installation template from wall Drill suitable holes for the selected wall plugs and screws Fastenthemountingbrackettothewallusing4 screwsandwallplugs scope of delivery Attach the mounting plate to the lower screws and tighten Fig 43 Fitting the mounting bracket and the mounting plate 5 2 Applianc...

Page 33: ... care to protect the floor from residual water It is not necessary to lay the appliance on its back 2 After soldering connecting pipes ensure that the appliance internal plastic PRV pipe 1 is then connected to the Pre plumbing manifold the printing on the pipe must be facing towards you 3 Ensure that 3 black plastic ratchet clips are securely fixed and tightened Ratchetclipnumber4mustbefittedbutle...

Page 34: ...onnections Connect the condensate discharge pipe work to the boiler s condensate outlet connections Fitting the drain pipe on the heating pressure relief valve Fig 48 Fitting the pipe on the heating pressure relief valve Fitting the condensate pipework Secure the pipe to the wall at the last joint Ensure the pipe protrudes through the wall frame by 25mm If exiting through the wall to run externall...

Page 35: ...s are pushed fully home and secured Thefluerisesfromtheapplianceatanangleof3 or52mmpermetre length Support the flue at each flue extension joint and at each change of direction use suitable brackets and fittings Flue bracket silver 100mm part number 7 738 112 876 Support Bracket Kit silver 7 738 112 876 Flue bracket 100mm part number 7 716 191 177 Flue brackets 100mm x 6 part number 7 716 191 178 ...

Page 36: ...t are connected to the appliance that require 230 Volts must be connected to the same supply as the appliance Type A RCDs must be employed where additional protection is required External fuse 3 Amps When stripping the wires ensure copper strands do not fall into the control box NOTICE Risk of damage from hot appliance components Hot appliance components can damage electrical cables Ensure all ele...

Page 37: ...rmostat supply FR input frost thermostat return 0010019570 001 5 7 Ø Ø 8 9 Ø 10 12 13 14 Ø 0010023703 001 PE PC0 N L PW2 N L FS FR LR LR PW1 N L N IN 230V OUT 230V L L N TW1 1 2 T1 1 2 T0 1 2 LF0 1 2 I3 1 2 I1 1 2 BUS 1 2 TW1 1 2 T1 1 2 T0 1 2 LF0 1 2 I3 1 2 I1 1 2 BUS 1 2 PE PC0 N L PW2 N L FS FR LR LR PW1 N L N IN 230V OUT 230V L L N N IN 230V L OUT 230V L N LR LR FS FR Without function Without ...

Page 38: ...ows for the Worcester controls options to be used which details can be found in the diver valve kit instructions The power supply to external controls must be taken from the appliance an alternative power supply must not be used Appliance external control connections example Theelectricalpowersupplytotheexternalequipment 2 issupplied from 230V OUT L Live N Neutral and PE earth terminals The Switch...

Page 39: ...he materials within the appliance aluminium mild steel stainless steel copperandbrass andanyothermaterials componentswithinthe system Record the date when the inhibitor was added to the system on the guarantee card The concentration level of inhibitor in the system should be checked every 12 months or sooner if system content is lost NOTICE Sealing agents Normally the addition of sealing agents to...

Page 40: ...ing mode on off set the maximum flow temperature 8 Burner display Illuminates when the burner is alight See the operating instructions for a description of the user menus 6 3 2 Turn on the appliance Set the language the first time the appliance is turned on To scroll through the languages press the or the key To select the desired language press the OK key When the display shows Siphon fill prog t...

Page 41: ...cedure It will be necessary to run water through the domestic hot water circuit to ensure that the appliance will not overheat whilst in chimney sweep mode In chimney sweep mode the rated output of the appliance can be selected Press the OK key when the countdown is completed and Chimney sweep is displayed Confirm the query with Yes Set the desired rated output using the or the keys The value is a...

Page 42: ...r Exit the chimney sweep mode Switch off the appliance close the gas isolator remove the pressure gauge and tighten the screw Check for gas tightness Fig 64 Refit combustion casing Refit the combustion casing Ensure this cover is engaged onto top bracket 1 before securing screw 3 Gas pressure within the system The appliance must be running at maximum output rate when performing the gas rate check ...

Page 43: ...low the product to come into contact with the electrical wiring 6 9 CO and combustion check The following combustion and flue integrity checks are mandatory and these values must be recorded on the Benchmark check list at the end of these instructions Once the gas rate and pressure have been confirmed as acceptable then the CO and combustion checks can be undertaken Theflowchartisgivenforguidance ...

Page 44: ...e point 1 Allow the readings to stabilise and check that O2 is equal to or greater than 20 6 CO2 is less than 0 2 If the readings are outside these limits then this indicates that there is a problem with the flue system or combustion circuit Yes No Yes Yes Set boiler to minimum rate Check all seals around the burner internal flue seals and case seals Rectify where necessary Turn off boiler and cal...

Page 45: ... checked and is satisfactory Refit the test point plugs after the test has been completed The flue gas analysis performance of the appliance can be checked via the flue turret adaptor sample points Flue gas sample point location on flue turret adaptor Fig 69 Combustion test 1 Flue gas sample point 2 Flue turret flue gas blank plug 3 Flue adaptor flue gas blank plug 6 12 Finishing commissioning 6 1...

Page 46: ...ianceinformationis located they will need this information if they call in with a problem Benchmark Commissioning checklist on page 75 contains all relevant appliance information Give the customer details of how to contact the installer gas emergency numbers Show the customer how to safely isolate the appliance Advise the customer where they can find information on the Worcester Bosch Group websit...

Page 47: ...llation neglect misuse or accidental damage or the nonobservance of the instructions contained in the Installation and Users Instructions leaflets The appliance has been used only for the normal domestic purposes for which it was designed Thatthisguaranteeappliesonlytoequipmentpurchasedandusedin the United Kingdom of Great Britain and Northern Ireland the Republic of Ireland the Isle of Man or the...

Page 48: ...C1 configuration Pump config Heating Mx heat outp Standby time Clock inh T off Clock inh T on Hot water1 Max DHW output DHW circ pump Cycle circ pump Turbine signal del DHW start del Preheat Man TD line TD Temperature Max TD duration Start TD Stop TD Pump Pump range map Pump ctr mode Min output Max output Pump overrun Min syst pressure Target pressure Special function Ventilation func Siphon fill ...

Page 49: ...3855 2019 01 Solar pump type Start solar system Function check Activate test Burner Ignition Fan Pump Cyl prim pump 3 way valve HC1 pump DHW circ pump Ionisat oscill Solar pump Reset Default setting Fault history Hidden menu Reset Maintenance Landlord Demo mode ...

Page 50: ...A Pump mod Actual system pump modulation in Outside temp Current outside temperature in C HC1 pump Current status on off Burner starts Number of burner starts since commissioning Hours run Elapsed time of the system since commissioning System pressure Current system pressure in bar Hot water Max outp Max hot water output in Max outp kW Max hot water output in kW DHW flow rate Current hot water flo...

Page 51: ...ed via the heating circuit module No own pump flow rate for HK1 is realised by the heating pump Own HC1 pump downstream the low loss header Dedicated pump installed Pump config None Heating pump Heating Max heat output Maximum released thermal output On natural gas applainces Measure the gas rate Compare the measurement with the setting tables Chapter 12 6 page 72 Correct deviations Standby time 3...

Page 52: ...1 2 60 minutes 24 h 24 hours Run on time of the heating pump pump run on time begins at the end of the heat requirement Min syst pressure 1 2 3 bar Target pressure 0 8 1 3 1 8 bar Special function Ventilation func Off Auto On The ventilation function can be activated after maintenance During ventilation the following appears in the info area of the standard display Ventilation func Siphon fill pro...

Page 53: ...q odr temp Off On When connecting a weather compensated control unit no adjustment to the appliance is required The system control unit optimises this setting This service function activatesasimple weather compensatedcontrollerwith alinearheatingcurve Dependingontheon offinput the heating is switched on or off Htg curve base 20 90 C This is only displayed if the controller was activated This can b...

Page 54: ... at least 3 minutes Restore the original settings Menu item Settings adjustment range Comment restriction Activate test Burner Off 100 This service function enables testing of the burner Ignition On Off Permanent ignition Test the ignition with permanent ignition without gas supply Topreventdamagestotheignitiontransformer never leave this function on for longer than 2 minutes Fan On Off Permanent ...

Page 55: ...appliance when tested by qualified engineers Aftereachservice theserviceintervalrecordsheetattherearofthis manual must be completed See the following instructions for detail of some of the service requirements Check that the safety and regulation appliances 3 bar pressure release valve air bleed etc are operating properly Check all joints and connections in the system and remake any that show sign...

Page 56: ... securing both sides the outer case 3 Pullbottomoffrontcoverforwardsandupwardstoreleasetheclipon top of the boiler and remove outer case Fig 73 Removing outer case 8 5 Fan pressure test NOTICE Fan pressure test The appliance must be running at maximum output in test mode for the fan pressure test chapter 6 4 Fig 74 Fan pressure test point This test is to determine if the heat exchanger requires cl...

Page 57: ...centage reading Table 22 CO2 and O2 contents If the CO2 is out of tolerance then please check The gas inlet pressure The gas rate The fan test pressure Theflueandairintake plusanypossibleblockagesinthecondensate disposal The condition of burner For leaks or obstructions in the exhaust paths CO2 is correctly adjusted The gas valve and venturi are factory set and should not need to be adjusted if fo...

Page 58: ... including a new gasket Install the burner and the burner cover Check the gas air ratio 8 9 2 Checking the non return valve in the air gas manifold 1 Unscrew the screws at the air gas manifold 2 Remove the air gas manifold Fig 78 Removing the air gas manifold 1 Remove the non return valve 2 Check the non return valve for contamination and cracks Fig 79 Non return valve in the air gas manifold Inst...

Page 59: ...position Disconnect electrical wires to the fan ignition transformer spark electrodes flue overheat thermostat main heat exchanger temperature sensor and flow pipe temperature sensor Flueway Fan assembly Ignition transformer Spark electrode assembly Burner housing burner and gasket Cleaning the heat exchanger Remove the siphon and place a suitable container under the outlet to catch the water and ...

Page 60: ...le of the brush to remove debris from the condensate tray It is possible to rinse any remaining debris from the heat exchanger either through the access point or alternatively through the top of the heat exchanger when the burner is removed Pour water into the heat exchanger to rinse the debris through to the suitable container below the outlet to the siphon Fig 85 Pour water into the heat exchang...

Page 61: ...ck tightness of electrode set Fig 89 Checking for leaks 8 9 6 Cleaning the siphon Cleaning the condensate trap WARNING Danger to life due to poisoning If the condensate trap is not filled poisonous flue gas can escape Onlyturnoffthesiphonfillingprogramduringmaintenance andturn it back on at the end of maintenance Make sure that the condensate drains off properly Damages resulting from an insuffici...

Page 62: ...d venturi are factory set and should not need to be adjusted if found to be out of tolerance and when all other possible causes have been checked please contact the Worcester Bosch Group Helpline 0330 123 3366 NOTICE Combustion testing The setting of the air gas ratio must be carried out by a competent registered gas engineer such as a Gas Safe registered engineer or British Gas engineer Setting o...

Page 63: ...eepmodeandstartuptheapplianceatmaximum rated output Measure the CO2 or O2 content Check the CO2 or O2 content at maximum rated output according to Tab 23 and adjust if required SecuritySeal 1 Fig 95 mustberemovedbeforeadjustingtheMax CO2 setting Once adjustment has been made the seal must be replaced with part number 8737708988 ToincreasetheCO2 content removeseal 1 andturntheadjustable venturi to ...

Page 64: ...he heat exchanger and Flueway until new gaskets and seals are available Afterreplacementofagasrelatedcomponent whereagasketorseal has been disturbed or replaced check for gas tightness using a gas sniffer analyser On re assembly check all affected seals for cracks hardness and deterioration If damaged or in any doubt the seal must be replaced Also after re assembly carry out the following checks F...

Page 65: ...ig 90 Pull the spring forward 1 Remove the pressure sensor 2 9 4 Pressure relief valve removal Open the cover Fig 54 Remove the condensate trap Fig 90 Pull the spring up 1 Press the PRV Pipe down lightly 2 Remove the Pressure relief valve 3 9 5 Replacing the gas valve Close the gas isolator 1 Unscrew the bayonet connection 2 Unscrew the union nut 3 Remove the gas pipe Fig 99 Removing the gas pipe ...

Page 66: ...e motor of the 3 way valve in the Service menu Special function 3 WV mid pos Yes 1 Pull out the motor 2 Press the cable retaining clip 3 Unplug the plug Fig 102 Removing the motor of the 3 way valve 9 7 Replacing the optional 3 way valve Remove the screws Pull out the 3 way valve Press the cable retaining clip Unplug the plug Fig 103 Removing the 3 way valve 9 8 Following inspection maintenance Re...

Page 67: ...normal operation Fault category B blocking faults Blockingfaultsresultintheheatingsystembeingshutdowntemporarily Theheatingsystemrestartsautomaticallyassoonastheblockingfaultis removed Fault category V locking faults Locking faults result in the heating system being shut down and the system can only be restarted after a reset Press the and keys until Reset is displayed The appliance resumes operat...

Page 68: ... to the temperature sensor 3 Replace the control unit 2920 V Fault in flame monitoring 2927 B Flame failed during burner operation 1 Open the main shut off valve 2 Open the appliance shut off valve 3 Shut down the appliance and check the gas line 4 Signal evaluation on printed circuit board defective 5 Replace the ionisation electrode 6 Establish protective conductor connection PE in the control u...

Page 69: ...o the pressure sensor 4 Replace the pressure sensor Fault code Fault category Fault text on the display description Remedy Appliance faults Remedy Combustion noises too loud rumbling noises Check the gas type Check the gas supply pressure Check the flue system clean or repair if required Check the gas air ratio Check the air gas ratio control valve replace if required Flow noises Set the pump rate...

Page 70: ... kW 2 9 2 9 5 0 5 0 Maximum flow temperature C 70 70 70 70 Maximum flow temperature possible C 82 82 82 82 Maximum permissible operating pressure PMS bar 2 5 2 5 2 5 2 5 Available pump head at 20 K C system temperature rise m 2 0 2 0 2 0 2 0 Flue Flue gas temperature 80 60 C max min load C 67 56 67 56 72 56 72 56 Flue gas temperature 40 30 C max min load C 49 31 49 31 52 31 52 31 CO2 level at max ...

Page 71: ... Pump characteristic map constant pressure 350 mbar 6 Pump characteristic map constant pressure 400 mbar A Pump curve at maximum pump rate B Pump curve at minimum pump rate H Residual head V Flow rate When the burner is running at a minimum rated heat Type Gas type OK Faulty GR8700iW 30 S Natural gas 3 A 3 A LPG 3 A 3 A GR8700iW 35 S Natural gas 7 A 7 A LPG 10 A 10 A Temperature C 10 Resistance 20...

Page 72: ...20 8 69 36 20 0 21 9 73 38 21 0 23 1 77 41 22 0 24 3 80 43 23 0 25 5 84 45 24 0 26 7 88 47 25 0 27 9 92 49 26 0 29 1 96 51 26 9 30 2 100 53 G20 20 mbar Gross calorific value HS 0 C kWh m3 11 2 Net calorific value Hi 15 C kWh m3 9 5 Performance kW Load kW Display Gas volume l min at TV TR 80 60 C 6 1 6 3 18 11 7 0 7 2 21 13 8 0 8 3 24 15 9 0 9 3 27 16 10 0 10 3 30 18 11 0 11 3 33 20 12 0 12 4 36 22...

Page 73: ...k 5 Flame sensing electrode 6 Ignition electrode 7 Heating block temperature limiter 8 Ignition transformer 9 Fan 10 Control cable of the heating pump 11 Heating pump 230 V 12 Connecting lead for KEY slot 13 Display 14 Code plug 2 3 4 6 11 8 10 16 1 0010023666 001 5 9 L N L 230V OUT 230V IN PE FR FS LR LR L N PW1 PW2 PC0 BUS I3 LF0 T1 TW1 T0 I1 1 2 1 2 N N L N L 1 2 1 2 1 2 1 2 1 2 4 6 5 8 4 7 5 1...

Page 74: ...pecifications Logs Greenstar 8000 Style 6720883855 2019 01 74 15 Terminal strip for external accessories terminal assignment Tab 13 16 3 way valve Accessory 17 Connecting lead 18 Earth PE 19 Earth bar 20 Not used ...

Page 75: ...rimary water system filter been installed Yes No The condensate drain has been installed in accordance with the manufacturer s instructions and or BS5546 BS6798 Yes CENTRAL HEATING MODE measure and record Gas rate m3 hr OR ft3 hr Burner operating pressure if applicable mbar OR Gas inlet pressure mbar Central heating temperatures Flow temperature C Return temperature C COMBINATION BOILERS ONLY Is t...

Page 76: ...s Yes Yes Yes No Yes Yes Yes Yes Yes Year 3 ________________________ ___________________ Yes Yes Yes Yes Yes Yes Yes Yes Yes No Yes Yes Yes Yes Yes Year 4 ________________________ ___________________ Yes Yes Yes Yes Yes Yes Yes Yes Yes No Yes Yes Yes Yes Yes Year 5 ________________________ ___________________ Yes Yes Yes Yes Yes Yes Yes Yes Yes No Yes Yes Yes Yes Yes Year 6 _______________________...

Page 77: ...ignature SERVICE 05 Date SERVICE 06 Date Engineer name Engineer name Company name Company name Telephone No Telephone No Gas safe register No Gas safe register No Record At max rate CO ppm AND CO2 Record At max rate CO ppm AND CO2 Atmin rate Wherepossible CO ppm AND CO2 Atmin rate Wherepossible CO ppm AND CO2 Comments Comments Signature Signature SERVICE 07 Date SERVICE 08 Date Engineer name Engin...

Page 78: ......

Page 79: ......

Page 80: ... Kingdom Tel 0330 123 9559 worcester bosch co uk TECHNICAL SUPPORT 0330 123 3366 RENEWABLE SUPPORT 0330 123 9229 CONTROLS AND CONNECTIVITY TEAM 0330 123 3641 APPOINTMENTS 0330 123 9339 SPARES 0330 123 9779 LITERATURE 0330 123 9119 TRAINING 0330 123 0166 SALES 0330 123 9669 ...

Reviews: