Unpacking and Checking Contents
To reduce the risk of injury,
never connect plug to power
source outlet until all assembly steps are com-
plete and until you have read and understood
the entire owner’s manual.
Model TC10 Tile Saw is shipped complete in one
box.
Separate all parts from packing materials and
check each one with the “Table of Loose Parts” to
make sure all items are accounted for before dis-
carding any packing material.
If any parts are missing, do not
at tempt to assemble the saw,
plug in power cord or turn the switch on until
the missing parts are obtained and are in-
stalled correctly.
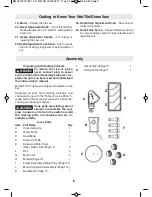
loose parts
Item part Name Qty
A Universal Guide 1
B Water Pump 1
C Saw Blade 1
D Extension Table 1
E Extension Water Trays
(Rear, Side A & B) (Page 10) 3
F Bolt 4
G Bolt Cover 4
H Manual (Page 10) 1
I Frame Assembly & Water Tray (Page 10) 1
J Motor/ Support Arm Assembly (Page 10) 1
K Nut Wrench (Page 11) 1
L Hex Wrench (Page 11) 1
M
Sliding Table (Page 11 1
Assembly
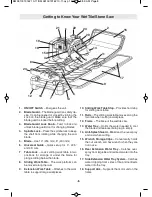
Getting to Know Your Wet Tile/Stone Saw
19. Motor
– Powers the tile saw.
20. Bevel Adjustment Knob
– To tilt the head for
making bevel cuts, 22.5° and 45°, and adjusting
back to 0°.
21. Depth Adjustment Handle
– For raising or
lowering the saw unit.
22. Depth Adjustment lock Knob
– Turn to unlock
head for making plunge cuts or setting depth of
cut.
23. Depth Stop Adjustment Knob
– Sets stop for
lowest cut position.
24. Work-Table fence
– Support tile/stone during
cut, also features scale for quick reference and
repetitive cuts.
!
WARNING
!
WARNING
-9-
A
B
C
G
f
D
BM 2610019162 10-11:BM 2610019162 10-11.qxp 10/20/11 8:59 AM Page 9


