background image

en

26

en

Subjekt to modification

Summary of Contents for SGS55E82EU

Page 1: ... ...

Page 2: ......

Page 3: ...oftener 6 Filling the salt dispenser 7 Adding rinse aid 7 Utensils 8 Detergent 11 auto 3in1 12 Overview of programmes 14 Washing dishes 15 Additional functions 17 Maintenance and care 17 Fault finding 20 Customer Service 22 Information 23 Installation 23 Waste disposal 25 ...

Page 4: ...ntains an electrically operated valve The connecting wires are inside the inlet hose Do not cut through this hose and do not immerse the plastic housing in water Warning For safety reasons if the appliance is not fitted in a recess thereby making a side wall accessible the door hinge area should be covered at the side Risk of injury Covers are available as optional accessories from customer servic...

Page 5: ... Warning Children could get locked in the appliance risk of suffocation or get stuck in other positions Therefore Remove the mains plug cut the mains wire and set aside Damage the door lock so that the door can no longer be closed Getting to know your appliance Diagrams of the control panel and the interior of the appliance can be found in the envelope at the front Individual positions are referre...

Page 6: ... agent can help you with this Identify setting from the following water hardness table Water hardness table Close the door Rotate the programme selector 3 from the 12 o clock position by one notch to the left Switch on main switch 1 and hold down for at least 3 sec The digital display 8 indicates the current set hardness value and the salt refill indicator 6 flashes hardness value has been set to ...

Page 7: ...t refill indicator is switched off Warning Do not pour detergent into the container for special salt This would destroy the water softener Salt refill indicator As soon as the salt refill indicator 6 is lit on the control panel refill with salt immediately before the next rinse cycle Depending on the washing frequency and the hardness setting the regeneration salt may not have to be topped up for ...

Page 8: ...c parts sensitive to hot water Copper and tin utensils Utensils which are soiled with ash wax lubricating grease or ink Absorbent materials such as sponges and cloths Aluminium and silver parts have a tendency to discolour and fade during the wash cycle Even some types of glass e g crystal glass objects may turn cloudy after many wash cycles Recommendation In future buy utensils which are identifi...

Page 9: ... dishes To prevent water dripping from the top basket onto the dishes in the lower basket we recommend that you empty the lower basket first and then the top basket Cups and glasses Upper basket 20 not included with all models Pots and pans Lower basket 27 Cutlery Cutlery should be placed in the dishwasher always unsorted and with the eating surface pointing downwards The spray jet is then better ...

Page 10: ... g cups lids etc can be held securely in the small accessories holder Adjusting the height of the basket some models If required the height of the upper utensils basket can be adjusted to provide more space for tall utensils either in the upper or lower basket Appliance height in cm 81 86 Max ø in cm upper 20 25 20 25 max ø in cm lower 30 25 34 29 Select one of the two following procedures accordi...

Page 11: ...died by adding more detergent See detergent packaging to determine whether a detergent is suitable for silver parts If you have any other questions we recommend that you contact the helplines of the detergent manufacturers Detergent dispenser with dosing aid The graduated detergent dispenser helps you pour in the correct amount Lower line 15 ml Middle line 25 ml Full to the brim 40 ml If the deter...

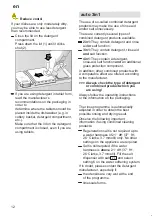
Page 12: ...function 4in1 They contain a detergent rinse aid salt function and an additional glass protection component In addition other combined products with a comparable effect are offered according to the manufacturer Always check the type of detergent or combined product which you are using Always follow the operating instructions or the information on the packaging The rinse programme is automatically ...

Page 13: ...e button A flashes By pressing button A you can switch the rinse aid indicator off or on Switch off the main switch 1 The setting is saved Remember to switch on the rinse aid refill indicator again if you use a detergent without an integrated rinse aid Switching the salt refill indicator water softening system off and on Close the door Rotate the programme selector 3 from the 12 o clock position b...

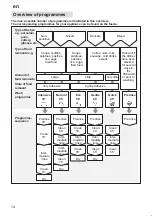
Page 14: ...Prerinse Clean 55_ Clean 45_ Soups potatoes pastries rice eggs fried food Wash programme Very little Amount of food remnants State of food remnant Intensive 70_ Eco 50_ Gentle 40_ Quick 45_ Prerinse Mixed Dry Clean 65_ Clean 50_ Prerinse Dry Clean 70_ Clean 70_ Prerinse 40_ Prerinse Rinse off if the dishes have been stacked for several days in the dishwash er prior to washing Inter mediate rinse I...

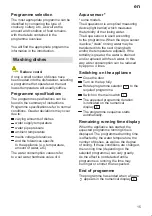
Page 15: ...suring device light barrier which measures the turbidity of the rinsing water The Aqua sensor is used according to the programme When the Aqua sensor is active clean rinsing water may be transferred into the next rinsing bath and or the temperature adjusted If the turbidity is greater the water is drained and is replaced with fresh water In this way water consumption can be reduced by approx 4 lit...

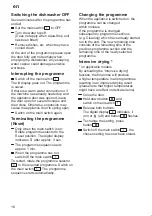
Page 16: ...c The programme sequence lasts approx 1 min When the programme has run switch off the main switch 1 To restart rotate the programme selector 3 to the required programme Switch on the main switch 1 The programme sequence starts automatically Changing the programme When the appliance is switched on the programme can be changed within minutes If the programme is changed subsequently programme section...

Page 17: ...Switch on the appliance Press the timer programming button until the digital display 8 jumps to Keep pressing the timer programming button until the required time is displayed To delete the timer programming keep pressing the button until is displayed You can change your programme selection at any time until the programme starts Maintenance and care A regular inspection and maintenance of your mac...

Page 18: ...consists of a filter cylinder a flat fine filter and depending on the model a microfilter Inspect the filters for obstructions every time the dishwasher has been used By unscrewing the filter cylinder you can remove the filter system Remove any food remnants and clean the filters under running water Reassembly Insert the filter system and screw down with the filter cylinder ...

Page 19: ... and the upper one is screwed tight Pump on applicable models Larger remnants of food that have not been trapped by the filters and have been left in the water can cause a blockage in the pump The water is no longer pumped out of the dishwasher and it can be seen covering the filter Proceed as follows First always disconnect the appliance from the power supply Ladle out as much water as possible R...

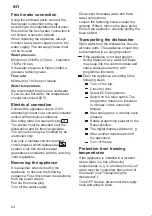
Page 20: ...e plug has not been inserted The appliance door has not been shut properly The tap has not been turned on The filter on the water supply hose is blocked Switch off the appliance and pull out the mains plug Turn off the tap Then clean the filter which is situated at the connection of the supply hose Finally restore the power turn on the tap and switch on the appliance with the appliance itself Lowe...

Page 21: ...ile washing is taking place Crockery has not been stacked properly inside the appliance Knocking sound coming from inlet valves This is caused by the way the water pipes have been laid and it has no effect upon the way the appliance functions There is no remedy for this with the dishes cutlery etc Remnants of food are stuck to the dishes cutlery etc Dishwasher was not loaded properly Jets of water...

Page 22: ...ainer Glasses become clouded and discoloured coating cannot be wiped off Unsuitable detergent was used Glasses are not dishwasher proof Smears left behind on glasses and cutlery glasses have acquired a metallic appearance Amount of rinse aid set too high Customer Service Please call your local service agent if you are not able to resolve any problem yourself The name of your nearest service agent ...

Page 23: ...ion The specifications for supply drainage and connected load must fulfil the required criteria as stated in the following paragraphs or in the installation instructions Install the appliance in the following sequence Check the delivery Install the appliance Connect the waste water Connect the fresh water Connect the power supply Delivery Your dishwasher was checked at the factory to ensure that i...

Page 24: ...moving the appliance to observe the following sequence First disconnect the appliance from the power supply Pull out the mains plug Turn off the water supply Disconnect the waste water and fresh water connections Loosen the fastening screws under the worktop If fitted remove the base panel Pull out the appliance carefully pulling the hose behind Transporting the dishwasher Drain water from the dis...

Page 25: ...al in an environmentally friendly manner Keep children away from shipping carton and packaging components Danger of suffocation from folding cartons and plastic film D Corrugated cardboard consists mainly of wastepaper D The moulded polystyrene parts do not contain any chlorofluorohydrocarbons D The polyethylene film PE consists partly of secondary raw materials D The wooden frames if fitted are m...

Page 26: ...en 26 en Subjekt to modification ...

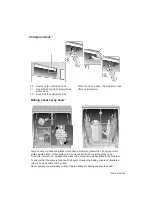
Page 27: ...e a diameter greater than 30 cm gourmet plates pasta plates dinner plates can be cleaned with the aid of the spray head To do this remove the top basket and insert the spray head as illustrated in the diagram To ensure that the spray jet can reach all parts arrange the baking sheets as illustrated max 4 baking sheets and 2 grilles Never operate the dishwasher without the top basket or baking sheet...

Page 28: ... 0 02 1 1 1 01 1 1 1 4 1 2 01 2 1 0 7 0 0 2 0 1 01 1 1 2 8 1 51 0 00 6 2 4 16 0 1 3 1 3 02 6 0 11 0 2 1 1 2 8 1 1 1 1 1 0 1 00 6 1 1 11 4 1 2 8 1 2 1 1 0 2 1 1 4 0 6 12 1 1 2 0 2 6 12 1 1 6 2 0 1 6 0 3 4 0 Robert Bosch Hausgeräte GmbH Carl Wery Straße 34 81739 München To contact us directly use the tel no or fax no in the enclosed customer service list ...

Reviews: