background image


Instructions for the user


32


8. CLEANING AND MAINTENANCE


Before any intervention, disconnect the power supply of the device.


8.1 Cleaning


Clean the cooking top regularly every time you use it, obviously after it 
has cooled. 


8.1.1  Regular daily cleaning of the hob 

In order to clean and preserve the surface, always use specific products 

only

, which do not contain abrasive substances or chlorine-based acid 

substances. 

How to use:

 pour the product on a damp cloth and wipe the surface, 

rinse thoroughly and dry with a soft cloth or deerskin. 


8.1.2  Food stains or residues 

Do not use metallic sponges or sharp scrapers: they will 
damage the surface. 
Use normal non-abrasive products and remove spots or 
residuals with non-scratch sponges or, if need be, with wood or 
plastic utensils. 
Rinse thoroughly and dry with a soft cloth or deerskin. 


8.2 Cleaning of cooking hob components


Grids, caps, flame cap crowns and burners can be 
removed for ease of cleaning. Wash them in warm 
water using a non-abrasive detergent, taking care 
to remove all tough spots. Before remounting, allow 
the components 

to fully dry out


8.2.1  Ignition plugs and safety devices 

For good functioning of the lighting ignition plugs and the safety devices, 
keep them very clean. 
Check frequently and clean with a damp cloth when necessary. 


Summary of Contents for NCT 675 N

Page 1: ...zioni per l uso GB Directions for use ES Instrucciones de manejo PT Instruções de Serviço FR Mode d emploi DE Gebrauchsanleitung NL Gebruiksaanwijzing NCT 685 C NET 682 C NCT 685 B NCT 685 N NET 682 N NCT 675 N BOSCH ...

Page 2: ...cemos por ter escolhido este nosso produto Aconselhamos a leitura atenta deste manual onde se encontram todas as indicações para manter inalteradas as qualidades estéticas e funcionais da placa de fogão FRANÇAIS 63 77 Merci d avoir choisi notre produit Nous vous conseillons de lire attentivement ce manuel dans lequel figurent toutes les indications pour maintenir inaltérées les qualités esthétique...

Page 3: ...OB _________________________________________30 8 CLEANING AND MAINTENANCE ____________________________32 THESE INSTRUCTIONS ARE VALID ONLY FOR END USER COUNTRIES WHOSE IDENTIFICATION SYMBOLS APPEAR ON THE COVER OF THIS MANUAL INSTRUCTIONS FOR THE INSTALLER these are for the qualified technician who must carry out a suitable check of the gas system install the appliance set it functioning and carry...

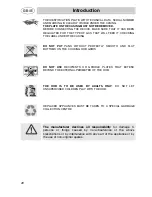
Page 4: ... CONSIDERED IMPROPER THE MANUFACTURER DECLINES ALL RESPONSIBILITY FOR IMPROPER USE DO NOT LEAVE THE PACKING IN THE HOME ENVIRONMENT SEPARATE THE VARIOUS WASTE MATERIALS AND TAKE THEM TO THE NEAREST SPECIAL GARBAGE COLLECTION CENTRE IT IS OBLIGATORY FOR THE ELECTRICAL SYSTEM TO BE GROUNDED ACCORDING TO THE METHODS REQUIRED BY SAFETY RULES THE PLUG TO BE CONNECTED TO THE POWER CABLE AND THE SOCKET M...

Page 5: ...T PERFECTLY SMOOTH AND FLAT BOTTOMS ON THE COOKING HOB GRIDS DO NOT USE RECIPIENTS OR GRIDDLE PLATES THAT EXTEND BEYOND THE EXTERNAL PERIMETER OF THE HOB THE HOB IS TO BE USED BY ADULTS ONLY DO NOT LET UNSUPERVISED CHILDREN PLAY WITH THE HOB REPLACED APPLIANCES MUST BE TAKEN TO A SPECIAL GARBAGE COLLECTION CENTRE The manufacturer declines all responsibility for damage to persons or things caused b...

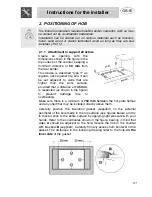
Page 6: ...o walls that are higher than the work surface provided that a distance of 145 mm is respected as shown in the figure to prevent damage due to overheating Make sure there is a minimum of 750 mm between the hot plate flames and any shelf that may be installed directly above them Carefully position the insulation gasket supplied on the external perimeter of the hole made in the top surface see figure...

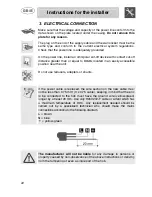
Page 7: ... accessible position near the unit Do not use reducers adapters or shunts If the power cable is replaced the wire section on the new cable must not be less than 0 75 mm 2 3 x 0 75 cable keeping in mind that the end to be connected to the hob must have the ground wire yellow green longer by at least 20 mm Use only H05V2V2 F cable or similar which has a maximum temperature of 90 C Any replacement ne...

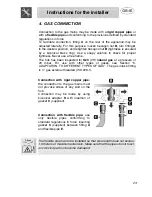
Page 8: ...n inspected for G20 2H natural gas at a pressure of 20 mbar For use with other types of gases see Section 5 ADAPTATION TO DIFFERENT TYPES OF GAS The gas intake fitting is gas external threaded ISO 228 1 Connection with rigid copper pipe the connection to the gas mains must not provoke stress of any kind on the hob Connection may be made by using biconical adapter D with insertion of gasket C suppl...

Page 9: ...r intakes protected by screens must be appropriately sized regulations in force and placed so as not to be blocked in any way The room where the oven is installed should be suitably ventilated to avoid overheating or excess humidity produced by cooking and in the case of lengthy use a window should be opened or the speed of any ventilators should be increased 4 3 Discharge of combustion products D...

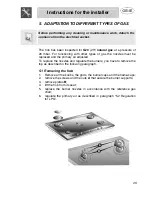
Page 10: ...be replaced and the primary air adjusted To replace the nozzles and regulate the burners you have to remove the top as described in the following paragraph 5 1 Removing the hob 1 Remove all the knobs the grids the burner caps and the flame caps 2 remove the screws and the nuts A that secure the burner supports 3 remove plates B 4 lift the hob from its seat 5 replace the burner nozzles in accordanc...

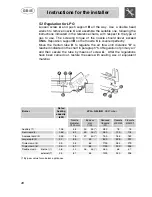
Page 11: ...art in paragraph 5 4 Regulation of primary air and then secure the tube by means of screw A After the regulations have been carried out restore the seals with sealing wax or equivalent material Burner Rated heating capacity kW LPG G30 G31 28 37 mbar Nozzle diameter 1 100 mm By pass mm 1 100 Reduced flowrate W Flowrate g h G30 Flowrate g h G31 Auxiliary 1 1 05 48 30 33 380 76 75 Semi rapid 2 1 65 6...

Page 12: ... out restore the seals with sealing wax or equivalent material Burner Rated heating capacity kW Natural gas G20 20 mbar Nozzle diameter 1 100 mm Reduced flowrate W Auxiliary 1 1 05 73 380 Semi rapid 2 1 65 92 380 Average rapid 3 2 55 115 750 Large rapid 4 3 1 126 800 Triple crown 5 3 9 140 1400 Triple crown 6 3 3 130 1400 internal 7 0 8 67 380 Double crown external 7 3 3 130 900 5 4 Regulation of ...

Page 13: ...the model until you get a suitable minimum flame Replace the knob and check burner flame stability rapidly turning the knob from maximum to minimum position the flame should not go out 6 2 Regulation of minimum for LPG To regulate the minimum for LPG completely tighten clockwise the screw inside or next to the gas tap pin depending on the model The diameters of the by passes for each burner are gi...

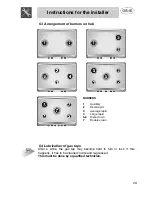
Page 14: ... 1 Auxiliary 2 Semi rapid 3 Average rapid 4 Large rapid 5 6 Triple crown 7 Double crown 6 4 Lubrication of gas taps After a while the gas tap may become hard to turn or lock If this happens it has to be cleaned inside and re greased This must be done by a qualified technician ...

Page 15: ... flame burning and to activate the safety device The burner might go off when the knob is released In this case repeat the aforesaid operation keeping the knob pressed for more than 2 seconds Should the burners go off accidentally in the models with valves a safety device will trip after approximately 20 seconds to block the gas outlet even if the cock is open 7 2 Practical advice for using the bu...

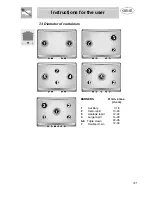
Page 16: ...nstructions for the user 31 7 3 Diameter of containers BURNERS 1 Auxiliary 2 Semi rapid 3 Average rapid 4 Large rapid 5 6 Triple crown 7 Double crown Ø min e max in cm 7 18 10 24 12 24 14 28 22 26 12 34 ...

Page 17: ...d stains or residues Do not use metallic sponges or sharp scrapers they will damage the surface Use normal non abrasive products and remove spots or residuals with non scratch sponges or if need be with wood or plastic utensils Rinse thoroughly and dry with a soft cloth or deerskin 8 2 Cleaning of cooking hob components Grids caps flame cap crowns and burners can be removed for ease of cleaning Wa...

Reviews: