background image

Summary of Contents for HES5022U-01

Page 1: ...Use and Care Manual Bosch Electric Range With Mechanical Controls and Convection ...

Page 2: ...ut the Cooktop 11 Operation 11 Operation Oven 12 About the Oven 12 Operation 12 Getting the Most Out of Your Appliance 15 Getting the Most Out of Your Cooktop 15 Getting the Most Out of Your Oven 16 Cleaning and Maintenance 21 Care and Cleaning 21 Maintenance 26 Service 27 Self Help 27 Warranty 29 Questions 1 800 944 2904 www boschappliances com 5551 McFadden Ave Huntington Beach CA 92649 We look ...

Page 3: ... Safety Instructions READ AND SAVE THESE INSTRUCTIONS Important Safety Instruc tions Fire Safety Do not use aluminum foil or protective liners to line any part of an appliance especially surface unit drip bowls or oven bottom Installation of these liners may result in a risk of electric shock or fire If materials inside an oven or warming drawer should ignite keep door closed Turn off the applianc...

Page 4: ...ack toward an exit Whenever possible do not operate the ventilation system during a cooktop fire However do not reach through fire to turn it off DO NOT TOUCH SURFACE UNITS OR AREAS NEAR UNITS Surface units may be hot even though they are dark in color Areas near surface units may become hot enough to cause burns During and after use do not touch or let clothing potholders or other flammable mater...

Page 5: ... appliance unless closely supervised by an adult Children and pets should not be left alone or unattended in the area where the appliance is in use They should never be allowed to play in its vicinity whether or not the appliance is in use CAUTION Items of interest to children should not be stored in an appliance in cabinets above an appliance or on the backsplash Children climbing on an appliance...

Page 6: ...e drawer it may not be remov able WARNING When properly cared for your new appliance has been designed to be safe and reliable Read all instructions carefully before use These pre cautions will reduce the risk of burns electric shock fire and injury to per sons When using kitchen appliances basic safety precautions must be followed including those in the following pages Have the installer show you...

Page 7: ... Storage Drawer Model and Serial Plate Oven Vent Anti Tip Bracket not shown Cooktop Scraper not shown Weiman Cook Top glass ceramic cooktop cleaner not shown Broiler Pan not shown Literature Package not shown Oven Lights 1 or 2 oven back wall not shown Convection Fan oven back wall not shown Broil Element top of oven interior not shown Oven Door Lock not visible not shown The radiant element uses ...

Page 8: ... as the cooktop is still hot The racks are designed with a stop so they will stop before coming completely out of the oven and not tilt CAUTION To avoid burns place oven racks in desired positions before turning oven on Always use oven mitts when the oven is warm If a rack must be moved while the oven is hot do not let oven mitts contact hot heat ing elements Inserting Racks Into Oven 1 Grasp rack...

Page 9: ...d of Cycle Indicator To indicate when a mode is finished 3 consecutive beeps will sound Default Settings The cooking modes automatically select the default tempera ture These can be changed when a different one is needed Flashing Symbol or Number Signals an incomplete setting and calls for another step or START to be pressed F Number Codes These codes display when there is a problem with the range...

Page 10: ...ers Youcontrol theoperation oftherangebyusing thetouchpadsanddialonthe backguard andtheknobs onthefrontpanel Thebackguard touchpads inconjunction withthedialonthebackguard areused toselectanovenmode settheoventemperature setthetime s andtosetup yourrange Tousethetouchpad press thecenterpartofthepadwiththeflatpart ofyourfingertip A beep willsound to indicate thattheselection hasbeenmade Turnthedial...

Page 11: ...ction 4 Turn knob to desired setting and press START When all settings for the function are complete SELECT FUNCTION flashes again 5 Press OFF to exit the Select Functions Menu Change the Beep Volume The volume of the control beep can be changed from LOW softest to HIGH loudest The control default for beep volume is Medium 1 Access SELECT FUNCTIONS Menu 2 Turn knob clockwise until VOLUME is displa...

Page 12: ...LECT FUNCTIONS Menu 2 Turn knob clockwise until OVEN TEMP OFFSET is displayed 3 Press START 0 F is displayed 4 Turn the knob to increase temperature in 25 F increments 5 Press START to accept a temperature change This feature is used to change all the Select Functions settings back to the origi nal factory settings or defaults 1 Access SELECT FUNCTIONS Menu 2 Turn knob clockwise until RESET DEFAUL...

Page 13: ... ON or OFF 5 Press _art to accept new selection Before Using the Appliance for the First Time Remove all packing materials and labels from range Remove packing materi als from inside the oven and inside the drawer While cool wipe with a clean damp sponge and dry Apply the glass ceramic cooktop cleaner to the glass ceramic cooktop Buff with a clean cloth See Care and Cleaning Section There may be a...

Page 14: ...ment push in on the control knob and turn in either direc tion to the desired heat setting OFF 1 9 5 6 Element Location Figure 4 Single Element Burner Knob Dual Element Control Knob To turn ON the small inner element push in on the control knob and turn it coun terclockwise Set to desired heat level To turn ON both the inner and outer elements together push in on the control knob and turn it clock...

Page 15: ...int the oven will beep 10 To change temperature during cooking press Temperature Turn the knob to select new temperature and press START 11 Once cooking has been completed press OFF to turn off oven In the convection bake mode the temperature is automatically reduced 25 F from the package or recipe temperature Simply enter the package or recipe tem perature when setting the mode and the range calc...

Page 16: ...ration is not completed the oven will beep periodically as a reminder to set time Press OFF to exit the Timer mode Selecting OFF when not in a setting mode will turn off the oven The TIMED COOK feature sets the oven to a cooking mode for a set period of time and then turns it off The TIMED COOK feature is available for each of the following oven modes Bake Convection Bake and Convection Roast Be s...

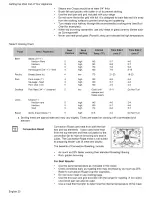
Page 17: ...s Been Set 2 Turn knob to BAKE END or BAKE TIME 3 Press Time Setting the Sabbath Feature See Set the Sabbath Feature on page 10 Getting the Most Out of Your Appliance Getting the Most Out of Your Cooktop Cooktop Cooking Guide Boiling Water Recommended Settings Time to boil can vary greatly depending on environmental conditions Try the fol lowing tips to decrease boil time Use a lid Use a pan that ...

Page 18: ... cookware bottom is to place 1 25 4 mm of water in the pan Bring the water to a boil and observe the location of the bubbles as the water starts to boil Good flat cookware will have an even distribution of bubbles over the bottom surface area Matching Diameters The base of the pan should cover or match the diameter of the element being used Pans may overhang the element area by 1 25 4 mm all aroun...

Page 19: ...our cake layers at the same time stagger pans on two racks so that one pan is not directly above the other To allow for best baking results stagger pans as shown in the graphic below Pan placement on one rack Baking Pans Preheating the Oven Pan placement on two racks Figure 7 Pan Placement Here are some tips for cooking with baking pans Glass baking dishes absorb heat therefore reduce oven tempera...

Page 20: ... to keep food at serving temperature Use the Warming setting on the oven to keep foods hot until ready to serve Warming mode temperatures are 140 220 F Default temperature is 170 Foods that must be kept moist should be covered with a lid or aluminum foil CAUTION When using Warm mode follow these guidelines Do not use the Warm Mode to heat cold food Be sure to maintain proper food temperature The U...

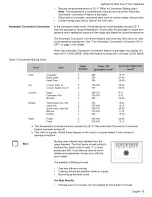
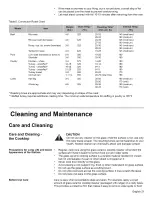
Page 21: ...f it will read CONV BAKE rq Cake Pie Cookies Breads Pizza Cupcakes 3 350 17 19 Bundt Cake 2 350 37 43 Angel Food 1 350 35 39 2 Crust fresh 9 2 375 425 45 55 2 Crust frozen fruit 9 2 375 68 78 Sugar 3 350 375 6 11 Chocolate Chip 3 350 375 8 13 Brownie 3 350 29 36 Yeast bread loaf 9x5 2 375 18 22 Yeast rolls 3 375 400 12 15 Quick bread loaf 8x4 2 350 375 45 55 Biscuits 3 375 400 11 15 Muffins 3 425 ...

Page 22: ...akes easily Lamb Chops 1 Medium rare Medium Well 5 5 5 high 145 4 6 2 4 high 160 5 7 4 6 high 170 6 8 5 7 Bread Garlic bread slices 1 Do Not Turn high N A 2 4 Do Not Turn a Broiling times are approximate and may vary slightly Times are element based on cooking with a preheated broil Convection Roast Convection Roast uses heat from both the bot tom and top elements It also uses extra heat from the ...

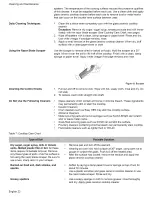
Page 23: ...e temperature for stuffing in poultry is 165 F Cleaning and Maintenance Care and Cleaning Care and Cleaning the Cooktop Precautions for Long Life and Good Appearance of the Surface Before Use Care CAUTION Do not use any cleaner on the glass while the surface is hot use only the razor blade scraper The resulting fumes can be hazardous to your health Heated cleaner can chemically attack and damage s...

Page 24: ...inse and dry Do not soak 2 To replace push knob straight onto shaft Glass cleaners which contain ammonia or chlorine bleach These ingredients may permanently etch or stain the cooktop Caustic Cleaners Oven cleaners such as Easy Off may etch the cooktop surface Abrasive Cleaners Metal scouring pads and scrub sponges such as Scotch Brite can scratch and or leave metal marks Soap filled scouring pads...

Page 25: ...y high temperature to burn away food soil and grease Do not clean parts or accessories in the self clean oven It is common to see smoke and or an occasional flame up during the Self Clean cycle depending on the content and amount of soil remaining in the oven tf a flame persists turn off the oven and allow it to cool before opening the door to wipe up the excessive food soil The oven door locks at...

Page 26: ...mportant Do not use Commercial Oven Cleaners on the self clean oven or any part because they will damage the finish or part 2 3 5 6 Press COOKING MODE Turn knob until SELF CLEAN mode appears Press START The default cleaning time is 4 hours To change cleaning time turn knob to change number of hours Otherwise continue to step 4 Press START SELF CLEAN flashes Press START REMOVE RACKS appears in the ...

Page 27: ...asy Off They may etch the surface The cleaners listed below indicate types of products to use and are not being endorsed Use all products according to package directions Racks Fiberglass Gasket Glass other than cook top Painted Surfaces Porcelain Surfaces Stainless Surfaces Wash with hot sudsy water Rinse thoroughly and dry or gently rub with cleansing powder or soap filled pads as directed If rac...

Page 28: ...rly could result in personal injury or product damage To avoid injury from hinge bracket snapping closed be sure that both levers are securely in place before removing door Also do not force door open or closed the hinge could be damaged and injury could result 1 Be sure to read the above WARNING before attempting to remove oven door 2 Open the door completely 3 Flip lever on hinge toward you Repl...

Page 29: ...y unscrewing it 5 Replace the bulb with a new 40 watt appliance bulb Avoid touching the bulb with fingers as oils from hands can damage the bulb when it becomes hot 6 Screw the lens back on 7 Turn power back on at the main power supply fuse or breaker box Service Self Help The Cooktop Table 9 Cooktop Troubleshooting Chart Use these suggestions before calling for service to avoid service charges El...

Page 30: ...r back on The oven should reset itself and will be operable Check circuit breaker or fuse box to your house Make sure there is proper electrical power to the oven Be sure oven temperature has been selected Adjust oven calibration if necessary see Change the Oven Temperature Offset on page 10 Refer to cooking charts for recommended rack posi tion Refer to cooking charts for recommended rack positio...

Page 31: ...heovenvent Donotblockthevent Warranty What this Warranty Cov ers Who it Applies to How Long the Warranty Lasts Repair Replace as Your Exclusive Remedy The limited warranty provided BSH Home Appliances Bosch in this Statement of Limited Product Warranty applies only to the Bosch freestanding and slide in range Product sold to you the first using purchaser provided that the Product was purchased 1 f...

Page 32: ... abuse accidents neglect improper operation failure to maintain improper or negligent installation tampering failure to follow operating instructions mishan dling unauthorized service including self performed fixing or exploration of the appliance s internal workings 4 adjustment alteration or modification of any kind 5 a failure to comply with any applicable state local city or county electri cal...

Page 33: ...PPLY TO YOU THIS WARRANTY GIVES YOU SPECIFIC LEGAL RIGHTS AND YOU MAY ALSO HAVE OTHER RIGHTS WHICH VARY FROM STATE TO STATE No attempt to alter modify or amend this warranty shall be effective unless authorized in writing by an officer of BSH To obtain warranty service for your Product you should contact the nearest Bosch authorized service center BSH Home Appliances 5551 McFadden Avenue Huntingto...

Page 34: ...Invented for life 5551 McFadden Avenue Huntington Beach CA 92649 800 944 2904 www boschappliances com 9000155040 10095 Rev A 3 06 BSH Home Appliances Corporation ...

Reviews: