background image

8

Four-wire Connection
Ungrounded Neutral

Connect the red oven wire to the red electrical supply 

wire (hot wire).

Connect the black oven wire to the black electrical 

supply wire (hot wire).

Connect the white neutral oven wire to the white 

neutral (not bare or green ground) electrical supply 

wire.

Connect the green ground oven wire to the bare or 

green ground electrical supply wire.

Three-wire Connection
Grounded Neutral

Connect red wire from oven to red wire in junction box.

Connect black wire from oven to black wire in junction 

box..

Connect both green ground wire and white wire from 

oven to white, green or bare neutral wire in junction 

box.

The conduit cable, where connected at the oven, swivels. 

Rotate conduit cable upward (or downward) and direct 

through hole prepared in cabinet to attach to junction 

box.
To maintain serviceability, the flex conduit must not be 

shortened and should be routed to permit temporary 

removal of the oven.

Mount to cabinet

NOTICE: 


Before installing the appliance, be sure to 

verify the cabinet dimensions and electrical connections.

Note:  

The appliance is heavy. It is advisable to install it 

with a second person.

1.

Fully insert the appliance and centre it. 

NOTICE: 


Do not kink the connecting cable or route it 

over sharp edges.

2.

Remove the rubber profiles.

3.

In the holes there are plastic sleeves which are 

required for fastening.

4.

Secure the appliance to the cabinet using 2 screws. 

5.

Reinsert the rubber profiles.

Check the Installation

9

WARNING

Before you plug in an electrical cord or turn on 

power supply, make sure all controls are in the OFF 

position.

Switch on the circuit breaker.
Verify that elements function properly.

SRZHUVXSSO\

MXQFWLRQER[

UHGZLUHV

JUHHQRUEDUH

JUHHQZLUH

8/OLVWHG

FDEOHIURP

ZKLWHZLUHV

EODFNZLUHV

ZLUH

FRQQHFWRU

RYHQ

SRZHUVXSSO\

MXQFWLRQER[

UHGZLUHV

ZKLWHEDUHRU

ZKLWHZLUH

JUHHQZLUH

JUHHQZLUH

FDEOHIURP

8/OLVWHG

EODFNZLUHV

RYHQ

FRQQHFWRU

Summary of Contents for hbe5451uc

Page 1: ...Installation Manual Built in oven HBE5451UC ...

Page 2: ...eeded 5 Parts Included 5 Power Requirements 5 Preparing the units 5 Removing Packaging 5 Dimensions and Cabinet Requirements 6 Appliance Dimensions 6 Cabinet Dimensions 6 Install Appliance 7 Electrical Installation 7 Mount to cabinet 8 Check the Installation 8 Bosch Support 9 Before Calling Service 9 Data Plate 9 Service 9 Parts and Accessories 9 4XHVWLRQV ZZZ ERVFK KRPH FRP XV H ORRN IRUZDUG WR K...

Page 3: ...ance of this warning 9 CAUTION This indicates that minor or moderate injuries may occur as a result of non observance of this warning NOTICE This indicates that damage to the appliance or property may occur as a result of non compliance with this advisory Note This alerts you to important information and or tips ...

Page 4: ...sehold Cooking and Liquid Heating Appliances UL 1026 Electric Household Cooking and Food Serving Appliances It is the responsibility of the owner and the installer to determine if additional requirements and or standards apply to specific installations Electric Safety Before you plug in an electrical cord be sure all controls are in the OFF position If required by the National Electrical Code or C...

Page 5: ...stant up to 195 F 90 C and adjacent unit fronts up to 160 F 70 C Cut out work on the units and worktop should be performed before fitting the appliances Remove any shavings as they may impair the function of the electrical components Removing Packaging NOTICE To prevent damage to your floor keep the unit in its packaging base until ready to be placed in the cabinet opening Do not slide the unit ac...

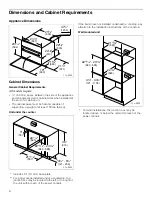
Page 6: ...8 kg Unit under the counter If the built in oven is installed underneath a cooktop pay attention to the installation instructions of the cooktop Wall mounted unit Includes _ 19 mm base plate For singel ovens installed under a countertop the junction box may be located to the left or the right of the unit within reach of the power conduit PP ʌ ʓʘ ê ʌ ʚ é ʌ ʚ ʐ ʓʘ ê è ʚ PP è ʓʘ èʌ ʓʘ è ʓʘ èʌ ʓʘ ë é ...

Page 7: ...ven to the white neutral electrical supply wire 9 CAUTION The appliance must be disconnected from the power supply during all installation work The appliance must only be connected with the power cable provided Protection against contact must be ensured by the installation Electrical Connection The four wire connection is preferred but where local codes permit the three wire connection is also acc...

Page 8: ...must not be shortened and should be routed to permit temporary removal of the oven Mount to cabinet NOTICE Before installing the appliance be sure to verify the cabinet dimensions and electrical connections Note The appliance is heavy It is advisable to install it with a second person 1 Fully insert the appliance and centre it NOTICE Do not kink the connecting cable or route it over sharp edges 2 ...

Page 9: ... in the spaces provided below Keep your invoice or escrow papers for warranty validation if service is needed Service We realize that you have made a considerable investment in your kitchen We are dedicated to supporting you and your appliance so that you have many years of creative cooking Please don t hesitate to contact our Customer Support Department if you have any questions or in the unlikel...

Page 10: ...s 13 Exigences électriques 13 Préparation du meuble 13 Pour enlever l emballage 13 Exigences en matière de dimensions et d armoire 14 Dimensions de l appareil 14 Dimensions de la découpe des armoires 14 Installation de l appareil 15 Installation électrique 15 Installation sur un caisson 16 Vérification de l installation 16 Soutien Bosch 17 Avant d appeler le service de dépannage 17 Plaque signalét...

Page 11: ...des blessures graves 9 ATTENTION Le non respect de cet avertissement peut entraîner des blessures mineures ou modérées AVIS Vous indique que des dommages à l appareil ou aux biens peuvent survenir si vous ne respectez pas cet avertissement Remarque Vous signale des informations importantes ou des conseils ...

Page 12: ...Appareils de cuisson domestique et de chauffage des liquides Household Cooking and Liquid Heating Appliances UL 1026 Appareils électriques domestiques pour la cuisson et la préparation des aliments Electric Household Cooking and Food Serving Appliances Il incombe au propriétaire et à l installateur de déterminer si des exigences et ou normes additionnelles s appliquent pour des installations spéci...

Page 13: ...us les travaux de découpe sur le meuble et sur le plan de travail avant d encastrer les appareils Retirer les copeaux ils peuvent compromettre le bon fonctionnement des composants électriques Pour enlever l emballage Remarque Pour éviter d endommager le plancher laissez l unité dans la portion inférieure de l emballage jusqu au moment de le placer dans l ouverture de l armoire Ne pas faire glisser...

Page 14: ...u moins 150 lb 68 kg Unité sous le comptoir Si le four encastrable est encastré sous une table de cuisson respecter la notice de montage de la table de cuisson Unité murale Comprend une plaque de base de _ po 19 mm Pour les fours simples installés sous un comptoir la boîte de jonction peut être située à la gauche ou à la droite de l appareil à portée du câble d alimentation PP ʌ ʓʘ ê ʌ ʚ é ʌ ʚ ʐ ʓ...

Page 15: ...le fil neutre blanc et le fil de terre dénudé du four au fil d alimentation électrique neutre blanc 9 ATTENTION Pour tous les travaux de montage l appareil doit être mis hors tension L appareil doit uniquement être raccordé au moyen du câble de raccordement fourni L encastrement doit garantir la protection contre les contacts accidentels Raccordement électrique La connexion de circuit terminal à 4...

Page 16: ...enté de façon à pouvoir être retiré temporairement du four Installation sur un caisson AVIS Avant d installer l appareil prendre soin de vérifier la dimension du coffret et les raccordements électriques Remarque L appareil est lourd Pour l insérer dans la découpe faite vous aider par une otre personne 1 1 Gerät ganz einschieben und mittig ausrichten AVIS Anschlussleitungen und kabel nicht knicken ...

Page 17: ...s espaces fournis ci dessous Conservez votre facture ou votre contrat aux fins de validation de garantie si jamais vous avez besoin d une réparation Service Nous réalisons que vous avez effectué un investissement considérable dans votre cuisine Nous nous engageons à offrir tout le support dont vous et votre appareil avez besoin afin que vous puissiez profiter pleinement de votre appareil Ne pas hé...

Page 18: ... 22 Piezas incluidas 22 Requisitos de electricidad 22 Preparación de los muebles 22 Quitar el embalaje 22 Dimensiones y requisitos del gabinete 23 Dimensiones del electrodoméstico 23 Dimensiones del hueco para el gabinete 23 Montaje del electrodoméstico 24 Instalación eléctrica 24 Unidad empotrada en gabinete 25 Pruebe la instalación 25 Soporte de Bosch 26 Antes de llamar al servicio 26 Placa de c...

Page 19: ...sta advertencia 9 ATENCION Esto indica que pueden producirse lesiones leves o moderadas si no se cumple con esta advertencia AVISO Esto indica que puede producirse un daño al electrodoméstico o a la propiedad como resultado de la falta de cumplimiento de este aviso Nota Esto lo alerta sobre información y o consejos importantes ...

Page 20: ...ondas Microwave Cooking Appliances CSA C22 2 N 64 Electrodomésticos para cocinar y para calentar líquidos de uso doméstico Household Cooking and Liquid Heating Appliances UL 1026 Electrodomésticos para cocinar y para servir alimentos eléctricos de uso doméstico Electric Household Cooking and Food Serving Appliances Es responsabilidad del propietario y el instalador determinar si se aplican otros r...

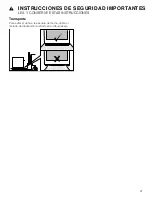
Page 21: ...21 9 INSTRUCCIONES DE SEGURIDAD IMPORTANTES LEA Y CONSERVE ESTAS INSTRUCCIONES Transporte Para evitar el daño a la abertura del horno utiliza el método del transporte mostrado en el dibujo abajo ...

Page 22: ...os muebles adyacentes hasta 70 C Realizar todos los trabajos de corte en los muebles y en la cubierta antes de montar el aparato Retirar las virutas de lo contrario podrían afectar el funcionamiento de los componentes eléctricos Quitar el embalaje Nota Para evitar que se dañe su piso mantenga la unidad en su base de embalaje hasta que esté lista para ser colocada en la abertura del gabinete No arr...

Page 23: ...idad instalada bajo cubierta Si el horno se monta debajo de una placa de cocción observar las instrucciones de montaje de dicha placa de cocción Unidad montada en la pared PP ʌ ʓʘ ê ʌ ʚ é ʌ ʚ ʐ ʓʘ ê è ʚ PP è ʓʘ èʌ ʓʘ è ʓʘ èʌ ʓʘ ë é Incluye una placa base de 19 mm Si el horno se instala debajo de la cubierta la caja de conexiones debe estar situada a la izquierda o a la derecha de la unidad al alca...

Page 24: ...e tierra desde el horno hasta el cable blanco neutral de la red de suministro 9 ATENCION El aparato debe estar sin tensión para poder realizar los trabajos de montaje El aparato solo puede conectarse con el cable de conexión suministrado La protección contra contacto accidental debe garantizarse mediante el montaje Conexión eléctrica La conexión del circuito con cuatro hilos es preferible pero don...

Page 25: ...en servicio técnico el conducto flexible no debe acortarse y debe enrutarse de manera que permita retirar temporalmente el horno Unidad empotrada en gabinete AVISO Antes de instalar el aparato asegúrese de verificar las dimensiones del gabinete y las conexiones eléctricas Nota El aparato pesa demasiado Se aconseja dos personas para insertarlo 1 1 Gerät ganz einschieben und mittig ausrichten AVISO ...

Page 26: ...ucirse previamente en los espacios libres abajo Conservar la factura o los documentos de compra que confirmen la validación de la garantía en caso de que el aparato necesite ser reparado Servicio técnico Sabemos que usted ha realizado una inversión considerable en su cocina Nos dedicamos a brindar asistencia a usted y a su aparato de manera que tenga muchos años de cocina creativa No dude en comun...

Page 27: ......

Page 28: ...1901 Main Street Suite 600 Irvine CA 92614 800 944 2904 www bosch home com 2012 BSH Home Appliances 914775906 940923 9000983955 9000983955 ...

Reviews: