9
Installing Tuckpointing Guard
The tool comes with the Tuckpointing
Guard completely assembled. However, if it
becomes necessary to make adjustments
to the guard, follow these instructions.
To remove wheel guard:
1. Unplug tool from power source.
2. Unscrew auxiliary handle.
3. Rotate guard until arrows on guard and
spindle neck are aligned.
4. Remove guard from spindle neck.
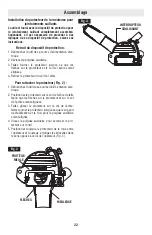
To re-attach guard (Fig. 2):
1. Unplug tool from power source.
2. Position guard on spindle neck so arrows on
guard and spindle neck align.
3. Slide guard on spindle neck, rotate guard
until stability bracket and hole for auxiliary
handle are aligned.
4. Screw in auxiliary handle to secure guard
on the tool.
5. Always position wheel guard between oper-
ator and work piece and direct sparks away
from operator (Fig. 3).
Assembly
GUARD
GRINDER
ARROWS
Fig. 3
SLIDE
SWITCH
Fig. 2
Summary of Contents for GWS13-52TG
Page 39: ...39 Notes Remarques Notas ...


