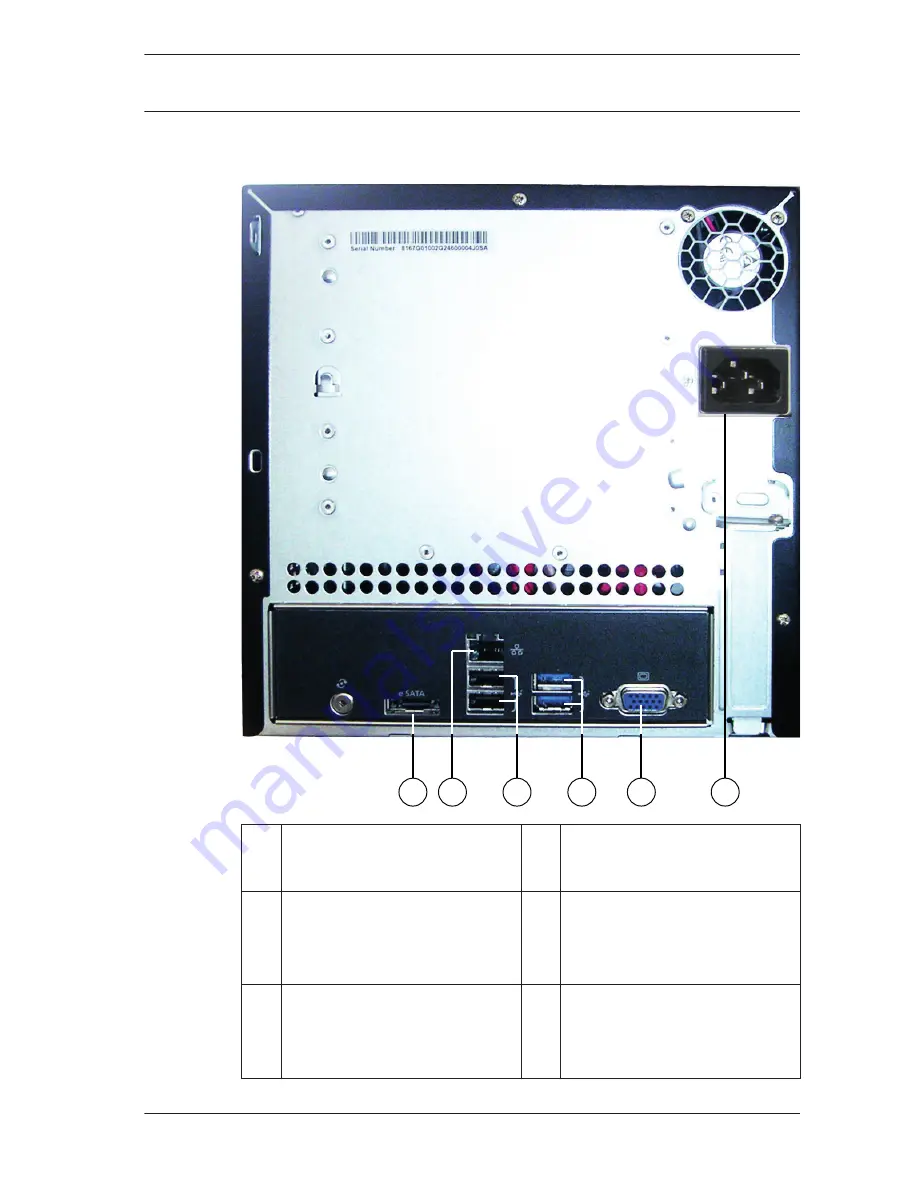
Bosch DIP-2040EZ-00N Installation Manual Download Page 13

DIVAR IP rear view:

2

3

4

5

1

6

1x eSATA (not used)

2x USB 3.0

Note: Do not use.

1x Ethernet (RJ45)

1x VGA (monitor)

Note: Only for
troubleshooting.

2x USB 2.0

Note: Only for
troubleshooting.

Mains connection 100 -

240 VAC

DIVAR IP 2000

System overview | en

13

Bosch Sicherheitssysteme GmbH

2014.07 | V1 | DOC

Summary of Contents for DIP-2040EZ-00N

Page 1: ...DIVAR IP 2000 DIP 2040EZ 00N DIP 2042EZ 4HD DIP 2042EZ 2HD en Installation Manual ...

Page 2: ......

Page 3: ...d drive 17 5 Installation first steps 18 5 1 Setup notes 18 5 2 Connecting the unit 18 6 Obtainging a basic configuration 20 7 Advanced configuration 21 8 Maintaining the system 23 8 1 Monitoring the system 23 8 2 Recovering the unit 24 8 3 Backing up the configuration 25 8 4 Adding replacing hard disks 26 8 4 1 Extending a 2 disk unit 26 8 4 2 Extending an empty unit 27 8 4 3 Replacing hard disks...

Page 4: ...ircuits or be pulled into a cooling fan Remove any jewelry or metal objects from your body which are excellent metal conductors that can create short circuits and harm you if they come into contact with printed circuit boards or areas where power is present Warning Interruption of mains supply Voltage is applied as soon as the mains plug is inserted into the mains socket However for devices with a...

Page 5: ...r cables and adaptors could cause a malfunction or a fire Electrical Appliance and Material Safety Law prohibits the use of UL or CSA certified cables that have UL CSA shown on the code for any other electrical devices Warning Lithium battery Batteries that have been inserted wrongly can cause an explosion Always replace empty batteries with batteries of the same type or a similar type recommended...

Page 6: ...uld only be carried out by qualified customer service personnel in accordance with the applicable electrical regulations Disposal Your Bosch product has been developed and manufactured using high quality materials and components that can be reused This symbol means that electronic and electrical devices that have reached the end of their working life must be disposed of separately from household w...

Page 7: ...working around exposed electrical circuits another person who is familiar with the power off controls should be nearby to switch off the power if necessary Use only one hand when working with powered on electrical equipment This is to avoid making a complete circuit which will cause electrical shock Use extreme caution when using metal tools which can easily damage any electrical components or cir...

Page 8: ...amage electronic components and printed circuit boards The following measures are generally sufficient to neutralize this difference before contact is made to protect your equipment from ESD Do not use mats designed to decrease electrostatic discharge as protection from electrical shock Instead use rubber mats that have been specifically designed as electrical insulators Use a grounded wrist strap...

Page 9: ...cautions The chassis cover must be in place when the system is operating to assure proper cooling Out of warranty damage to the system can occur if this practice is not strictly followed Note Please handle used batteries carefully Do not damage the battery in any way A damaged battery may release hazardous materials into the environment Do not discard a used battery in the garbage or a public land...

Page 10: ...on for Bosch Security Systems products can be found as follows 4 Open any browser enter www boschsecurity com select your region and your country start a search for your product select the product in the search results to show the existing documents 2 10 en Available documentation DIVAR IP 2000 2014 07 V1 DOC Bosch Sicherheitssysteme GmbH ...

Page 11: ...utilizes a highly energy efficient embedded design at a very affordable price which nevertheless boasts Bosch quality through and through Easy to install and operate DIVAR IP 2000 features wizard based set up and centralized configuration to reduce installation times All components are pre installed and pre configured Simply connect to the network and turn on the unit DIVAR IP 2000 is ready to beg...

Page 12: ... 3 4 6 1 Lock for front cover 4 LAN activity LED 2 Power on off LED 5 System status LED 3 Hard disk access LED 6 Individual hard disk LED 12 en System overview DIVAR IP 2000 2014 07 V1 DOC Bosch Sicherheitssysteme GmbH ...

Page 13: ...d 4 2x USB 3 0 Note Do not use 2 1x Ethernet RJ45 5 1x VGA monitor Note Only for troubleshooting 3 2x USB 2 0 Note Only for troubleshooting 6 Mains connection 100 240 VAC DIVAR IP 2000 System overview en 13 Bosch Sicherheitssysteme GmbH 2014 07 V1 DOC ...

Page 14: ...f Network disconnected Blue On Network connected Blue Blinking Network activity System LED N A Off System has booted in normal operation Blue Blinking System is booting or a software update is being applied Red On Undefined software error Contact technical support Individual hard disk LED N A Off default No hard drive configured for this bay Blue On Hard drive present and working 3 2 14 en System ...

Page 15: ... panel This chapter describes the LAN port LED on the rear of the chassis LAN connector 1 2 Nr LED indicator LED color LED state NIC state 1 RJ45 LED left N A Off No connection or 10 Mb s Green On 100 Mb s Yellow On 1000 Mb s 2 RJ45 LED right Yellow On Active connection Yellow Blinking Transmit or receive activity 3 3 DIVAR IP 2000 System overview en 15 Bosch Sicherheitssysteme GmbH 2014 07 V1 DOC...

Page 16: ...ave the same capacity Notice Insert the hard disks before initial system start See also Safety precautions page 4 Installing a hard drive page 17 Removing hard drive trays The drives are mounted in drive carriers to simplify their installation and removal from the chassis These carriers also help promote proper airflow for the drive bays To remove hard drive trays from the chassis 1 Turn off the s...

Page 17: ... with the printed circuit board side facing down so that the mounting holes align with those in the carrier 3 Replace the drive carrier into the chassis bay making sure that the drive carrier handle is completely closed Notice We recommend using the respective Bosch hard disk drives The hard disk drives as one of the critical component are carefully selected by Bosch based on available failure rat...

Page 18: ... only be used for troubleshooting Changes can result in malfunctioning of the system Connecting the unit DIVAR IP system is ready to go out of the box The application provides a simple to install and intuitive to use solution for network surveillance systems Connecting the unit 1 Connect the unit and the cameras to the network 2 Connect the unit to the power supply 3 Turn on the unit A series of s...

Page 19: ...n the network Use this web page wizard pages to obtain a basic system configuration See also Device views page 11 Obtainging a basic configuration page 20 DIVAR IP 2000 Installation first steps en 19 Bosch Sicherheitssysteme GmbH 2014 07 V1 DOC ...

Page 20: ...only if there is one DIVAR IP in the same network not if there are multiple DIVAR IP Multiple DIVAR IP 2000 are in the same network Use the IP Helper tool to display all devices with their IP addresses The tool is available in the online catalog on the DIVAR IP 2000 product page 2 On the Welcome page select your preferred language then click Start configuration 3 Run through the wizard and follow ...

Page 21: ...tree structure to the right where to make the changes Video devices page Adding and removing devices Defining the motion detection settings Recording page Defining phases Assigning properties to phases Alarms page Defining scenarios Adding and deleting actions Configuring e mail properties Remote access page Selecting a dynamic DNS provider Testing the connections to DIVAR IP 2000 System page Crea...

Page 22: ...is available for each page See also Obtainging a basic configuration page 20 Monitoring the system page 23 Using the IP Helper tool page 29 22 en Advanced configuration DIVAR IP 2000 2014 07 V1 DOC Bosch Sicherheitssysteme GmbH ...

Page 23: ...ress bar of the web browser enter http mydivar dlacockpit or http IP address of DIVAR IP dlacockpit then press ENTER The DIVAR IP 2000 Dashboard is displayed Note If the DIVAR IP user interface is already open click the Dashboard tab 3 Select the desired page in the tree structure to the right where to obtain system information System information page Displays status and hard drive information for...

Page 24: ...e Recovery menu is displayed Notice Make sure that a VGA monitor a keyboard and a mouse are connected to the unit 2 Select one of the following Initial to factory image all data will be deleted restores to factory default image and deletes all data on the HDDs or Restore to Factory image all data will not be deleted restores to factory default image data on the HDDs will not be deleted Note Window...

Page 25: ...d backing up the configuration frequently so that recent backups are always available if required To back up the configuration 1 In the DIVAR IP configuration expand System then click Service 2 To back up the configuration click Back up A dialog box is displayed 3 Click Save Where the configuration is saved depends on the browser settings Note If you want to select a specific target directory for ...

Page 26: ...ier handle is completely closed 3 Turn on the unit by pressing the power button 4 Open DIVAR IP Dashboard with any browser To do this in the address bar of the web browser enter http mydivar dlacockpit or http IP address of DIVAR IP dlacockpit then press ENTER DIVAR IP 2000 Dashboard displays the message that you must open Configuration Disk management for configuration 5 Click Configuration to op...

Page 27: ...See also Chassis setup page 16 Obtainging a basic configuration page 20 Replacing hard disks If a hard disk fails the individual disk status LED to the right of the disk carrier will turn red To replace hard disks 1 Remove the defective hard disk Use the handle to pull the disk carrier out of the chassis Note You can remove the hard disk during operation 2 Turn off the unit by pressing the power b...

Page 28: ...e the system manually To update DIVAR IP manually 1 In DIVAR IP Dashboard click Device monitor in the tree structure 2 Click Update manually A dialog box is displayed where you can browse for the update file Notice If your system is connected to the internet the system is automatically checking for updates If an update is available you can download and install it directly If your system is not con...

Page 29: ... PC in the network to open IP Helper Opening IP Helper directly from a USB stick is possible The IP Helper tool is available for download as follows in the online catalog on the DIVAR IP 2000 product page under http mydivar com To find DIVAR IP systems 1 Double click the IP Helper tool iphelper exe 2 A dialog box opens that displays all IP devices with their IP addresses located in the network Sea...

Page 30: ...er informs you about the Microsoft License Terms for Microsoft Windows Storage Server 2008 R2 Standard Please read the following pages carefully 9 30 en End user license agreement EULA DIVAR IP 2000 2014 07 V1 DOC Bosch Sicherheitssysteme GmbH ...

Page 31: ...DIVAR IP 2000 End user license agreement EULA en 31 Bosch Sicherheitssysteme GmbH 2014 07 V1 DOC ...

Page 32: ...32 en End user license agreement EULA DIVAR IP 2000 2014 07 V1 DOC Bosch Sicherheitssysteme GmbH ...

Page 33: ...DIVAR IP 2000 End user license agreement EULA en 33 Bosch Sicherheitssysteme GmbH 2014 07 V1 DOC ...

Page 34: ...34 en End user license agreement EULA DIVAR IP 2000 2014 07 V1 DOC Bosch Sicherheitssysteme GmbH ...

Page 35: ...DIVAR IP 2000 End user license agreement EULA en 35 Bosch Sicherheitssysteme GmbH 2014 07 V1 DOC ...

Page 36: ...36 en End user license agreement EULA DIVAR IP 2000 2014 07 V1 DOC Bosch Sicherheitssysteme GmbH ...

Page 37: ...DIVAR IP 2000 End user license agreement EULA en 37 Bosch Sicherheitssysteme GmbH 2014 07 V1 DOC ...

Page 38: ...38 en End user license agreement EULA DIVAR IP 2000 2014 07 V1 DOC Bosch Sicherheitssysteme GmbH ...

Page 39: ......

Page 40: ...Bosch Sicherheitssysteme GmbH Robert Bosch Ring 5 85630 Grasbrunn Germany www boschsecurity com Bosch Sicherheitssysteme GmbH 2014 ...

Reviews: