background image

Measurement label

Function

raw_name

mV value of sensor

raw_name_fi

filtered mV value of sensor

name

physical value of sensor

name_fi

filtered physical value

Notice

Working with automatically created measurement sheets is ex‐
plained in chapter ‘

Setting up an online measurement [

}

 100]

’.


Configuring a multipoint adjustment

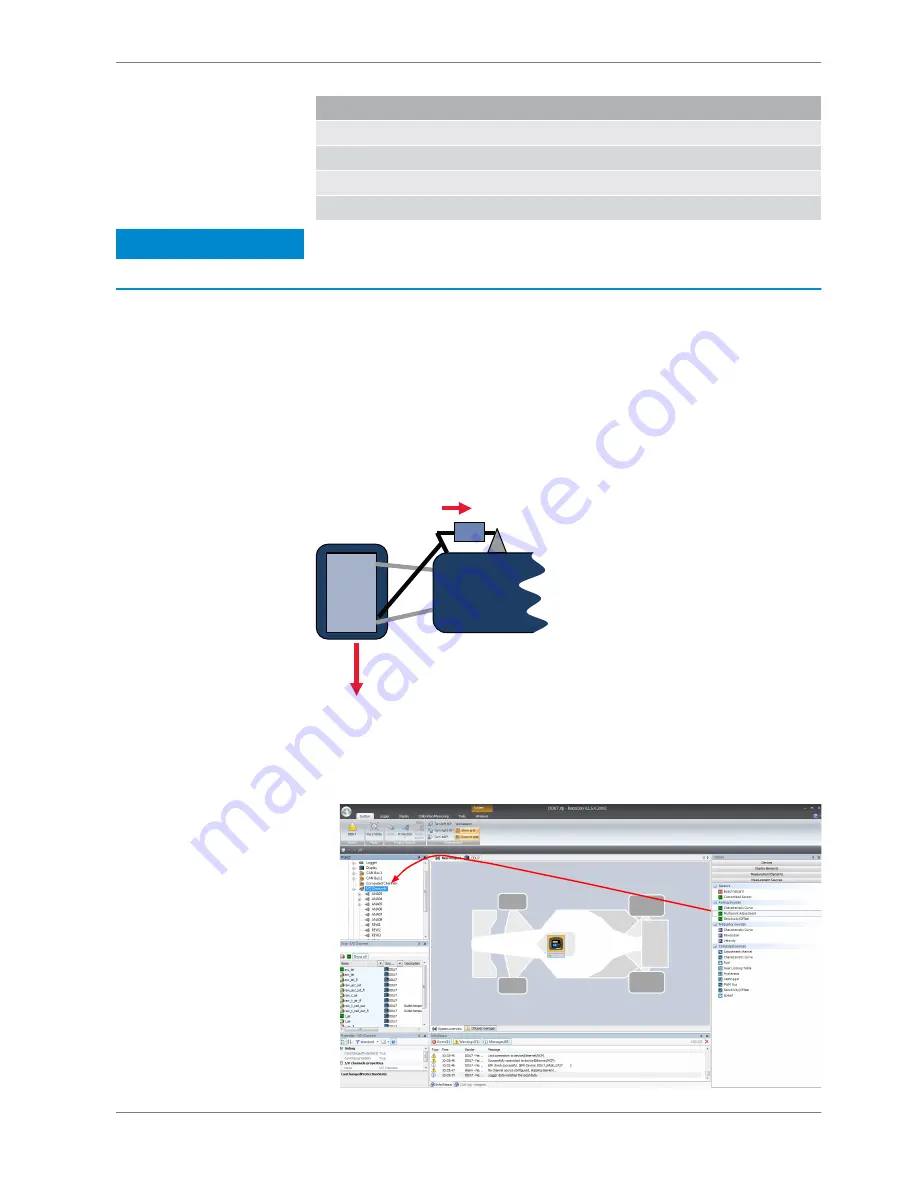
Example: Measurement of wheel force

▪ Physical property ‘wheel force’ not directly measureable
▪ Load transfer through suspension kinematics
▪ Physical value at sensor position defined by vehicle
▪ Curve definition by online adjustment at vehicle


Force at wheel 


Force at sensor 

1. Click on ‘Measurement Sources’ in the Toolbox.
2. Expand the list of ‘I/O Channels’ by clicking on ‘+’ in the DDU 8 Project Tree.
3. Drag the ‘Multipoint Adjustment’ analog signal source from the Toolbox and

drop it on the desired analog input channel in DDU 8 Project Tree.

Drag + Drop

10.3.4

Analog and Frequency Inputs | 10


Bosch Motorsport

DDU S2 PLUS Manual

87 / 136

Summary of Contents for DDU S2 Plus

Page 1: ...Display DDU S2 Plus Manual Version 1 0 9 16 2016 ...

Page 2: ...s 63 9 CAN Bus 66 9 1 CAN bus trivia 66 9 2 CAN input 67 9 3 CAN output 75 10 Analog and Frequency Inputs 79 10 1 Features 79 10 2 Analog inputs 79 10 3 Configuring inputs 80 10 4 Configuring computed sources 92 10 5 Hysteresis 94 11 Online Measurement 98 11 1 Achieving an online connection 98 11 2 Setting up an online measurement 100 11 3 Online calibration of measurement channels 106 11 4 Group ...

Page 3: ... 2 Protocol 125 15 3 Sensor recommendation 125 15 4 Measurement labels 128 15 5 GPS troubleshooting 129 16 Fuel Consumption Calculation 131 16 1 Setting up fuel consumption calculation and tank mangement 131 16 2 Fuel consumption diagnosis counter reset 132 16 3 Example 133 17 RaceCon Shortcuts 134 Table of Contents Bosch Motorsport DDU S2 PLUS Manual 3 136 ...

Page 4: ...d the manual carefully and follow the application hints step by step Don t hesitate to contact us contact data can be found on the last page of this docu ment Disclaimer Due to continuous enhancements we reserve the rights to change any illustra tions photos and technical data within this manual Please retain this manual for your records In this document all screenshots are created by way of examp...

Page 5: ... the negative battery terminal Connection should be free from dirt grease paint anodizing etc Use large diameter wire More metal to metal contact is better The following notations for power signals are used KL 15 is a switched battery rail controlled by the IGN switch KL 30 is an unswitched battery positive rail same as battery positive terminal KL 31 is an unswitched ground rail same as battery n...

Page 6: ...nal Electric Loads IGN Switch KL15 SENSPWR5 SENSGND active Sensor ANA_IN xx NTC Sensor ANA_IN xy switched pos terminal Star connection dig sensors e g wheelspeed µC As short as possible SENSPWR10 UBATT_FUSE KL30 LS_SWITCH1 4 Bosch Motorsport diagnosis connector PC DDU 3 3 Onboard Network Concept 6 136 DDU S2 PLUS Manual Bosch Motorsport ...

Page 7: ...r DDU 8 Additional devices can be connected via Ethernet and CAN buses CAN in and out is freely configurable Application Display 5 7 graphic color display 12 user configurable display pages 10 multicolor freely configurable RGB LEDs Resolution 640 x 480 pixel Supported image file formats bmp gif jpg png tif Converters 8 kHz AD converters with digital low pass filter Configurable math channels User...

Page 8: ...nels 6 Speed inputs Hall 2 Input range 0 to 5 V Resolution 12 bit Switchable pull up resistor 3 kOhm Outputs Sensor supply 5 V 1 350 mA 1 Sensor supply 10 V 1 350 mA 1 Environment External switch for page selection 12 steps B 261 209 658 01 External switch for brightness adjust ment or page selection 6 steps B 261 209 659 01 Connectors and Wires Motorsport connector AS 2 14 35PN at DDU S2 PLUS 37 ...

Page 9: ... 13 Sensor supply 10 V 14 Sensor supply 5 V 15 ANA_IN_1 16 ANA_IN_2 17 ANA_IN_3 18 ANA_IN_4 19 Ethernet 2 TX 20 Ethernet 2 TX 21 RS232 GPS TX 22 Screen Ethernet 23 ANA_IN_5 24 Ethernet 1 RX 25 Ethernet 1 TX 26 ANA_IN_6 27 Unused 28 Synchronization 29 CAN1_H 30 CAN1_L 31 RS232 GPS RX 32 Terminal 30 33 Unused 34 Unused 35 CAN2_H 36 CAN2_L 37 Sensor ground Technical Data 4 Bosch Motorsport DDU S2 PLU...

Page 10: ...Installation Notes The required software pst file for this device is available in the download area of our homepage www bosch motorsport com 4 Technical Data 10 136 DDU S2 PLUS Manual Bosch Motorsport ...

Page 11: ...ttery voltage and GND Communication channels CAN bus The DDU 8 has two CAN buses configurable as input and output Different baud rates are selectable Please note that the DDU 8 does not contain any CAN termi nation resistors Thus the CAN termination resistors need to be integrated into the wiring loom Ethernet channels The DDU 8 has two 100 MBit full duplex Ethernet communication port The port is ...

Page 12: ...erminal 30 Permanent positive Pin 2 Terminal 15 Switched positive Pin 3 Terminal 31 GND Pin 4 CAN High Diagnostic CAN bus Pin 16 CAN Low Diagnostic CAN bus Pin 10 K Line ECU diagnosis Pin 8 Ethernet RxD Ethernet interface Pin 9 Ethernet RxD Ethernet interface Pin 11 Ethernet TxD Ethernet interface Pin 12 Ethernet TxD Ethernet interface Pin 22 Screen Cable screen 5 3 4 5 Inputs and Outputs 12 136 D...

Page 13: ...Mechanical Drawing 6 Mechanical Drawing 6 Bosch Motorsport DDU S2 PLUS Manual 13 136 ...

Page 14: ...in 6 Ethernet Tx Pin 7 Ethernet Tx Pin 8 Ethernet Rx Pin 9 Ethernet Rx Pin 10 Ethernet Screen Setting up the network interface The DDU 8 contains a DHCP server network addresses can be assigned automat ically to the configuration PC The IP address of DDU 8 is 10 10 0 208 1 Switch off the PC s firewall 2 Set up the PC s network interface as shown in the screenshots Select Internet Protocol TCP IP C...

Page 15: ...s It is used to set up configure and calibrate the DDU 8 For better understanding Bosch Motorsport offers a video tutorial that explains many functions of RaceCon The video tutorial is available in the Software Down load section of www bosch motorsport com Connecting the Unit to RaceCon The following screenshot shows an overview of the RaceCon Main Screen with its areas All sub windows are resizab...

Page 16: ...roject Tree Data Area Properties Message Area Main Area Toolbox 1 Start the RaceCon software 2 In the File menu select New to create a new project 7 Starting up 16 136 DDU S2 PLUS Manual Bosch Motorsport ...

Page 17: ... 4 Select the program archive delivered with the DDU 8 PST file 5 Click OK RaceCon detects configuration differences between the DDU 8 and the Race Con project and asks for permission for data download 6 Click OK to proceed Successful Ethernet connection DDU talks to PC The download starts and the DDU 8 carries out a reset Starting up 7 Bosch Motorsport DDU S2 PLUS Manual 17 136 ...

Page 18: ...ackground and dot indicate matching configuration First display configuration Quick Start This chapter explains the configuration of a display element showing the battery voltage See chapter Display element configuration for a detailed instruction to config ure display elements 1 Expand the DDU 8 Project Tree by clicking 7 2 7 Starting up 18 136 DDU S2 PLUS Manual Bosch Motorsport ...

Page 19: ... drop it on the display page A message in the Large Element box shows that it is not linked to a measure ment channel 4 In the DDU 8 Project Tree click on DDU 8 to display the available measure ment channels 5 In the data window scroll down to ub measurement channel for battery voltage Starting up 7 Bosch Motorsport DDU S2 PLUS Manual 19 136 ...

Page 20: ... Area and drop it on the Large Element 7 Right click on DDU 8 in the DDU 8 Project Tree and choose Download Con figuration The configurations download starts and the DDU 8 carries out a reset 7 Starting up 20 136 DDU S2 PLUS Manual Bosch Motorsport ...

Page 21: ...The value of the battery voltage is displayed on the DDU 8 Starting up 7 Bosch Motorsport DDU S2 PLUS Manual 21 136 ...

Page 22: ...ay pages All Pages Display elements placed on this page are displayed on all pages Recommended for Alarm display elements Single Page Display elements placed on this page are displayed only on this page The priority of display elements placed on All Pages is higher than the priority of display elements placed on single pages Example An Alarm placed on All Pages is displayed on all display pages an...

Page 23: ...s Display area Display element configuration Numeric display element Adding a numeric display element to display page The Large Element and the Medium Element numeric display elements differ in element and font size The element and font size can be changed using the Nu meric Wizard Notice In this view the displayed values are random values and do not show the real values of the measurement channel...

Page 24: ...channel Drag Drop 2 Drag a measurement channel from the Data Area and drop it on the numeric display element Drag Drop The measurement channel is linked to the numeric display element Configuring a numeric display element 1 Double click on the numeric display element The Numeric Wizard window opens 8 Display Configuration 24 136 DDU S2 PLUS Manual Bosch Motorsport ...

Page 25: ...ose the font size alignment borderstyle background and foreground color of the numeric display element g Click the Extended button to show further options to change the color of the title border and text individually 2 Click OK when done Bargraph display element Adding a Bargraph display element to display page Drag the Bargraph display element from the Toolbox and drop it on the display page Drag...

Page 26: ...der lines h Enter the physical value where the Bargraph begins i Enter the physical value where the Bargraph ends j Choose the background color of the Bargraph k Choose the foreground color of the Bargraph l Click the Extended button to show further options to change the color of the title border and text individually 2 Click OK when done Notice The tab Conditional Formatting is explained in chapt...

Page 27: ...a new condition channel Choose an existing condition The Alarm is displayed if function is TRUE i e result of the calculation is 0 c Enter the alarm message displayed in the middle of the Alarm display element Enter the variable channel value to display the value of the measurement channel d Choose the measurement channel e Choose the type of input data Value Gear Time in different formats f Enter...

Page 28: ... if an alarm is triggered d Enter the time until the Alarm resets automatically after the minimum display time entered in c Only possible if Alarm is resettable e Enter the time until the Alarm can appear again after a reset 3 Click OK when done 4 Copy alarm to all display pages by clicking Move to All Pages 8 Display Configuration 28 136 DDU S2 PLUS Manual Bosch Motorsport ...

Page 29: ...if function is TRUE i e result of the calculation is 0 c Enable the checkbox if you want to define parts of the image as transparent d Select the basic transparent color key This means that any pixel of the amage near depending of the tolerance value to this color gets transparent e Select a tolerance in percent to define parts of the mage as transparent 2 Switch to the tab Alarm representation It...

Page 30: ...guring a Label display element 1 Double click on the Label display element The Label Wizard window opens a b c d a Enter the title displayed on top of the Label display element b Enter the text displayed in the middle of the Label display element c Choose the font size alignment borderstyle background and foreground color of the Label display element d Click the Extended button to show further opt...

Page 31: ... any pixel of the image near depending of the Tolerance value to this color gets transparent d Select a tolerance in percent to define parts of the image as transparent 2 Click OK when done Conditional formatting This function pigments the displayed values in dependence of a specified meas urement channel value Example The text color changes from white to red when the battery voltage is fewer than...

Page 32: ... color of the title border and text individually If a Bargraph display element is used its colors can also be changed The lower and the upper limits are configured in the same way 3 Click OK when done Context menu The context menu appears by right clicking on a display element Show and edit properties Move element to different page Copy element to different page or all pages Change type of display...

Page 33: ...y Tab LEDs 1 Click on the tab LEDs in the display view 2 Click on the button Add shift lights Button Add shift lights Tab LEDs 3 The shift light configuration window appears Set up the shifting lights using the following configuration possibilities 8 3 1 Display Configuration 8 Bosch Motorsport DDU S2 PLUS Manual 33 136 ...

Page 34: ...box control unit use the Gear Lookup Table to translate numeric values to ASCII format For more information see chapter Converting a gear channel to ASCII representation 4 Click OK when done The configuration is displayed in the DDU 8 LED Configuration window Converting a gear channel to ASCII representation If you get the gear information of a different control unit as the Bosch ECU e g a gearbox...

Page 35: ...ption of the translated ASCII measure ment channel e g gear ASCII 4 Click Ok when done A graphic shows the connection between the input and output channels The measurement channel can now be used in the shift LED configuration Creating customized LED pattern You can create your own LED pattern with an individually created condition The LEDs flash if the condition becomes true 1 Click on the button...

Page 36: ...the LEDs in the one color Then choose Display off pattern and define the LEDs in the other color 2 Click OK when done The configuration is displayed in the DDU 8 LED Configuration window Assigning display pattern priority You can assign the priority of the created display pattern and shift lights The 1st display pattern is activated before all following pattern if its condition is true The 2nd dis...

Page 37: ... math channel etc Option 1 12 position switch 1 Connect 12 position switch to one of analog input ANAxx and sensor GRD 2 Select one of Analog input and then select Characteristic Curve 3 Select Pull up value 3 01 kOhm and go Next 8 4 8 4 1 Display Configuration 8 Bosch Motorsport DDU S2 PLUS Manual 37 136 ...

Page 38: ...ween voltage and switch position and go Next Voltage 5000 x R R 3010 5000 Sensor supply mV R Resister for each Rotary sw position Ohm 3010 Pull up resistor Ohm 8 Display Configuration 38 136 DDU S2 PLUS Manual Bosch Motorsport ...

Page 39: ... Limit Select Output data type from 8 16 or 32 Bit Do not check Use adjustment value Input Measurement sheet and go Finish 6 Input Name and Description and go Ok Display Configuration 8 Bosch Motorsport DDU S2 PLUS Manual 39 136 ...

Page 40: ...7 Select Display Open 8 Select Setting 8 Display Configuration 40 136 DDU S2 PLUS Manual Bosch Motorsport ...

Page 41: ...tion 11 Search configured channel and double click and then it shows Raw voltage and Page position Option 2 Up Down switches 1 Connect Up Down switch to analog input ANAxx and sensor GRD 2 Select Display Switch and drug into DDU 8 8 4 2 Display Configuration 8 Bosch Motorsport DDU S2 PLUS Manual 41 136 ...

Page 42: ...rap around or Display switch does not wrap around Display switch does wrap around goes Maximum position to Minimum posi tion or the other way round by switching and Display switch does not wrap around does not Input measurement Sheet and go Finish 4 Input Name and Description and go Ok 8 Display Configuration 42 136 DDU S2 PLUS Manual Bosch Motorsport ...

Page 43: ...5 Open configured ANA channel and change pull up value to 3 01 kOhm and go Finish Display Configuration 8 Bosch Motorsport DDU S2 PLUS Manual 43 136 ...

Page 44: ...6 Select Display Open 7 Check Use a channel to switch pages and select channel configured above 8 Display Configuration 44 136 DDU S2 PLUS Manual Bosch Motorsport ...

Page 45: ...8 Select Download configuration 9 Open DDU 8 and go Statistics configured channel position is shown Display Configuration 8 Bosch Motorsport DDU S2 PLUS Manual 45 136 ...

Page 46: ...Option 3 CAN input signal math channel or ANA_IN channel 1 Select Display and Setting 8 4 3 8 Display Configuration 46 136 DDU S2 PLUS Manual Bosch Motorsport ...

Page 47: ...N channel The selected channel has to include value from 0 5 to 11 5 Page 1 is shown with the value 1 5 Page 2 is shown with 1 5 the value 2 5 Page 3 is shown with 2 5 the value 3 5 Page 12 is shown with 11 5 the value Display Configuration 8 Bosch Motorsport DDU S2 PLUS Manual 47 136 ...

Page 48: ...ess and or page This can be an input switch a math channel etc Option 1 6 position switch 1 Connect 6 position switch to one of Analog input ANAxx and Sensor GRD 2 Select one of Analog input and then select Characteristic Curve 8 5 8 5 1 8 Display Configuration 48 136 DDU S2 PLUS Manual Bosch Motorsport ...

Page 49: ...Input the relation between voltage and switch position and go Next Voltage 5000 x R R 3010 5000 Sensor supply mV R Resister for each Rotary sw position Ohm 3010 Pull up resistor Ohm Display Configuration 8 Bosch Motorsport DDU S2 PLUS Manual 49 136 ...

Page 50: ... Limit Select Output data type from 8 16 or 32 Bit Do not check Use adjustment value Input Measurement sheet and go Finish 6 Input Name and Description and go Ok 8 Display Configuration 50 136 DDU S2 PLUS Manual Bosch Motorsport ...

Page 51: ...7 Select Display Open 8 Select Setting Display Configuration 8 Bosch Motorsport DDU S2 PLUS Manual 51 136 ...

Page 52: ...tch brightness and select channel configured above Change value for background and LEDs for each switch position if it is nee ded 10 Select Download configuration 8 Display Configuration 52 136 DDU S2 PLUS Manual Bosch Motorsport ...

Page 53: ... then it shows Raw voltage and switch position Option 2 Up Down switches 1 Connect Up Down switch to Analog input ANAxx and Sensor GRD 2 Select Display Switch and drag into DDU 8 8 5 2 Display Configuration 8 Bosch Motorsport DDU S2 PLUS Manual 53 136 ...

Page 54: ...rap around or Display switch does not wrap around Display switch does wrap around goes Maximum position to Minimum posi tion or the other way round by switching and Display switch does not wrap around does not Input measurement Sheet and go Finish 4 Input Name and Description and go Ok 8 Display Configuration 54 136 DDU S2 PLUS Manual Bosch Motorsport ...

Page 55: ...5 Open configured ANA channel and change pull up value to 3 01 kOhm and go Finish Display Configuration 8 Bosch Motorsport DDU S2 PLUS Manual 55 136 ...

Page 56: ...7 Check Use a channel to switch brightness and select channel configured above Change value for Background and LEDs for each switch position if it is nee ded 8 Display Configuration 56 136 DDU S2 PLUS Manual Bosch Motorsport ...

Page 57: ...8 Select Download configuration 9 Open DDU 8 and go Statistics Configured channel position is shown Display Configuration 8 Bosch Motorsport DDU S2 PLUS Manual 57 136 ...

Page 58: ...Option 3 CAN input signal math channel or ANA_IN channel Select Display and Setting 8 5 3 8 Display Configuration 58 136 DDU S2 PLUS Manual Bosch Motorsport ...

Page 59: ...operations on up to 4 measurement channel s Numerical result Result can be used as input source for various display elements numeric ele ments alarms Bargraphs and further calculations in the whole RaceCon project Conditional function Arithmetic and logical operations on one or more measurement channel s If Else structure with reset Numerical result Result can be used as input source for various d...

Page 60: ...iguration possibilities a b c d e f g h a Enter the name of the math channel b Enter a description of the math channel c Enter the formula d Select the logical operator e Choose a measurement channel f Define a value that can be used as a constant in the formula g Choose a function h Describes the function selected above 2 Click Finish when done The math channel is displayed in the DDU 8 math chan...

Page 61: ...lowing configuration possibilities a b c d e a Enter the name of the conditional function b Enter the If condition Click on the pencil symbol to open an editor to enter expressions c Enter the Then condition Click on the pencil symbol to open an editor to enter expressions d Enter the Otherwise condition Click on the pencil symbol to open an editor to enter expressions e Enter the reset value must...

Page 62: ...s always set for the new variable entered in Name before If condition becomes TRUE for the first time after power up when If condition changes state from FALSE to TRUE An example of a condition to set up the maximum front brake pressure is given on the next page The conditional function is displayed in the math channel window Example Setting up a condition for maximum front brake pressure 20 20 10...

Page 63: ...d Because the condition p_br_front_mx sets the value of p_br_front_mx and the value that is already set to 40 before noth ing changes When p_br_front rises to 40 the IF condition changes to TRUE again and triggers the THEN condition Now the reset value 10 is used for p_br_front_mx in the THEN condition Because 40 is bigger than 10 the new value of p_br_front_mx is 40 Condition channels Condition c...

Page 64: ... condition the operator and the measurement channel or condition to be compared Range Choose the measurement channel or condition the operator and define the minium and maximum value Multiple Choose the measurement channel or condition the operator and enter the value of up to 5 constants d Enter the minimal time to detect the signal of the measurement channel to avoid high frequent switchovers e ...

Page 65: ... with binary values to be compared Combine multiple conditions by adding AND or OR relations To negate a condition right click on the condition and select Negation Combine several up to 16 conditions Click Next to go to the next page Choose the output setting of the result Constant TRUE FALSE Result is as a constant with the value TRUE or FALSE Blinking Result is a blinking if the condition is ful...

Page 66: ...m one bus to the other CAN bus trivia CAN message 11 Bit standard or 29 Bit extended identifier Up to 8 bytes of data payload CAN bus Needs termination resistors 120 Ohm in wiring harness All devices connected to the bus must use identical data rate Configuration of bus data rate in Properties menu by double click on the CAN bus in project tree 1 MBaud 500 kBaud 250 kBaud 125 kBaud Row counter con...

Page 67: ... file Import RaceCon CAN input configuration from file Display CAN bus properties Baudrate Create new CAN channel 1 Right click on CAN Input of desired bus CAN1 CAN2 or CAN3 2 Select New CAN Channel from menu 3 Insert name and description of channel 4 Click OK when done The channel is listed in the Data window and a CAN channel configuration win dow opens 9 2 9 2 1 9 2 2 CAN Bus 9 Bosch Motorsport...

Page 68: ...tionality Automatic assignment to measurement view Extracting data from CAN bus Representation Byte Some CAN devices need to be addressed by a byte represented CAN channel The address can be assigned in this window and is illustrated by a bargraph 9 2 3 9 2 4 9 CAN Bus 68 136 DDU S2 PLUS Manual Bosch Motorsport ...

Page 69: ...pecify time out period and raw value d Check the box if a multiplexer row counter is used e Enter data position length and format f The bargraph shows assignment of the bytes Red colored fields show the assignment of the data bytes Orange colored fields show the assignment of the multiplexer bytes CAN Bus 9 Bosch Motorsport DDU S2 PLUS Manual 69 136 ...

Page 70: ... format f The matrix table shows the assignment of the bits Red colored fields show the assignment of the data bits Orange colored fields show the assignment of the multiplexer bits Conversion to physical values a b c d e f g a Enter factor gain for conversion to physical value b Enter offset for conversion to physical value c Select type of physical value d Select unit of physical value e Enter m...

Page 71: ...ent sheet Insert a name for a new sheet or select an existing sheet from the list box For an online view of the value measured by the DDU 8 insert the channel in an online measurement sheet which is described in the next chapter Online view of CAN channels in vehicle 1 Double click on Sheet 1 in Project Tree Measurement Sheet 1 is displayed in Main Area 2 Click on Measurement elements in the Toolb...

Page 72: ... measurement element displays the values of the assigned channel 6 Connect PC to the vehicle and switch to Race Mode by clicking F11 on the keyboard to display online data Import a CAN database DBC file 1 Right click on CAN Input of desired bus CAN1 CAN2 or CAN3 2 Select Import DBC file from menu A file browser opens 9 2 8 9 CAN Bus 72 136 DDU S2 PLUS Manual Bosch Motorsport ...

Page 73: ... in the Data window Export RaceCon CAN configuration 1 Right click on CAN Input of desired bus CAN1 CAN2 or CAN3 2 Select Export from menu An Export Selection window opens 3 Specify the filename 4 Click OK when done Import RaceCon CAN configuration 1 Right click on CAN Input of desired bus CAN1 CAN2 or CAN3 2 Select Import from menu A file browser opens 9 2 9 9 2 10 CAN Bus 9 Bosch Motorsport DDU ...

Page 74: ...op the channel to CAN Input of desired CAN bus on right hand side 6 Click Finish If a measurement channel belongs to more than one source e g and MS 5 1 the Solve Label Ambiguity window opens 7 Assign the ambiguous channels to the desired source 8 Click Finish 9 CAN Bus 74 136 DDU S2 PLUS Manual Bosch Motorsport ...

Page 75: ... CAN bus properties Baudrate Create new CAN output message channel 1 Right click on CAN Output of desired bus CAN1 CAN2 or CAN3 2 Select New CAN Message from menu The Create new CAN Out message window opens 3 Enter name of message CAN Id and Grid output interval 4 Optionally specify a multiplexer 9 3 9 3 1 9 3 2 CAN Bus 9 Bosch Motorsport DDU S2 PLUS Manual 75 136 ...

Page 76: ...red measurement channel and drop it on message s bytes Click here Drag Drop The measurement channel is assigned to the CAN message Set up word length byte order and quantization Set byte order of channel on CAN bus Word length and quantization of channel are fixed Byte Order can only be changed if a channel allocates more than one byte 9 3 3 9 CAN Bus 76 136 DDU S2 PLUS Manual Bosch Motorsport ...

Page 77: ...ens 3 Specify the filename 4 Click OK when done Import RaceCon CAN configuration 1 Right click on CAN Outputs of desired bus CAN1 CAN2 or CAN3 2 Select Import from menu A file browser opens 3 Select the input file and click OK An Import Selection window opens 4 Select channels to import 9 3 4 9 3 5 CAN Bus 9 Bosch Motorsport DDU S2 PLUS Manual 77 136 ...

Page 78: ...n right hand side 6 Click Finish If a measurement channel belongs to more than one source e g and MS 5 1 the Solve Label Ambiguity window opens 7 Assign the ambiguous channels to the desired source 8 Click Finish 9 CAN Bus 78 136 DDU S2 PLUS Manual Bosch Motorsport ...

Page 79: ...he exact values in mV Measurement labels with the characters _fi show filtered values The word name in the table is a placeholder for the channel s name Measurement label Function raw_name mV value of sensor raw_name_fi Filtered mV value of sensor name Physical value of sensor name_fi Filtered physical value Filtered channels are routed through digital low pass filters DDU 8 uses A D converter ove...

Page 80: ...ard 1 Click on Measurement Sources in the Toolbox 2 Expand the list of I O Channels by clicking on in the DDU 8 Project Tree 3 Drag the Bosch Sensor Wizard from the Toolbox and drop it on the desired analog input channel in the DDU 8 Project Tree Drag Drop The Bosch Sensor Wizard opens 10 3 10 3 1 10 Analog and Frequency Inputs 80 136 DDU S2 PLUS Manual Bosch Motorsport ...

Page 81: ... Click Ok when done The channel is inserted into the DDU 8 Project Tree Channel is linked to ANA03 Input pin Pull up resistor is activated Calculation of physical value with characteristic curve Available measurements for channel Measurement label Function raw_name mV value of sensor raw_name_fi Filtered mV value of sensor name Physical value of sensor name_fi Filtered physical value Analog and Fr...

Page 82: ...e Toolbox and drop it on the desired analog input channel in the DDU 8 Project Tree A Sensitivi ty Offset Wizard opens 4 To activate the internal pullup resistor check the box The internal pullup re sistor is used to get a 5 V signal at the analog channel of the DDU 8 It allows you to use a push button The fixed value of the internal pullup resistor is 3 010 Ohm If using an additional external pul...

Page 83: ...rement variable Check box to enable online calibration of offset and enter desired physical offset value Enter name to automatically create a new measurement sheet Notice Working with automatically created measurement sheets is ex plained in chapter Setting up an online measurement 100 7 Click Finish when done 8 Enter channel name and description 9 Click OK when done The channel is inserted into t...

Page 84: ... Example Thermistor 5 kOhm From sensor data sheet resistance values over temperature The sensor has a nonlinear behaviour Use characteristic curve for linearization Input voltage is the ratio between pull up resistor and thermistor Pin Thermistor 5V 3 kOhm 1 Click Measurement Sources in the Toolbox 2 Expand the list of I O Channels by clicking on in the DDU 8 Project Tree 3 Drag the Characteristic...

Page 85: ... the analogue channel of the DDU 8 It allows you to use a push button The fixed value of the internal pull up resis tor is 3 010 Ohm If using an additional external pull up resistor set up the overall resistance 5 Click Next when done The second part of the Sensitivity Offset Wizard opens Analog and Frequency Inputs 10 Bosch Motorsport DDU S2 PLUS Manual 85 136 ...

Page 86: ...al limits of the channel Choose data type of the measurement variable This sensor does not need offset calibration Enter name to auto matically create a new measurement sheet 7 Click Finish when done 8 Enter channel name and description 9 Click OK when done The channel is inserted into the DDU 8 Project Tree Channel is linked to ANA05 Input pin Pull up resistor is activated Characteristic curve fo...

Page 87: ...y wheel force not directly measureable Load transfer through suspension kinematics Physical value at sensor position defined by vehicle Curve definition by online adjustment at vehicle Force at wheel Force at sensor 1 Click on Measurement Sources in the Toolbox 2 Expand the list of I O Channels by clicking on in the DDU 8 Project Tree 3 Drag the Multipoint Adjustment analog signal source from the ...

Page 88: ...If using an additional external pullup resistor set up the overall resistance 5 Click Next when done The second part of the Multipoint Adjustment Wizard opens Physical channel value Choose unit group and unit of physical value Select type of curve Enter physical adjustment values her can still be edited later Electrical pin value 6 Click Next when done The third part of the Multipoint Adjustment W...

Page 89: ...iption 9 Click OK when done The channel is inserted into the DDU 8 Project Tree Channel is linked to ANA06 Input pull up resistor is deactivated Characteristic curve for sensor Adjustment is enabled Available measurements for channel Measurement label Function raw_name mV value of sensor raw_name_fi filtered mV value of sensor name physical value of sensor name_fi filtered physical value Online de...

Page 90: ...d 1 Linear phase no signal distortion 0 500 1000 1500 2000 2500 3000 2 1 5 1 0 5 0 0 5 1 1 5 2 Abtastwerte roh Wert 10000Hz Abtastrate 0 5 10 15 20 25 30 1 5 1 0 5 0 0 5 1 1 5 Abtastwerte gefiltert Wert 100Hz Abtastrate 0 5 10 15 20 25 30 1 5 1 0 5 0 0 5 1 1 5 Abtastwerte dezimiert Wert 100Hz Abtastrate Sensor signal with noise Recorded signal 100Hz unfiltered Recorded signal 100Hz filtered 10 3 5...

Page 91: ...d data for recording use unfiltered data for real time Configuring a frequency input Example measurement of wheel speed Pulse wheel attached to wheel Each passing tooth of pulse wheel triggers hall sensor Calculation of wheel speed with wheel circumference 1 Click Measurement Sources in the Toolbox 2 Expand the list of I O Channels by clicking on in the DDU 8 Project Tree 3 Drag the Velocity digit...

Page 92: ...V01 Input pin has hall interface Number of teeth Wheel circumference Available measurements for channel Measurement label Function raw_name mV value of sensor raw_name_fi filtered mV value of sensor name physical value of sensor name_fi filtered physical value Notice Measurement of Revolution is similar Configuring computed sources Computed sources receive data from a measurement channel rather th...

Page 93: ...nsitivity Offset computed source from the Toolbox and drop it on Computed Channels in the DDU 8 Project Tree Drag Drop A Computed Sensitivity Offset Wizard opens Choose input channel Choose unit group and unit of output Enter sensivity and offset of conversion formula 3 Click Next when done The second part of the Computed Sensitivity Offset Wizard opens Analog and Frequency Inputs 10 Bosch Motorsp...

Page 94: ...ject Tree Notice Working with automatically created measurement sheets is ex plained in chapter Setting up an online measurement Hysteresis The hysteresis function avoids the high frequent switchover of the measurement channel value The hysteresis can be adjusted for each input measurement chan nel individually and can be used for further processing 1 Click Measurement Sources in the Toolbox 2 Dra...

Page 95: ... when the hysteresis function is activated after vehicle s startup j Enter the channel s state A or B at startup 3 Click Next when done The second part of the Hysteresis Wizard opens Choose data type of the measurement variable Check the box to force the channel s quantization if the quantization should be a fixed value in the whole CAN system Enter name to automatically create a new measurement s...

Page 96: ... input Calculated speed is average of both speeds if speed difference between wheels limit Calculated speed is maximum of both speeds if speed difference between wheels limit Calculating vehicle speed of 4 wheel drive Wheel speeds of all wheels as in put Calculated speed is speed of 2nd fastest wheel Setting up calculated speed 1 Click on tab System Overview 2 Click on Measurement Sources in the T...

Page 97: ...channels Set limit for speed difference for calculation 4 Click Finish when done The speed calculation is inserted into the DDU 8 Project Tree Speed calculation in Project Tree Measurement channels calculated speed and calculated distance Configuration window DDU S2 PLUS Analog and Frequency Inputs 10 Bosch Motorsport DDU S2 PLUS Manual 97 136 ...

Page 98: ...on interface Ethernet Communication protocol XCP Achieving an online connection Set up the PC for access to the Unit 1 Switch off local firewall on the PC 2 Set IP Configuration for the Ethernet interface to automatic configuration DHCP See chapter Setting up the network interface 14 for details 3 Start RaceCon 4 Establish the Ethernet connection to the vehicle 5 Power on the vehicle Yellow dot in...

Page 99: ...istency If the system s configuration in RaceCon has been changed the dot and back ground becomes yellow and a configuration download is necessary Configuration download 1 Right click on DDU 8 in the DDU 8 Project Tree 2 Select Download configuration The configuration download starts A Green dot and background indicate a successful download 11 1 2 11 1 3 Online Measurement 11 Bosch Motorsport DDU ...

Page 100: ...et1 Sheet 1 is opened in a new page Calibration Measuring RaceCon change automatically to Calibration Measuring Back to page System from the context menu of the project new measurement pages can be created From the context menu of a measurement page the folder can be renamed and deleted It also allows the creation of measurement pages 11 2 11 Online Measurement 100 136 DDU S2 PLUS Manual Bosch Mot...

Page 101: ...ages click on the tabs on the bottom of the page Calibration Measuring Tabs to switch between sheets To add an element to a measurement sheet do following steps 1 Drag a measurement element from the Toolbox and drop it on the measure ment sheet Online Measurement 11 Bosch Motorsport DDU S2 PLUS Manual 101 136 ...

Page 102: ... and drop it on the measurement el ement If the DDU 8 is online the value is displayed Drag Drop The measurement element s appearance can be changed from the context menu of the element 11 Online Measurement 102 136 DDU S2 PLUS Manual Bosch Motorsport ...

Page 103: ...Numeric indicator Measurement label Oscilloscope Chart Automatic creation of measurement sheets RaceCon can create measurement sheets automatically You can create and use measurement sheets with the DDU 8 as well as with all other devices connected to RaceCon Drag Drop 11 2 1 Online Measurement 11 Bosch Motorsport DDU S2 PLUS Manual 103 136 ...

Page 104: ...measurement channel select a measurement sheet from the list box or enter a name for a new measurement sheet Select existing sheet from list or enter name of new sheet 11 Online Measurement 104 136 DDU S2 PLUS Manual Bosch Motorsport ...

Page 105: ...ion zeros only when this functionality is activated in the settings of this channel see chapter Enable online offset calibration for measurement channel 106 Using the measurement sheets 1 When RaceCon is online press the F11 key to switch from Design Mode in to Race Mode The measurement sheet is extended to full screen The but ton for offset calibration is active 2 Switch between different sheets ...

Page 106: ...ture etc Manual calibration is necessary Solution online offset calibration Example acceleration sensor Enable online offset calibration for measurement channel During creation of the measurement channel 11 3 11 3 1 11 Online Measurement 106 136 DDU S2 PLUS Manual Bosch Motorsport ...

Page 107: ... sensor s offset 1 Apply the desired physical condition to the sensor e g 1 G to an acceleration sensor 2 Open the measurement channel s online page by double clicking on the measurement channel name in the Data Area 3 Enter the physical target value e g 1 G and press the Calibrate button Calibration target value Initiate calibration The sensor s offset is now calibrated 11 3 2 Online Measurement ...

Page 108: ...drop it on the DDU 8 A Group Adjustment Channel Wizard opens Double click add group adjustment Notice If a low active signal is selected as an input channel do not forget to enable the pull up resistor for the pin Otherwise the group adjustment will be triggered periodically See chapter Configuring a generic linear sensor 82 for further information concerning the pull up resistor 3 Click Next when...

Page 109: ...channel you want to assign Click here to configure the channel Check the box to add channel to group adjustment The selected measurement channels are added to the group adjustment event Triggering the group adjustment 1 Connect the input pin to GND using a push button 2 Make sure the pullup resistor is enabled if you selected active low trigger polarity 3 Double click on the input channel grp_adj_...

Page 110: ...multipoint adjustment channels Example measurement of wheel force Physical property wheel force not directly measureable Load transfer through suspension kinematics Physical value at sensor position defined by vehicle Curve definition by online adjustment at vehicle Force at wheel Force at sensor 1 Create a multipoint adjustment measurement channel To create a multipoint channel see chapter Config...

Page 111: ...ply the desired physical condition to the sensor e g by applying a force on the wheel 7 Enter the physical value in the value column of the desired calibration point e g 745 N 8 Press the Calibrate button of the desired calibration point 9 Repeat for all curve points 10 Click Close when done The calibration curve is displayed in the online view Online Measurement 11 Bosch Motorsport DDU S2 PLUS Ma...

Page 112: ...Adjustment points vs offset adjustment 11 Online Measurement 112 136 DDU S2 PLUS Manual Bosch Motorsport ...

Page 113: ...with the name of your product Error memory representation in RaceCon Bosch Motorsport devices feature an error memory Information on errors can be visualized via RaceCon online measurement or can be transmitted via telemetry Accessing the memory The error memory can be accessed as shown in the illustration 12 12 1 12 2 12 2 1 Error Memory 12 Bosch Motorsport DDU S2 PLUS Manual 113 136 ...

Page 114: ...ct if the error is still active or not An error is deleted from the list when the user actively clears the error memory the user updates the firmware The error memory is not cleared by a configuration download and is not cleared by a power cycle Clearing the error memory There are two ways of clearing the error memory both are shown in the follow ing illustration 12 2 2 12 Error Memory 114 136 DDU...

Page 115: ...s available for the error memory itself Error Status device measurement label error_state 0 no error present in memory 1 at least one inactive error present in memory no active errors 2 at least one active error present in memory If displayed in a measurement sheet this property s value 0 1 or 2 is translated into a verbal description 12 3 12 3 1 Error Memory 12 Bosch Motorsport DDU S2 PLUS Manual...

Page 116: ...em 0 no error present in memory No orange border MIL off black No entries 1 at least one inactive error present in memory no active errors Constantly orange border Info cycling through errors present in error memory MIL constantly orange 12 Error Memory 116 136 DDU S2 PLUS Manual Bosch Motorsport ...

Page 117: ...can be seen from the number of occurrences Number of occurrences How many times has the error been detected since the last time the error memory was cleared Error active state device label error_active_rotate All failure modes are continuously diagnosed any error detected will be writ ten to the error memory Once an error is detected it is qualified as active 1 TRUE Error was detected in most rece...

Page 118: ...start again with the first error in the error memory stack and its error properties will be displayed again So monitoring these labels over a sufficiently long peri od of time provides the information on all individual errors in the error memory To understand this behavior it is recommended to observe the three labels in a measurement sheet while more than one error is active and watch the values ...

Page 119: ...ck whether measurement is within the desired range can be activated in the ANA pin setup wizard to allow for a diagnosis re garding shortcut to ground shortcut to battery voltage cable breakage a mini mum maximum has to be defined 12 4 12 4 1 Error Memory 12 Bosch Motorsport DDU S2 PLUS Manual 119 136 ...

Page 120: ...being ac tivated and deactivated evaluating the behaviour of the measured value detects cable breakage regardless of the pull up resistor being activated by the user Open line detection is triggered as shown in the illustration 12 4 2 12 Error Memory 120 136 DDU S2 PLUS Manual Bosch Motorsport ...

Page 121: ...display con figuration recording telemetry configuration Calibration data Characteristic curves and offsets created by online calibration at the vehicle Recorded data Measurement data recorded during vehicle operation Firmware update The scheme shows the process during each connection between RaceCon and DDU 8 13 13 1 13 2 Firmware 13 Bosch Motorsport DDU S2 PLUS Manual 121 136 ...

Page 122: ...he DDU 8 Project Tree right click on DDU 8 and choose Synchronize then Update firmware A pop up menu opens 2 Select the destination of the firmware archive PST 3 Click OK when done The firmware update starts The DDU 8 displays the message Updating firm ware Do not switch off the car s ignition or interrupt the power supply of the DDU 8 13 2 1 13 Firmware 122 136 DDU S2 PLUS Manual Bosch Motorsport...

Page 123: ...date is complete the DDU 8 displays the message Up dating firmware finished Do a powercycle Switch the car s ignition off and on again to cycle the power of the DDU 8 Firmware 13 Bosch Motorsport DDU S2 PLUS Manual 123 136 ...

Page 124: ...e the hardware device which should be cloned 3 Define destination and filename 4 Click OK to start procedure Change the device 1 Click Clone apply in Extras menu 2 Choose clone file 3 Click Ok Please remember that following properties are not stored into the clone Lifetime of device Serial number Upgrade features 14 14 Clone the Unit 124 136 DDU S2 PLUS Manual Bosch Motorsport ...

Page 125: ...face baud rate DDU 8 Baud rate can be set with the GPS_BAUDRATE characteristic Data format DDU 8 expects 8 data bits no parity bit 1 stop bit 8N1 Protocol DDU 8 expects NMEA Protocol ASCII The following messages are decoded Message Function GGA GPS fix information GSA Overall satellite data GSV Detailed satellite data RMC Recommended minimum data for GPS VTG Vector track and speed over the ground ...

Page 126: ...ensor In U Center click View Configuration View to start the configuration The following 3 points have to be changed Transfer Rate Click on PRT Ports Change the baud rate to a fix value this value needs to meet the setting of RaceCon For a good signal quality we recommend 115 200 baud Click on Send to store the new setting in U Center Click on CFG Configuration Click on Send to save the new settin...

Page 127: ...ks as shown in the following picture Click on Send to store the new setting in U Center As during configuration step 1 click on CFG Configuration Click on Send to save the new setting on the sensor GPS Sensor 15 Bosch Motorsport DDU S2 PLUS Manual 127 136 ...

Page 128: ...d to save the new setting on the sensor Notice Sensor needs reception for visible signal It takes time to start the sensor Measurement labels The decoded NMEA messages are copied to these DDU 8 measurement labels Measurement label Function gps_PDOP Position Dilution Of Precision gps_HDOP Horizontal Dilution Of Precision gps_VDOP Vertical Dilution Of Precision gps_lat Latitude degree gps_long Longi...

Page 129: ...vigation 1 Fix not avail able 2 2D 3 3D These measurement labels are arrays where the indexed element points to the same satellite E g gps_info_satsigstrength 3 tells the receiving signal strength of satellite 3 Satellite 3 has the SAT ID given in gps_info_satid 3 Measurement label Function gps_info_satid Satellite PRN number gps_info_satinuse Used in position fix gps_info_satelevation Elevation i...

Page 130: ...up Does the GPS sensor view the sky Did the GPS sensor complete its initial start up procedure This may take up to 20 min A correct reception is indicated when gps_fix is showing 3D Fix GPS sensor values are frozen Does the sensor has lost its reception The old values will be kept if the reception is lost The gps_smask channel shows which NMEA sentence is received 15 GPS Sensor 130 136 DDU S2 PLUS...

Page 131: ...tank mangement 1 Select Measurement Sources in Toolbox 2 Drag Fuel element and drop it on the vehicle in System Overview Do not drop it on the DDU 8 Drag Drop A fuel consumption wizard opens 16 16 1 Fuel Consumption Calculation 16 Bosch Motorsport DDU S2 PLUS Manual 131 136 ...

Page 132: ... lap completed using target lap consumption entered in the field Target lap consumption g Choose values to initiate a reset of fuel consumption if desired Manually using RaceCon On power down assuming that the tank is filled each time the ignition is turned off By signal source as input channel e g a switch connected to input pin 3 Press Finish when done Fuel consumption diagnosis counter reset To...

Page 133: ..._dls Remaining fuel in tank starting at tank capacity Fuel_fuellap_dls Fuel consumption for current lap starting at 0 Fuel_fuellapold_dls Fuel consumption of last lap completed Fuel_laprem_dls Remaining laps with fuel in tank 16 3 Fuel Consumption Calculation 16 Bosch Motorsport DDU S2 PLUS Manual 133 136 ...

Page 134: ...r F11 Toggle display to fullscreen Race Mode F12 Enlarge main screen CTRL Tab Switch between opened windows Project Tree Plus at numeric pad or right cursor Expand selected node Minus at numeric pad or left cursor Close selected node Star at numeric pad Open all nodes DEL Delete seleted object Display page measurement page Cursor Move selected display element one grid unit in chosen direction SHIF...

Page 135: ......

Page 136: ...Bosch Engineering GmbH Motorsport Robert Bosch Allee 1 74232 Abstatt Germany www bosch motorsport com ...

Reviews: