background image

How to connect or remove the microphone
The microphone can be easily connected to the DCNM-MMD Multimedia Device, page 23:

9

6

4

8

5

7

Figure 7.4: DCNM‑HDMIC to DCNM‑MMD connection

 
To do so:
1.

Gently guide the connection guidance (4) into the DCNM‑MMD microphone connector
(9).

2.

Gently push the connector plug (6) into the DCNM‑MMD microphone connector (9) until
the connection lock (5) fits/click into place.

3.

To remove the microphone from the DCNM‑MMD: Shift lockslider (7) towards the
DCNM‑MMD and hold in place lock release (8) and pull out the microphone.

DCNM-MMDSP Anti-reflection foil

The DCN multimedia Anti‑reflection foil is a self‑absorbed premium tempered glass screen
protector which has anti‑scratch and anti‑wear features.
 
Installation procedure
1.

Please use the included alcohol swab and the microfiber fabric to clean the DCNM‑MMD
LCD screen before installation.

2.

Peel the positioning adhesive release paper from the rear of anti‑reflection foil.

3.

Position the anti‑reflection foil on the DCNM‑MMD LCD screen, and then fix the
positioning adhesive to the side of the DCNM‑MMD.

4.

Open the anti‑reflection foil, and use the “cleaning stick” to clean surface dust from the
LCD screen.

5.

Peel the protective film from the other side of the anti‑reflection foil.

6.

Lightly press the anti‑reflection foil on to the LCD screen. If air bubbles are trapped under
the anti‑reflection foil, use the “squeegee” to remove them.


7.3

DCN multimedia

Mechanical installation of Contribution Devices | en

27

Bosch Security Systems B.V.

Hardware Installation Manual

2013-08 | V1.0 |

Summary of Contents for DCN multimedia

Page 1: ...DCN multimedia Conference System en Hardware Installation Manual ...

Page 2: ......

Page 3: ...witches 15 5 Installation material and tools 16 5 1 DCNM CBxx System Network Cable 16 5 2 DCNM CBCON System Network Cable Connector 50 pcs 17 5 3 DCNM CBTK System Network Cable Toolkit 18 5 4 DCNM CB250 System Installation Cable 19 6 Mechanical installation of Central Equipment 20 6 1 DCNM APS and DCNM PS 20 7 Mechanical installation of Contribution Devices 23 7 1 DCNM MMD Multimedia Device 23 7 2...

Page 4: ...ty precautions Some products of the DCN multimedia product range are designed to be connected to the public mains network To avoid any risk of electric shock all interventions must be carried out with disconnected mains supply Interventions with the equipment switched on are authorized only when it is impossible to switch the equipment off The operation must only be performed by qualified personne...

Page 5: ...equipment or personal injuries Caution The equipment or the property can be damaged or persons can be lightly injured if the alert is not observed Warning The equipment or the property can be seriously damaged or persons can be severely injured if the alert is not observed Danger Not observing the alert can lead to severe injuries or death Copyright and disclaimer All rights reserved No part of th...

Page 6: ...nfigured as a daisy chain configuration see Typical system setup page 7 or as a star configuration Daisy chain configuration Uses dedicated cabling consisting of CAT 5e cables including two additional power conductors Star configuration Each device is connected with an individual standard CAT 5e cable An Ethernet switch is also required for providing Power over Ethernet PoE Notice When Power over ...

Page 7: ...erence multimedia devices DCNM MMD Participants can use the multimedia device to make their contributions to a meeting 5 1 is a DCNM MMD used for system power on off This DCNM MMD is always connected to the powered socket of the DCNM APS or DCNM PS 5 2 is a DCNM MMD used via Power over Ethernet PoE Ethernet switch 6 System Network Cable DCNM CBxxx Connects DCN multimedia devices audio powering swi...

Page 8: ...stem capabilities DCN multimedia product and system capabilities depend on The lengths of the system network cables The number of connected devices The system power supply capacity Cable length System network cables DCNM CBxx lengths 2 5 10 or 25 m have a direct effect on the available power supply capacity The longer the system network cable the less power supply capacity is available to drive th...

Page 9: ...ion tool The calculation tool can be used to calculate the total power capacity of the system This makes the design and planning of the DCN multimedia conference system easier The calculation tool uses the power consumption of devices and the system network cable lengths to calculate the needed system power supply capacity The calculation tool is on the DVD supplied with the DCNM APS and on the Bo...

Page 10: ...tworks are used Optional SNMPv3 support for switch supervision purposes The following table shows recommended switches to use with OMNEO These managed switches may offer support for the optional requirements as stated above Managed switches IGMP Snooping RSTP Y N SNMPv3 Y N HP Networking E2520 series v1 v2 v3 Y Y HP Networking V1900 series Y 2 Y Y HP Networking V1910 series Y3 Y Y Netgear GS108T N...

Page 11: ...ort router MAC address table of at least 1000 addresses per directly connected subnet The following table contains routers or router families all of which are actually layer 3 switches that are recommended to be used in OMNEO systems Layer 3 switches or switch series Remarks Cisco 3560 X series Requires IP services feature set HP 3500 yl series Requires Premium License HP 3800 series HP 4800 serie...

Page 12: ...ulation plan is needed you should use the power calculation tool To calculate the total power supply capacity 1 Count all multimedia devices 2 Know the exact location where the devices are installed 3 Count each system network cable of the same length Device type Power consumption Watts DCNM MMD 12 50 DCNM CB02 1 19 DCNM CB05 2 43 DCNM CB10 4 50 DCNM CB25 10 71 Table 4 1 Power consumption Watts Or...

Page 13: ...1 and 2 9 Mains inlet mains switch and fuse holder 10 Reset button 11 Ground switch grounded or floating 12 Socket 1 without power 13 Socket 2 low power 15 17 19 Socket 3 4 5 high power 14 16 18 20 Overload LED for sockets 2 5 Green Power OK Red Overload Remove cable and wait a few seconds for the system to reset the overload DCN multimedia System installation design and planning en 13 Bosch Secur...

Page 14: ... 140 21 W2 1 For socket 2 the cable power consumption of the cable does not need to be counted 2 The shortest redundant cable does not need to be counted Redundant network If a system network cable between the devices is accidentally disconnected or broken signals cannot be transmitted anymore To prevent this from happening and to ensure continuous operation a redundant system network cable 4 can ...

Page 15: ...s can supply power to every port but the total power the Ethernet switch can supply is limited Please consult the documentation of the PoE Ethernet switch used Notice If the PoE is used the DCNM MMD cannot be configured as a daisy chain redundant cabling is not required Using PoE the DCNM MMD cannot be daisy chained connected Using PoE does not provide redundant cabling 2 1 Item Description 1 Netw...

Page 16: ... CBxxx The minimum bend radius of the system network cable is 50 mm radius DCNM CBxx System Network Cable The system network cables terminated with connectors on both ends are available in different lengths and are used to connect DCN multimedia devices to each other The cable consists of four CAT 5e twisted pairs to transmit data and two copper wires to supply the power Ordering number Cable leng...

Page 17: ...e 18 1 2 3 5 7 9 8 6 4 4 3 1 5 6 7 9 8 1 2 3 5 7 9 8 6 4 4 3 1 5 6 7 9 8 Figure 5 2 DCNM CBCON Front and exploded view Item Description 1 Strain relief boot 2 Ferrule 3 Plug connector shield 4 Power contacts Qty 2 5 Load bar 6 Power contact cavity 2 places 7 Housing 8 Locking latch 9 Signal contact cavity 8 Places 5 2 DCN multimedia Installation material and tools en 17 Bosch Security Systems B V ...

Page 18: ...0 System Installation Cable page 19 2 1 Item Description 1 Power wiring tool 2 Signal wiring tool Table 5 2 Toolkit content Notice Please consult the custom length for system network cables section on the DVD which is supplied with the DCNM APS 5 3 18 en Installation material and tools DCN multimedia 2013 08 V1 0 Hardware Installation Manual Bosch Security Systems B V ...

Page 19: ... system network cable length is 50 m 164 04 ft Notice Please consult the custom length for system network cables section on the DVD which is supplied with the DCNM APS See also DCNM CBCON System Network Cable Connector 50 pcs page 17 DCNM CBTK System Network Cable Toolkit page 18 5 4 DCN multimedia Installation material and tools en 19 Bosch Security Systems B V Hardware Installation Manual 2013 0...

Page 20: ...the following parts 1x Mains power cord 1x Safety instructions 1x Set of 19 inch mounting brackets 4x bottom feet 1x DVD containing manuals and software only with DCNM APS Front view 1 2 2 1 3 Item Description 1 19 mounting brackets 2 Ventilation inlet 3 Indication LED Off Switched off Green Switched on Amber Standby Blinking Services on the server PC are not running Alternating green amber When a...

Page 21: ...nd 2 9 Mains inlet mains switch and fuse holder 10 Reset button 11 Ground switch grounded or floating 12 Socket 1 without power 13 Socket 2 low power 15 17 19 Socket 3 4 5 high power 14 16 18 20 Overload LED for sockets 2 5 Green Power OK Red Overload Remove cable and wait a few seconds for the system to reset the overload DCN multimedia Mechanical installation of Central Equipment en 21 Bosch Sec...

Page 22: ...ly 1 2 3 Figure 6 3 19 inch rack flat surface and feet mounting Item Description 1 19 inch rack mounting bracket 2 Flat surface mounting bracket 3 Feet mounting Notice The device extends 30 mm in front of the 19 mounting brackets when installed in a 19 rack system Caution Do not obstruct the airflow vents on the front side and rear left and right sides 22 en Mechanical installation of Central Equi...

Page 23: ...nd side views Item Description 1 7 capacitive touch screen 2 LED strip 3 Two way loudspeaker 4 3 5 mm stereo jack for headphone or headset with integrated microphone 5 Headphone volume control 6 Chairperson priority or microphone mute button 7 Microphone request button 8 Cable guides 9 Microphone input connector 7 7 1 DCN multimedia Mechanical installation of Contribution Devices en 23 Bosch Secur...

Page 24: ...evice Refer to figure DCNM MMD Bottom view fixed installation following 1 Insert the system network cable connector 2 2 Lead the system network cable through the cable guides 3 How to install The multimedia device can be free standing or fixed in more permanent installations using mounting screws For fixed installation 1 The distance between the centres of the screw inserts 1 on the bottom of the ...

Page 25: ...CBxx System Network Cable page 16 DCNM CB250 System Installation Cable page 19 DCN multimedia Mechanical installation of Contribution Devices en 25 Bosch Security Systems B V Hardware Installation Manual 2013 08 V1 0 ...

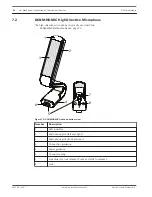
Page 26: ... bottom view Number Description 1 LED indicator 2 Microphone grill left and right 3 Microphone grill front and rear 4 Connection guidance 5 Slider guidance 6 Connector plug 7 Lockslider for lock release Press and shift to release 8 Lock 7 2 26 en Mechanical installation of Contribution Devices DCN multimedia 2013 08 V1 0 Hardware Installation Manual Bosch Security Systems B V ...

Page 27: ...r which has anti scratch and anti wear features Installation procedure 1 Please use the included alcohol swab and the microfiber fabric to clean the DCNM MMD LCD screen before installation 2 Peel the positioning adhesive release paper from the rear of anti reflection foil 3 Position the anti reflection foil on the DCNM MMD LCD screen and then fix the positioning adhesive to the side of the DCNM MM...

Page 28: ... from the rear side of the DCNM MMD 1 2 2 Figure 7 5 DCNM NCH to DCNM MMD assembly Item Description 1 Name card holder 2 Magnets Notice A paper insert template is included on the DVD that is supplied with the DCNM APS 7 4 28 en Mechanical installation of Contribution Devices DCN multimedia 2013 08 V1 0 Hardware Installation Manual Bosch Security Systems B V ...

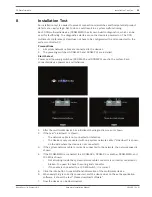
Page 29: ...he diagnostic screen is shown 2 If the text Link down is shown The network cable is not connected or defective The device is only connected with one system network cable Link down is shown on the side where the device is not connected 3 If the system network cable is correctly connected to the network the network speed is shown 4 If the DCNM MMD is connected to a DCNM APS DCNM PS or another DCNM M...

Page 30: ...ion manual on how to download the devices Customer service If a fault cannot be resolved please contact your supplier or system integrator or go directly to your Bosch representative 30 en Installation Test DCN multimedia 2013 08 V1 0 Hardware Installation Manual Bosch Security Systems B V ...

Page 31: ......

Page 32: ...Bosch Security Systems B V Torenallee 49 5617 BA Eindhoven The Netherlands www boschsecurity com Bosch Security Systems B V 2013 ...

Reviews: