background image

CM751B

Installer Reference Guide

4

Bosch Security Systems    5/13    CM751BIRG  FTR1.0

Introduction

The CM751B module allows you to interface compatible 

security control panels to the building’s hard wired IP 

connection point using a CAT 5E connection cable.  Once 

configured and operating you will be able to report to 

monitoring centres that support the available IP report-

ing formats and to upload/download to the control panel 

through an internet or intranet connection.

Getting Started

There are four main steps required to configure the 

CM751B for reporting to the control room.  The instruc-

tions assume that you are installing a new IP module and 

that you are using the Solution Link RAS software.  

1.  Install the CM751B hardware on the control panel.
2.  Configure the module’s features and parameters.
3.  Configure the control panel for IP reporting.
4.  Configure the control panel for IP remote access.

A number of IP connection tools are included in the Solu-

tion Link RAS software and it is recommended that you 

make use of these when configuring the CM751B.  At this 

point you should connect your laptop to the same LAN 

that the CM751B is connected and then run Solution Link.  

If the premises has a Network Administrator you should 

work with them to complete the installation as a number 

of steps listed below can be avoided if the administrator 

can provide you with the required information. 

It is important at this point to record the 
MAC or physical address of the CM751B IP module 
for future reference.  You can record this  
information in the “Customer Details” on page 11

i

Note


Figure 1: MAC Address Location

Step 1 - Installing the IP Module

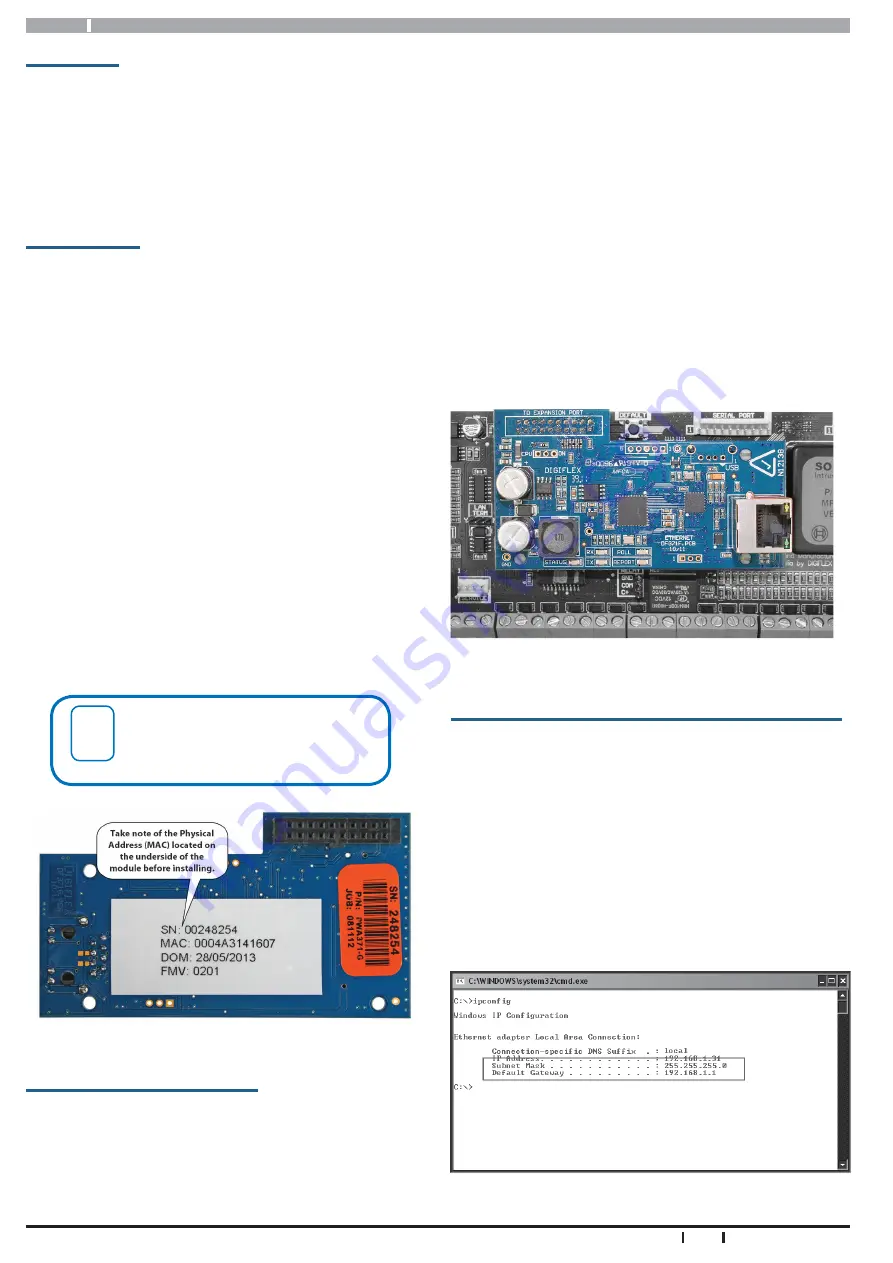
Ensure that the panel is powered off before proceeding.  

Plug the 3 short plastic standoffs into the module and 

then plug it onto the Expansion Port header pins on the 

panel as shown in “Figure 2: CM751B Module Installed On 

Solution 144” on page 4.  If you are connecting the 

CM751B to a panel which also has a CM101B Voice Mod-

ule fitted then you should use the longer standoffs from 

the HW750 Riser Kit. 
Once installed, connect the ethernet cable to the CM751B 

and re power the control panel. Observe the module’s 

green Status LED.  Under normal operation the Status LED 

will remain on steady for approximately 3 seconds follow-

ing power up while the system configures the module.

During this process if the connected internal network is 

DHCP enabled, the module will request an IP address from 

DHCP server.  Once the module receives an address the 

Status LED will begin to flash slowly.   


If the Status LED is flashing fast then the module has not 

received an IP address or there is a IP address conflict.  If 

this occurs check all LAN wiring to the module and or 

contact the network administrator for assistance.  

Figure 2: CM751B Module Installed On Solution 144

Step 2 - Configuring the IP Module’s Network Settings

The CM751B module will need a fixed or reserved IP 

address on the network that it is to be connected to.  If 

the network administrator is available then they should 

provide you with the Default Gateway, Subnet Mask and 

IP Address to be used.  

If you are trying to determine this information without 

an administrator then you will need to obtain the Default 

Gateway and Subnet mask for the network.  To do this run 

the IPCONFIG command on your laptop or another PC 

which is connected to the same network as the module.  
 

Figure 3: IP Config Showing Gateway and Subnet Mask

Summary of Contents for CM751B

Page 1: ...CM751B IP Ethernet Interface Module Security System Installer Reference Guide EN Security Systems ...

Page 2: ... an editorial fashion and to the benefit of the trademark owner with no intention of infringement of the trademark Notice of Liability While every effort has been taken the accuracy of this document neither Bosch Security Systems Pty Ltd nor any of its official representatives shall have any liability to any person or entity with respect to any liability loss or damage caused or alleged to be caus...

Page 3: ...7 Figure 14 Configuring the Encryption Settings 7 Figure 15 Configuring IP Remote Access 7 Figure 16 Using the IP Resolution Server Tool 8 Figure 17 Static Public IP Address Option 8 Figure 18 Configuring UDP Remote Connections 8 TABLES Table 1 Solution 144 Program Options 9 Table 2 PCB Indicator Meanings 10 Table 3 RJ45 Socket Indicator Meanings 10 TABLE OF CONTENTS Copyright Notice 2 Trademarks ...

Page 4: ...ation Step 1 Installing the IP Module Ensure that the panel is powered off before proceeding Plug the 3 short plastic standoffs into the module and then plug it onto the Expansion Port header pins on the panel as shown in Figure 2 CM751B Module Installed On Solution 144 on page 4 If you are connecting the CM751B to a panel which also has a CM101B Voice Mod ule fitted then you should use the longer...

Page 5: ...Assistant Figure 5 Customer Panel Form Press the OK button and the assistant will begin scan ning the private network LAN for the presence of CM751B modules If more than one module is found select the one from the list whose MAC address matches the one you are installing and press the OK button Figure 6 Solution Link Network Assistant You should now be able to establish a RAS session with the pane...

Page 6: ...bnet Mask and the Default Gateway in the fields provided and then save the changes Figure 11 Subnet Mask and Default Gateway Entry Step 3 Configuring the Panel for IP Reporting Before you will be able to configure the panel for IP reporting you will need to make sure you have the rel evant information from the control room The following is required 1 IP Address for the base station s IP Receiver 2...

Page 7: ...s current public IP Address When you attempt the remote con nection using Solution Link the software will provide you with the customers current public IP address Figure 15 Configuring IP Remote Access IP Remote Access If required you can configure the module to only accept incoming connections from a specific IP Address In the default state the RAS IP Address is set to 000 000 000 000 for both us...

Page 8: ...en one of two internet protocols UDP or TCP UDP User Datagram Protocol is a connectionless protocol The packets of exchanged data are smaller and with less overhead however the IP network does not guarantee re ceipt Although UDP is connectionless the RAS software application confirms delivery of each packet so although the layer does not guarantee delivery the application does so there should be n...

Page 9: ...0 00 00 00 00 00 00 00 00 00 00 00 00 00 00 00 00 00 00 00 00 00 00 MENU 5 6 6 Conettix NNC Dest 1 Dest 2 00000000 00000000 MENU 5 6 7 SIA IP Account Dest 1 Dest 2 0000000000000000 0000000000000000 MENU 5 6 8 SIA IP Account Prefix Dest 1 Dest 2 000000 000000 SIA IP Receiver Prefix Dest 1 Dest 2 000000 000000 User Name Dest 1 Dest 2 MENU 5 6 9 Password Dest 1 Dest 2 Comms IP Remote Access MENU 5 7 ...

Page 10: ... Communication between Panel and Module Slow Flash Normal Operation Fast Flash No IP Address or IP Address Conflict See System Troubles RX GREEN Flashes every time the IP module receives an IP packet TX RED Flashes every time the control panel sends an IP packet POLL GREEN Flashes every time the control panel sends a poll packet REPORT RED Flashes every time the control panel sends an alarm report...

Page 11: ...IPCSV Conettix NNC Encryption Key Specifications Part Number CM751B IP Interface Module Operating Voltage Supplied by Panel Derate the maximum available 12V accessory power from the panel by 60ma when the module is fitted Compatible With Solution 144 Firmware V2 10 or higher Network Interface RJ45 Ethernet 10BASE T or 100BASE T Auto Sensing Encryption 128 bit AES Module Connection The CM751B mount...

Page 12: ...Bosch Security Systems 25 Huntingwood Drive Huntingwood NSW 2148 Australia Phone 612 9672 1777 Facsimile 612 9672 1717 2013 Bosch Security Systems CM751BIRG Issue FTR1 0 N12138 N12138 RoHS ...

Reviews: