English |
15
d
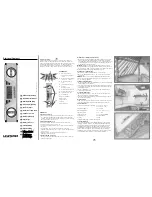
180°
A
B
– Turn the measuring tool 180° without adjusting the height. Aim it at wall A
such that the vertical laser line runs through the already marked point
Ⅰ
.
Allow the measuring tool to level in and mark the point where the laser
lines cross on wall A (point
Ⅲ
).
– The discrepancy
d
between the two marked points
Ⅰ
and
Ⅲ
on wall A re-
veals the actual height deviation of the measuring tool.
The maximum permitted deviation on the measuring distance of
2 ×
5
m =
10
m is as follows:
10
m × ±
0.5
mm/m = ±
5
mm. The discrepancy
d
between points
Ⅰ
and
Ⅲ
must therefore amount to no more than
5
mm.
Checking the Level Accuracy of the Horizontal Line
For this check, you will need a free area of 5 ×
5
m.
– Mount the measuring tool in the middle between walls A and B on a tri-
pod, or place it on a firm, level surface. Select horizontal mode with auto-
matic levelling and allow the measuring tool to level in.
Bosch Power Tools
1 609 92A 58R | (04.03.2020)


