background image

-7-

Assembly

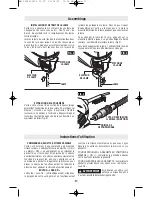
BLADE INSTALLATION AND REMOVAL

This jigsaw is equipped with the Bosch “One
Touch” tool-less blade changing system.
This system makes changing blades simple
and fast.

Insert the saw blade (teeth in cutting
direction) until it latches in the plunger 
(Fig. 2.) When inserting the saw blade, the
back of the blade must rest in the groove of

the guide roller To prevent damage to tool,
do not manually turn blade ejector lever
when inserting the blade 

To change the saw blade, push the ejector
lever to the center stop; this releases and
ejects the saw blade (Fig. 3).

When changing the blade, tool should be
held so that the blade is safely ejected.

BLADE

PLUNGER

BLADE

EJECTOR

LEVER

BLADE

BLADE

PLUNGER

BLADE

EJECTOR

LEVER

BLADE

FIG. 2

FIG. 3

DUST EXTRACTION

Your tool is equipped with a dust port for dust
extraction. To use this feature, attach
vacuum hose (optional accessory) to the dust
port, and connect the opposite end of the
hose to a shop vacuum cleaner (Fig. 4).

FIG. 4

VARIABLE SPEED CONTROLLED

TRIGGER SWITCH

Your tool is equipped with a variable speed trigger
switch.  The tool can be turned "ON" or "OFF" by
squeezing or releasing the trigger.  The speed
can be adjusted from the minimum to maximum
nameplate RPM by the pressure you apply to the
trigger.  Apply more pressure to increase the
speed and release pressure to decrease speed.

"LOCK-ON" BUTTON

The "Lock-ON" button, located in the handle of

your tool allows for continuous operation at
maximum RPM without holding the trigger.

TO LOCK TRIGGER "ON": squeeze trigger,
depress button and release trigger.

TO UNLOCK THE TRIGGER: squeeze trigger
and release it without depressing the "Lock-
ON" button.

If the “Lock-ON” button is
continuously being depressed,

the trigger can not be released.

Operating Instructions

!

WARNING

DUST PORT

VACUUM HOSE

(OPTIONAL

ACCESSORY)

BLADE

EJECTOR

LEVER

BM 2609932576 11-07  11/26/07  11:36 AM  Page 7

Summary of Contents for 120V - JS5 Jig Saw Tool

Page 1: ...ion française Versión en español See page 2 Voir page 12 Ver la página 22 1 877 BOSCH99 1 877 267 2499 www boschtools com Call Toll Free for Consumer Information Service Locations Pour obtenir des informations et les adresses de nos centres de service après vente appelez ce numéro gratuit Llame gratis para obtener información para el consumidor y ubicaciones de servicio JS5 BM 2609932576 11 07 11 ...

Page 2: ...rotection devices like electrician s rubber gloves and footwear will further enhance your personal safety Personal safety Stay alert watch what you are doing and use common sense when operating a power tool Do not use a power tool while you are tired or under the influence of drugs alcohol or medication A moment of inattention while operating power tools may result in serious personal injury Use s...

Page 3: ...llow persons unfamiliar with the power tool or these instructions to operate the power tool Power tools are dangerous in the hands of untrained users Maintain power tools Check for misalignment or binding of moving parts breakage of parts and any other condition that may affect the power tools operation If damaged have the power tool repaired before use Many accidents are caused by poorly maintain...

Page 4: ... When removing the blade from the tool avoid contact with skin and use proper protective gloves when grasping the blade or accessory Accessories may be hot after prolonged use If your tool is equipped with a dust bag empty it frequently and after completion of sawing Spontaneous combustion may in time result from mixture of oil or water with dust particles Be extremely careful of dust disposal mat...

Page 5: ...ng from 0 setting Arrow Action in the direction of arrow Alternating current Type or a characteristic of current Direct current Type or a characteristic of current Alternating or direct current Type or a characteristic of current Class II construction Designates Double Insulated Construction tools Earthing terminal Grounding terminal Warning symbol Alerts user to warning messages Ni Cad RBRC seal ...

Page 6: ...ally WARNING Jigsaw LOCK ON BUTTON TRIGGER SWITCH ALLEN WRENCH 5 MM VENTILATION OPENINGS CHIP BLOWER SWITCH BLADE ROLLER GUIDE BLADE ORBIT SELECTOR LEVER CUTTING GUIDE SLOTS BLADE BASE VARIABLE SPEED DIAL RUBBERIZED GRIP DUST PORT Model number JS5 Voltage rating 120 V 50 60Hz Amperage rating 5 7 A No load speed n0 500 3 100 min Stroke length 7 8 Wood 3 9 16 Aluminium 3 4 Steel 3 8 BM 2609932576 11...

Page 7: ...re attach vacuum hose optional accessory to the dust port and connect the opposite end of the hose to a shop vacuum cleaner Fig 4 FIG 4 VARIABLE SPEED CONTROLLED TRIGGER SWITCH Your tool is equipped with a variable speed trigger switch The tool can be turned ON or OFF by squeezing or releasing the trigger The speed can be adjusted from the minimum to maximum nameplate RPM by the pressure you apply...

Page 8: ...ll rise due to the slower speed of the internal cooling fan In such cases it is necessary to occasionally run the tool at full speed for a few minutes to keep the motor operating at high efficiency BLADE ORBIT Maximum cutting efficiency can be obtained by adjusting the blade orbit selector lever to suit the material being cut The following chart will help you determine which setting to use for you...

Page 9: ...ant to cool the blade and extend its life Choose blades carefully as the ability of the jigsaw to follow curves provides smoother finishes or faster cutting is directly related to the type of blade used BLADE SELECTION Choose blades carefully as the ability of the jigsaw to make the fastest cuts to follow tight curves to achieve the smoothest finish and or to maximize the life of the blade are dir...

Page 10: ...ing Fig 9 PARALLEL CUTTING 1 Insert bar of guide through lock knob clamp then through the slots provided in foot from either side of foot with the edge guide facing DOWN Fig 9 2 Hook lock knob clamp onto edge of footplate adjust fence to desired width and securely tighten lock knob clamp Fig 9 CIRCLE CUTTING 1 Before attaching the guide draw a circle and predrill a 13 64 center hole in workpiece 2...

Page 11: ...e tool may be cleaned most effectively with compressed dry air Always wear safety goggles when cleaning tools with compressed air Ventilation openings and switch levers must be kept clean and free of foreign matter Do not attempt to clean by inserting pointed objects through openings Certain cleaning agents and solvents damage plastic parts Some of these are gasoline carbon tetrachloride chlorinat...

Page 12: ...ues d un outil prévu pour le C A tomberont probablement en panne et risquent de créer un danger pour l utilisateur S il est nécessaire d utiliser l outil dans un lieu humide il faut l alimenter par l intermédiaire d un disjoncteur différentiel de fuite à la terre DDFT L emploi d un DDFT et de dispositifs de protection personnelle tels que gants et chaussures d électricien en caoutchouc améliorent ...

Page 13: ...gez les outils électroportatifs dont vous ne vous servez pas hors de portée des enfants et ne permettez pas à des personnes qui ne connaissent pas l outil électroportatif ou qui ignorent ces consignes de s en servir Les outils électroportatifs sont dangereux dans les mains d utilisateurs inexpérimentés Entretenez les outils électroportatifs Vérifiez que les pièces mobiles sont alignées correctemen...

Page 14: ...rsque vous retirez la lame de l outil évitez tout contact avec la peau et utilisez des gants de protection appropriés pour saisir la lame ou l accessoire Les accessoires risquent d être chauds après une utilisation prolongée Si votre outil est muni d un sac à poussière videz le fréquemment et après voir fini de scier Une combustion spontanée peut se produire au bout d un certain temps en conséquen...

Page 15: ...vitesse augmente depuis le réglage 0 Flèche Action dans la direction de la flèche Courant alternatif Type ou caractéristique du courant Courant continu Type ou caractéristique du courant Courant alternatif Type ou caractéristique du courant ou continu Construction classe II Désigne des outils construits avec double isolation Borne de terre Borne de mise à la terre Symbole d avertissement Alerte l ...

Page 16: ...modèle JS5 Tension nominale 120 V 50 60 Hz Intensité 5 7 A Vitesse à vide n 500 3 100 mn Longueur de course 23 mm Bois 90 mm Aluminium 20 mm Acier 10 mm BOUTON LOCK ON COMMANDE À GÂCHETTE CLÉ HEXAGONALE DE 5 MM OUVERTURES DE VENTILATION INTERRUPTEUR DE SOUFFLANTE DE COPEAUX CYLINDRE DE GUIDAGE DE LA LAME MANETTE DE SÉLECTION DE L ORBITE DE LA LAME RAINURES DE GUIDAGE DE LA COUPE LAME BASE CADRAN D...

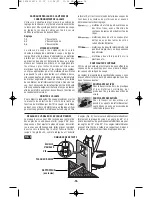
Page 17: ...tte appuyez sur le bouton et relâchez la gâchette POUR DÉVERROUILLER LA GÂCHETTE comprimez la gâchette et relâchez la sans appuyer sur le bouton Lock On Si le bouton Lock On est enfoncé continuellement il n est pas possible de relâcher la gâchette INSTALLATION ET RETRAIT DE LA LAME Cette scie à chantourner est munie du système de changement de lame sans outil One Touch de Bosch Ce système rend le ...

Page 18: ...e la température du moteur augmente en raison de la vitesse plus faible du ventilateur de refroidissement interne Dans de tels cas il est nécessaire de faire fonctionner l outil à haute vitesse pendant quelques minutes de temps en temps afin de permettre au moteur de continuer à fonctionner au rendement maximum ORBITE DE LA LAME Pour obtenir le rendement de coupe maximum ajustez la manette de séle...

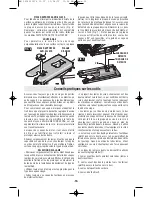
Page 19: ...e une coupe nette sur le dessus de l ouvrage le côté qui fait face à la plaque d assise de la scie à chantourner comme quand on coupe un plan de travail déjà installé depuis le dessus Quand on utilise des lames à dents inversées il faut appliquer à la scie à chantourner une force poussant vers le bas Les lames qui ont des dents pointant vers l extérieur plutôt que vers le haut ou vers le bas perme...

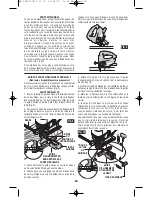
Page 20: ...is à travers les fentes pratiquées dans le pied depuis l un quelconque des côtés du pied le guide d alignement du bord étant orienté VERS LE BAS Fig 9 2 Accrochez la bride du bouton de verrouillage au bord de la plaque d assise ajustez le guide de refente à la largeur désirée et serrez à fond la bride du bouton de verrouillage Fig 9 COUPE CIRCULAIRE 1 Avant d attacher le guide tracez un cercle et ...

Page 21: ...eur moyen de nettoyer l outil est d utiliser de l air comprimé sec Il faut toujours porter des lunettes de protection quand on utilise de l air comprimé Les ouïes de ventilation et les leviers de l interrupteur doivent rester propres et exempts de corps étrangers Ne tentez pas de les nettoyer en enfonçant des objets pointus dans les orifices Certains agents de nettoyages et certains dissolvants ab...

Page 22: ...e para CA con una fuente de energía de CC Aunque pueda parecer que la herramienta funciona correctamente es probable que los componentes eléctricos de la herramienta con capacidad nominal para CA fallen y creen un peligro para el operador Si es inevitable usar la herramienta mecánica en lugares húmedos se debe utilizar un interruptor de circuito accionado por corriente de pérdida a tierra GFCI par...

Page 23: ... la herramienta Las herramientas mecánicas son peligrosas en manos de usuarios que no hayan recibido capacitación Mantenga las herramientas mecánicas Compruebe si hay piezas móviles desalineadas o que se atoran si hay piezas rotas y si existe cualquier otra situación que podría afectar el funcionamiento de la herramienta mecánica Si la herramienta mecánica está dañada haga que la reparen antes de ...

Page 24: ...ienta evite el contacto con la piel y use guantes protectores adecuados cuando agarre la hoja o el accesorio Los accesorios pueden estar calientes después de un uso prolongado Si la herramienta está equipada con una bolsa para polvo vacíe dicha bolsa frecuentemente y después de completar la operación de aserrado Con el tiempo se puede producir una combustión espontánea como resultado de la mezcla ...

Page 25: ...ación de 0 Flecha Acción en la dirección de la flecha Corriente alterna Tipo o una característica de corriente Corriente continua Tipo o una característica de corriente Corriente alterna o continua Tipo o una característica de corriente Construcción de clase II Designa las herramientas de construcción con aislamiento doble Terminal de toma de tierra Terminal de conexión a tierra Símbolo de adverte...

Page 26: ...5 Voltaje nominal 120 V 50 60 Hz Amperaje nominal 5 7 A Velocidad sin carga n 500 3 100 min Longitud de carrera 23 mm Madera 90 mm Aluminio 20 mm Acero 10 mm BOTÓN DE FIJACIÓN EN ENCENDIDO INTERRUPTOR GATILLO LLAVE ALLEN DE 5 MM ABERTURAS DE VENTILACIÓN INTERRUPTOR DEL SOPLADOR DE VIRUTAS GUÍA DE RODILLO DE LA HOJA PALANCA SELECTORA DE LA ÓRBITA DE LA HOJA RANURAS PARA LA GUÍA DE CORTE HOJA BASE D...

Page 27: ...l sistema de cambio de hoja con un solo toque sin necesidad de herramientas One Touch de Bosch Este sistema hace que cambiar las hojas sea fácil y rápido Inserte la hoja de sierra con los dientes orientados en el sentido de corte hasta que quede fija en el émbolo Fig 2 Cuando inserte la hoja de sierra la parte trasera de la hoja debe descansar en la ranura del rodillo de guía Para evitar daños a l...

Page 28: ... prueba en material de desecho para determinar el mejor ajuste materiales duros tales como metales o chapas metálicas delgadas y que se usan con hojas de cuchillo hojas con borde granulado o trabajo de raspado materiales bandos en los casos en que se realice trabajo de corte más limpio o trabajo de contorneado delicado materiales de densidad mediana tales como maderas más duras o tablero de aglome...

Page 29: ...s lograr acabados más lisos o cortar más rápidamente está relacionada directamente con el tipo de hoja que se utilice SELECCIÓN DE HOJAS Seleccione las hojas cuidadosamente ya que la capacidad de la sierra caladora para hacer los cortes más rápidos seguir curvas cerradas lograr el acabado más liso y o maximizar la duración de la hoja está relacionada directamente con el tipo de hoja utilizado Use ...

Page 30: ...ego a través de las ranuras provistas en la placa base desde cualquiera de los dos lados de la placa base con la guía de borde orientada hacia ABAJO Fig 9 2 Enganche la abrazadera del pomo de fijación en el borde de la placa base ajuste el tope guía a la anchura deseada y apriete firmemente la abrazadera del pomo de fijación Fig 9 CORTE CIRCULAR 1 Antes de instalar la guía dibuje un círculo y pret...

Page 31: ...mienta se puede limpiar más eficazmente con aire comprimido seco Use gafas de seguridad siempre que limpie herramientas con aire comprimido Las aberturas de ventilación y las palancas de interruptor deben mantenerse limpias y libres de materias extrañas No intente limpiar introduciendo objetos puntiagudos a través de las aberturas Ciertos agentes de limpieza y disolventes dañan las piezas de plást...

Page 32: ...S À VOTRE CAS EN AUCUN CAS LE VENDEUR NE SAURAIT ÊTRE TENU POUR RESPONSABLE DES INCIDENTS OU DOMMAGES INDIRECTS INCLUANT MAIS NE SE LIMITANT PAS AUX PERTES DE PROFITS CONSÉCUTIFS À LA VENTE OU L USAGE DE CE PRODUIT CERTAINS ÉTATS AMÉRICAINS ET CERTAINES PROVINCES CANADIENNES N ADMETTANT PAS LE PRINCIPE DE LA LIMITATION NI L EXCLUSION DES DOMMAGES INDIRECTS ET CONSÉQUENTIELS IL EST POSSIBLE QUE LES...

Reviews: