


5
4
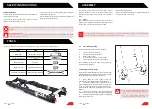
ASSEMBLY
The assembly of the Idylle fork on your frame requires
par�cular a�en�on in order to guarantee op�mal safety
condi�ons. Please make sure you follow the instruc�ons
below.
1.1
Pivot
Before cu�ng the pivot of your fork, measure the necessary
length of pivot, taking into account the total height of your
headset, stem, and adding a margin of 5 to 10mm.
Calculate the length as below:
Length of the head tube of the frame + height of the headset
+ height of the stem + 5 to 10mm.
SAFETY INSTRUCTIONS
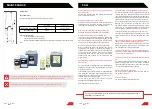
TOOLS
GENERAL WARNINGS
The fork is an important element that has a direct influence
on the stability of the bike.
This manual must be consulted before using your shock
absorber and for the dura�on of its life.
If necessary, or for any service opera�on, please contact an
authorized BOS suspension.
A�er installa�on, test your bike at a slow pace to make sure
that everything works properly.
CAUTION opera�ons may impair your safety or cause damage to your suspension. Be sure to take note of these
warnings.
IMPORTANT INFORMATIONS
These indica�ons are intended to allow you to op�mize the opera�ons described in this manual or op�mize the
performance of your suspension.
To carry out adjustments and rou�ne maintenance of your fork, you will need the following tools :
TOOL
USE
FIGURE
Metal saw
Steer tube cut-out
1.5/5mm Allen key
Wheel axle/ crown fork
screw
26mm Socket
Top cap
21mm Socket
Compression bloc nut
14/16mm Flat wrench
Hydraulic stop position
Never disengage the pivot tube from the lower clamp, even if the pivot tube is too short, or when changing the
frame. It is impera�ve to change the set for important security reasons.
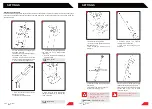
1.2
Front wheel moun�ng
To assemble the front wheel, proceed as follows :
1.
Loosen the fork axle screws (1).
2.
Unscrew the axle (2) to remove it.
3.
Place the front wheel.
4.
Insert the axle and screw it in un�l it stops.
5.
Tighten the axle locking screw (torque 4N.m).
The disassembly of the front wheel must respect the
reverse previous opera�ons.
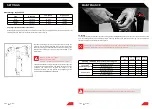
1.3 Moun�ng the brake caliper
The Idylle brake caliper bolt pa�ern uses a post mount 200
(PS200) standard mount. In order to mount the disc brake
device, apply the following recommenda�ons :
1.
When fi�ng the brake caliper, follow the
manufacturer's instruc�ons for the brake model used.
2.
Ensure that all fixing screws are �ghtened to the
torque recommended by the manufacturer. For that, refer
to the user manual provided by the manufacturer. It is
recommended to install a new set of pads to ensure be�er
alignment.
3.
Pass the brake hose from the caliper through the
inside of the cas�ng, then through the hose guide provided
4.
Finish by tes�ng the braking system on flat ground
before riding on the trails.
•
The disc brake caliper moun�ng bolts must
have 10 mm of thread engagement with the
fork.
•
The disc brake caliper moun�ng bolt
�ghtening torque level must be 10 n.m.


