


EN
WWW.BORMANNTOOLS.COM
6
Notice
The vacuum include double suction structure including front and upper suction, can be used in different function.
Vacuum upper suction (picture A)
Hose connectors connect with upper suction, and use cap stem the front suction.
Use front suctions when suction water (Picture B).
Hose connect with front suction, and cap stem the upper area.
Operating Instructions
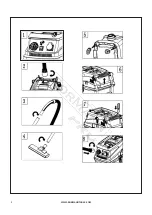
1. Turn on or turn off (Picture 1)
(1). Turning the device ON: After waiting for the power cord plug into the socket, press the switch button to 1 position, open the vacuum cleaner.
(2). Turning off the device: Press the switch button to 0 position, close vacuum cleaner.
2. Hose connected to the vacuum cleaner (Picture 2)
Insert: Insert the hose joint aspiration in the mouth and the clockwise until the lock.
Pull: Holding the hose connector, counter-clockwise until the pull hose.
3. Handle connect to take over pipe (Picture 3)
1. One side of the hose connect to the pipe, locking clockwise to tighten.
2. Hands hold interfaces to take over and handle respectively, reverse pull force.
4. Take over to connect to the floor brush (Picture 4)
1. One side of pipe connect to the floor brush, locking, clockwise to tighten.
2. Hands holding interface to brush and take over to the counterclockwise direction until pull out.
5. The front wheel installed (Picture 5)
1. Head and tank, after separation from the vacuum body parts (including universal wheel and rear wheel component).
2. Pull down the vacuum tank, insert two universal wheel base front on both sides of the hole.
6. Power cord keeping (Picture 6)
1. The cable brackets are on the back of the vacuum, when do not use the machine, keep the cable on the brackets.
2. When use machine, take out the cable from brackets.
7. Accessories storage (Figure 7)
1. Storage holes are on the 2 sides of machine, accessories can be put in.
8. Blower function (Picture 8)
1. Insert the hose to the blowing part.
2. Use the hose blowing the area.
9. Reverse wind function (Picture 9)
1. When the suction is lower, use the head of hose press the button.
2. Repeat press three to five times, increase the suction.
10. Dust bag assemble (Picture 10)
1. Take off the transparent cover.
2. Install the dust bag on the cover, then assemble to the machine.
11. Dust bag replacement (Picture 11)
1. Take off the transparent cover including the dust bag.
2. Use new dust bag instead of old one.
12. Cover separate from tank (Picture 12)
1. Open the 2 side clamps
2. Holding the handle and take out the cover.
13. Filter replacement (Picture 13)
1. Take out the cover, the dirty filter is in the bottom, take out the filter.
2. Use a new filter instead of the old one, then assemble.
14. Filter Clean (Picture 14)
1. Take out the filter and use clean water.
2. After clean, keep the filter dry, then reuse.
15. Connectors clean (Picture 15)
1. Take off the connectors from the cover, use water clean.
2. Assemble the connectors and keep it tight.
16. Adding water control (Picture 16)
1. Take off the cover from the vacuum body, pull water into the tank.
2. Please note the ''water level'', avoid adding too much water.


