background image

19 


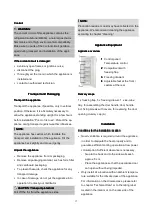
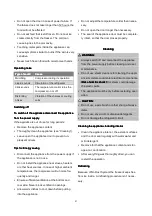
Dismount the foot bracket 
and the lower door hinge. 


Attach the door hinge at the other appliance side,  
after you have unscrewed the 
hinge pin and used it from the 


other hinge side. Transfer and fix the foot bracket 
too. Turn in the feet accordingly. 


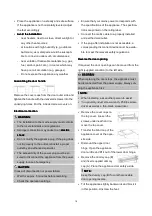
Replace the appliance upright. Put the appliance 
door on the hinge pin and fix it in its intended po-
sition. 


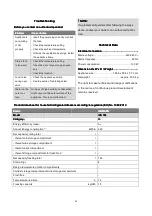
Transfer the upper door hinge at the opposite 
side, after you have unscrewed the hinge pin and  
used it from the other hinge side. 
Put the hinge pin in the hole of  


the appliance door and fasten the hinge. 


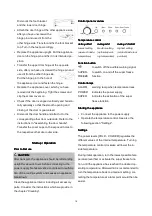
Replace the appliance cover, which you have 
removed at the beginning. Tight the screws and 
clip the screw covers on. 


Check if the door is aligned vertically and horizon-
tally optimally so that the smooth opening and 
closing of the door is guaranteed. 


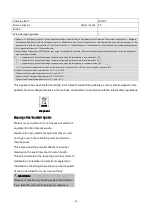
Dismount the door handle and attach it to the 
corresponding other door outer side. Refer to the 
instructions in "Assembling the door handle". 
Transfer the cover caps on the exposed holes to 
the respective other door outer side. 


Startup / Operation

Startup / Operation

Startup / Operation

Startup / Operation    

Prior to first use

Prior to first use

Prior to first use

Prior to first use    

    CAUTION:

CAUTION:

CAUTION:

CAUTION:    

After transport, the appliance should be left standing 
upright for about 4 hours before connecting to the 
power supply. Nonobservance could lead to malfunc-
tion of the cooling system and causes an appliance 
breakdown. 


Clean the appliance interior including all accessory 
parts. Consider the instructions which we provide in 
the chapter “Cleaning”. 


Control panel ove

Control panel ove

Control panel ove

Control panel overview

rview

rview

rview    


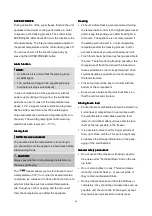
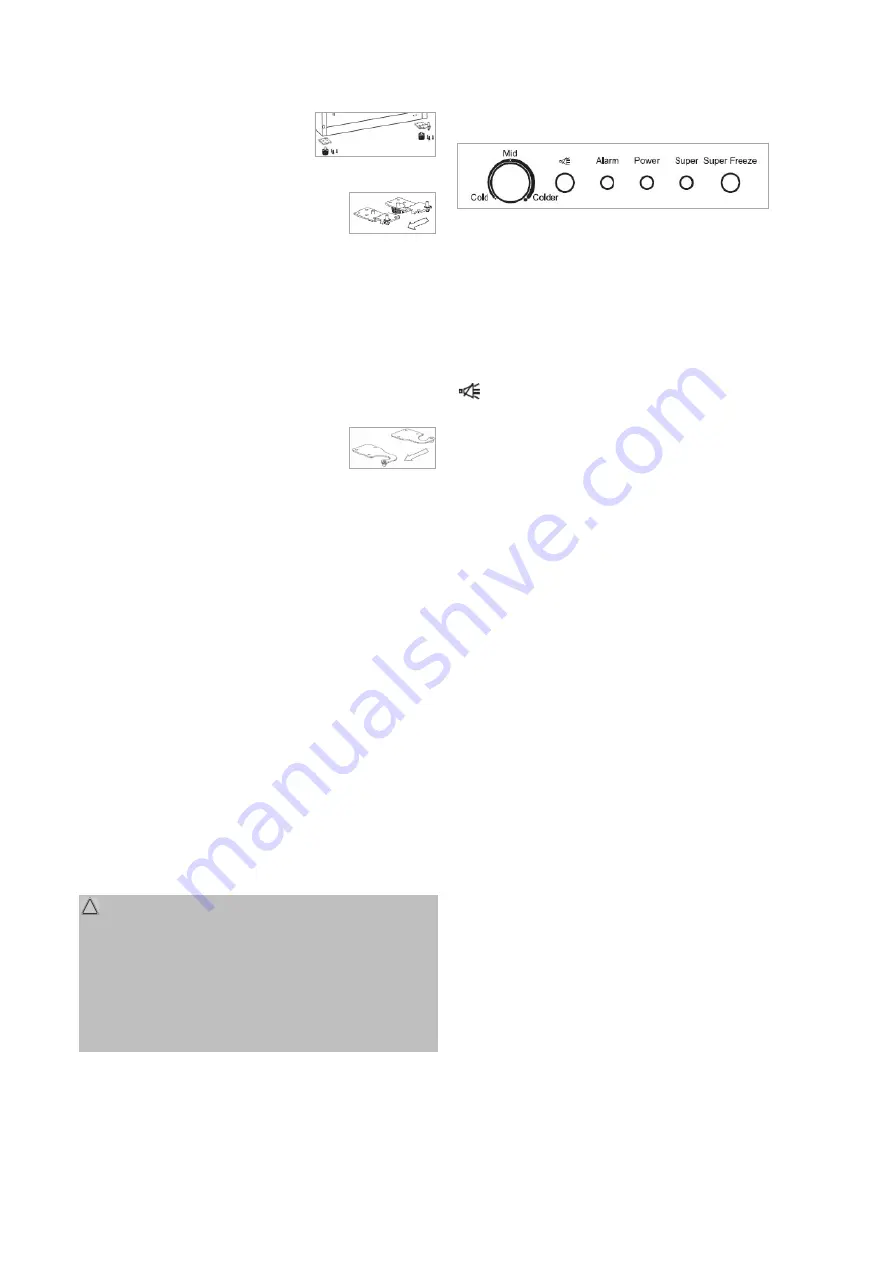
Temperature control

Temperature control

Temperature control

Temperature control    
Setting 

Setting 

Setting 

Setting COLD

COLD

COLD

COLD    

Setting

Setting

Setting

Setting    MID

MID

MID

MID    

Setting 

Setting 

Setting 

Setting COLDER

COLDER

COLDER

COLDER    

Lowest setting 
(warmest inside 
temperature) 

Medium setting 
(optimal operat-
ing temperature) 

Highest setting 
(coldest inside tem-
perature) 


Function button

Function button

Function button

Function button    


to switch off the audible warning signal 

SUPER -
FREEZE 

to switch on and off the super freeze 
function 


Control lamps

Control lamps

Control lamps

Control lamps    
ALARM 

warning lamp when temperature rises 

POWER 

indicates the power supply 

SUPER 

indicates the activation of the super 
freeze function 


Starting the appliance

Starting the appliance

Starting the appliance

Starting the appliance    


Connect the appliance to the power supply. 


Operate the temperature control. See also the 
following section "Settings". 


Settings

Settings

Settings

Settings    

The power levels [COLD - COLDER] regulates the 
different values of the internal temperature. Turning 
the temperature control clockwise will lower the in-
side temperature. 


During initial operation, turn the lowest possible tem-
perature level first or activate the super freeze func-
tion, until the appliance has reached the desired op-
erating temperature. Afterwards it is recommended to 
turn the temperature back to a medium setting; cor-
recting the temperature at a later point would then be 
easier. 


Summary of Contents for GS 184

Page 1: ...184 GS 184 GS 184 NoFrost NoFrost NoFrost NoFrost F F F FREEZER REEZER REEZER REEZER Bedienungsanleitung Garantie Bedienungsanleitung Garantie Bedienungsanleitung Garantie Bedienungsanleitung Garantie...

Page 2: ...8 Reinigung Seite 10 St rungsbehebung Seite 11 Technische Daten Seite 11 Garantie Kundendienst Seite 13 Entsorgung Seite 14 ENGLISH ENGLISH ENGLISH ENGLISH Contents Contents Contents Contents Introdu...

Page 3: ...EIS HINWEIS HINWEIS Die Darstellungen in dieser Bedienungsanleitung k nnen vom Originalger t abweichen Benutzen Sie das Ger t ausschlie lich f r den privaten und den daf r vorgesehenen Zweck Dieses Ge...

Page 4: ...uchen Sie keine mechanischen Einrichtungen oder sonstigen Mittel um den Abtauvorgang falls notwendig zu beschleunigen au er den in der Anleitung beschriebenen Hilfsmitteln Modellabh ngig im Lieferumfa...

Page 5: ...des K hlkreislaufs des K hlkreislaufs offenes Feuer Z ndquellen unbedingt vermeiden den Netzstecker ziehen Raum in dem das Ger t steht durchl ften und einen Fachmann kontaktieren Transport und Verpack...

Page 6: ...en Sie unter Technische Daten und auf dem Typenschild welches sich im Innenraum oder auf der Ger ter ckseite befindet Stellen Sie das Ger t nur auf einer stabilen und sicheren Standfl che auf Falls da...

Page 7: ...ubendreher sowie Schlitzschraubendreher Entfernen Sie die Abdeck kappen auf der Ger teabde ckung L sen Sie die darun terliegenden Schrauben und entnehmen Sie die Abdeckung Versetzen Sie die Blindkap p...

Page 8: ...ste Stufe w rmste In nentemperatur mittlere Stufe optimale Be triebstemperatur h chste Stufe k l teste Innentempe ratur Funktionstasten Funktionstasten Funktionstasten Funktionstasten zum Ausschalten...

Page 9: ...h chste Leistungs stufe zu stellen und diese Stellung auch nach dem Einfrieren noch einige Stunden zu belassen Das Ger t wird nicht beeintr chtigt wenn nach dem Einfriervorgang die Einstellung nicht...

Page 10: ...eeinsparung Tipps zur Energieeinsparung Tipps zur Energieeinsparung Tipps zur Energieeinsparung Trennen Sie das Ger t von der Stromversorgung wenn Sie das Ger t nicht in Gebrauch haben Stellen Sie das...

Page 11: ...frei r umen Ger t frei aufstellen Eingelagerte Lebensmittel sind zu warm Pr fen Sie die Temperatureinstellung Lassen Sie die T r nur so lange wie notwendig ge ffnet berpr fen Sie den Aufstellort Das...

Page 12: ...h 4 K hlschrank mit einem Ein Sterne Fach 5 K hlschrank mit einem Zwei Sterne Fach 6 K hlschrank mit einem Drei Sterne Fach 7 K hl Gefrierger t 8 Gefrierschrank 9 Gefrier truhe 10 Mehrzweck K hlger te...

Page 13: ...s Aufstellen oder Aufbewahren durch un sachgem en Anschluss oder Installation sowie durch h here Gewalt oder sonstige u ere Einfl sse entstehen fallen nicht unter die Garantieleistung Wir behalten uns...

Page 14: ...ht mehr benutzen werden Sie helfen damit die potenziellen Auswirkungen durch falsche Entsorgung auf die Umwelt und die menschliche Gesundheit zu vermeiden Sie leisten damit Ihren Beitrag zur Wiederver...

Page 15: ...This appli ance is not fit for commercial use The appliance is only to be used as described in the user manual Do not use the appliance for any other purpose Any other use is not intended and can res...

Page 16: ...and persons with reduced physical sensory or mental capabilities or lack of experience and knowledge if they have been given supervision or instruction concerning use of the use of the use of the use...

Page 17: ...t the appliance into operation Contact your distributor CAUTION Transport protection CAUTION Transport protection CAUTION Transport protection CAUTION Transport protection Pull off the foil from the a...

Page 18: ...from the power supply in case of emergency CAUTION CAUTION CAUTION CAUTION In case of disconnection or power failure Wait for approx 5 minutes before restarting Check the operation settings Ensure th...

Page 19: ...ncluding all accessory parts Consider the instructions which we provide in the chapter Cleaning Control panel ove Control panel ove Control panel ove Control panel overview rview rview rview Temperatu...

Page 20: ...ing and the amount of food the temperature can affect the appliance Freezing Freezing Freezing Freezing 24 hours before freezing we recommend turning the temperature control to the highest power level...

Page 21: ...tall the appliance near stoves heaters or other heat sources In case of higher ambient temperatures the compressor will run more fre quently and longer Ensure sufficient ventilation at the bottom and...

Page 22: ...tion Mains voltage 220 240 V Mains frequency 50 Hz Power consumption 100 W Dimension H x W x D Weigh Dimension H x W x D Weigh Dimension H x W x D Weigh Dimension H x W x D Weight t t t Appliance siz...

Page 23: ...r than 18 C and a min freezing capacity in 24 h 5 Climate class SN ambient temperature of 10 C up to 32 C Climate class N ambient temperature of 16 C up to 32 C Climate class ST ambient temperature of...

Page 24: ...24 C Bomann GmbH C Bomann GmbH C Bomann GmbH C Bomann GmbH www bomann de www bomann de www bomann de www bomann de Stand 11 15...

Reviews: